In this tutorial, I’ll show you how to install OpenFaaS Standard or OpenFaaS for Enterprises into a private, airgapped network.
There are no special tools required to perform an offline installation, but you will need a computer with Internet access in order to prepare for the installation. On your private network, you should have Kubernetes already installed, but if you don’t, K3s could be a good option and has documentation for offline installations.
If you don’t have a private registry in your airgap or are unsure how to set one up, CNCF Harbor is a popular open-source choice. For testing, I used Docker’s open source registry now called “CNCF Distribution”, with authentication and a self-signed TLS certificate, with the CA’s public key placed in the trust bundle.
Since the private network has no Internet access, we need to perform a subset of the tasks on a computer with access to the public Internet:
On the public network:
- Download container images
- Download specific chart versions
- Download any CLI tools needed
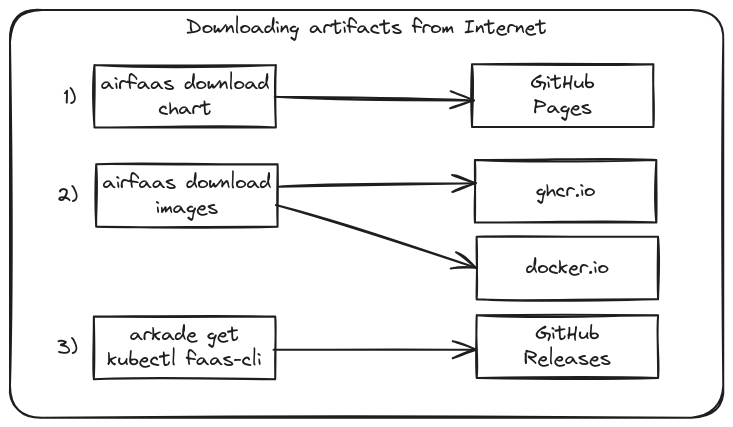
Download the various charts, images and CLI tools required.
On the private network:
- Restore container images into a self-hosted registry
- Configure any pull secrets required
- Install the exported chart with Helm
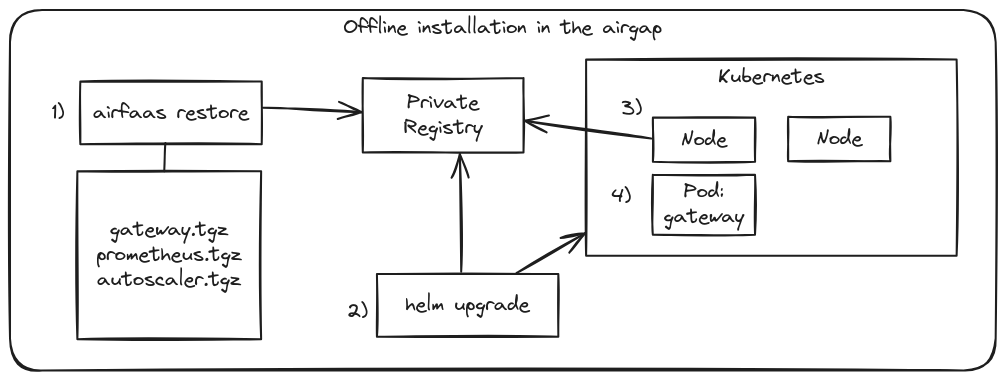
“airfaas restore” places the container images into the private registry, Helm performs an installation pointing at the new images, then the kubelet will pull those images and start the containers for OpenFaaS.
Now, all of the steps above can become tedious and repetitive, and there a number of existing solutions for automation. However most of the ones we looked at were opinionated, complex, and tied you into new concepts that were unnecessary. That’s where airfaas comes in. A simple extension to the existing OpenFaaS CLI which makes your initial installation, and subsequent updates a walk in the park.
Walk-through with airfaas
There are two logic parts to this walk-through, the first set of steps are run on an Internet-facing computer, to prepare what’s needed for an offline installation. The second set of steps cover the offline installation itself, and deploying a sample function from the store.
Download the charts you will need
First of all, you can download airfaas for the public network using:
faas-cli plugin get airfaas
You can then use it via faas-cli airfaas or create an alias alias airfaas="faas-cli airfaas".
If your local machine is running MacOS with Apple Silicon, and the remote machine runs Linux, you can override the Operating System and Architecture to pre-download airfaas for the remote computer.
Now, download the Helm chart or charts that you require.
Examples:
## Download all charts from repo
airfaas download chart

## Download a single chart
airfaas download chart openfaas/cron-connector

## Download a specific version of a chart
airfaas download chart openfaas/openfaas --version 0.9.0
The charts --url is set to https://openfaas.github.io/faas-netes/ as a default.
Here’s what you get when you download all the charts in the repository (which is the default):
$ airfaas download chart

Downloading: (all charts)       https://openfaas.github.io/faas-netes/
NAME                         VERSION  DESCRIPTION
openfaas/openfaas            14.2.34  OpenFaaS - Serverless Functions Made Simple
openfaas/cron-connector      0.6.10   Trigger OpenFaaS Functions with cron schedules
openfaas/federated-gateway   0.1.0    Federated Gateway for OpenFaaS service providers
openfaas/kafka-connector     0.7.9    Connect OpenFaaS functions to Kafka topics
openfaas/mqtt-connector      0.4.7    Connect OpenFaaS functions to MQTT topics
openfaas/nats-connector      0.3.2    Trigger OpenFaaS Functions from NATS Pub/Sub
openfaas/postgres-connector  0.1.1    Trigger OpenFaaS functions from PostgreSQL
openfaas/pro-builder         0.4.13   Build OpenFaaS functions via a REST API
openfaas/probuilder          0.2.0    Build OpenFaaS functions via a REST API
openfaas/queue-worker        0.2.7    Dedicated queue-worker for OpenFaaS using JetStream
openfaas/sns-connector       0.1.3    Invoke functions from an AWS SNS messages.
openfaas/sqs-connector       0.2.4    Connect OpenFaaS functions to SQS topics
Downloading openfaas/openfaas (14.2.34) => chart/openfaas/openfaas
Downloading openfaas/cron-connector (0.6.10) => chart/openfaas/cron-connector
Downloading openfaas/federated-gateway (0.1.0) => chart/openfaas/federated-gateway
Downloading openfaas/kafka-connector (0.7.9) => chart/openfaas/kafka-connector
Downloading openfaas/mqtt-connector (0.4.7) => chart/openfaas/mqtt-connector
Downloading openfaas/nats-connector (0.3.2) => chart/openfaas/nats-connector
Downloading openfaas/postgres-connector (0.1.1) => chart/openfaas/postgres-connector
Downloading openfaas/pro-builder (0.4.13) => chart/openfaas/pro-builder
Downloading openfaas/probuilder (0.2.0) => chart/openfaas/probuilder
Downloading openfaas/queue-worker (0.2.7) => chart/openfaas/queue-worker
Downloading openfaas/sns-connector (0.1.3) => chart/openfaas/sns-connector
Downloading openfaas/sqs-connector (0.2.4) => chart/openfaas/sqs-connector
Then you’ll see the various tarballs downloaded:
$ find chart/ | grep tgz
chart/openfaas/queue-worker/queue-worker-0.2.7.tgz
chart/openfaas/mqtt-connector/mqtt-connector-0.4.7.tgz
chart/openfaas/nats-connector/nats-connector-0.3.2.tgz
chart/openfaas/postgres-connector/postgres-connector-0.1.1.tgz
chart/openfaas/probuilder/probuilder-0.2.0.tgz
chart/openfaas/federated-gateway/federated-gateway-0.1.0.tgz
chart/openfaas/sqs-connector/sqs-connector-0.2.4.tgz
chart/openfaas/sns-connector/sns-connector-0.1.3.tgz
chart/openfaas/pro-builder/pro-builder-0.4.13.tgz
chart/openfaas/cron-connector/cron-connector-0.6.10.tgz
chart/openfaas/kafka-connector/kafka-connector-0.7.9.tgz
chart/openfaas/openfaas/openfaas-14.2.34.tgz
Download the container images
Next, download the images for all the charts, or a specific chart.
Like the previous command, a --url and --version command are available.
Here, we’ll download just two of the charts we need:
$ airfaas download images openfaas/openfaas
$ airfaas download images openfaas/cron-connector
Here’s the output from the second chart, notice how it’s downloaded all available images, so if you change a configuration value later on, you won’t have to download and sync images again.
$ airfaas download images openfaas/cron-connector
Downloading: chart openfaas/cron-connector      https://openfaas.github.io/faas-netes/
Showing values for: "openfaas/cron-connector"
Total images: 2
NAME       IMAGE
image      ghcr.io/openfaas/cron-connector:0.6.1
pro.image  ghcr.io/openfaasltd/cron-connector:0.2.5

Downloading: ghcr.io/openfaas/cron-connector:0.6.1
Wrote images/openfaas/cron-connector/image.tar (7.4MB)

Downloading: ghcr.io/openfaasltd/cron-connector:0.2.5
Wrote images/openfaas/cron-connector/pro.image.tar (6.205MB)
Download a sample function for testing
We recommend exporting one of the sample functions from the store so you can deploy something and see the setup working.
arkade get crane

mkdir -p images/samples/

crane pull ghcr.io/openfaas/alpine:latest ./images/samples/alpine.tar
Download any supporting CLI tools
Lastly, you may wish to download various CLI utilities for use on the air-gapped computer on the private network, where you’ll perform the installation, including a separate copy of airfaas itself.
Let’s assume you’re going to run the various tools on a Linux computer with an amd64 architecture, and want to download them to ./tools.
mkdir -p tools

export OS="linux"
export ARCH="x86_64"

faas-cli plugin get airfaas \
  --path ./tools \
  --os $OS \
  --arch $ARCH

arkade get \
    --path ./tools \
    --os $OS \
    --arch $ARCH \
    kubectl \
    crane \
    kind \
    k3sup \
    kubectx \
    helm \
    faas-cli
Now prepare a USB disk, or use scp or rsync to copy the files to the computer or jump host on the private network.
Perform an installation on the private network
Restore the images into a private registry
We typically encounter registries with any of the below:
- HTTP only, no authentication
- TLS with a self-signed certificate not in the local trust bundle
- TLS with a self-signed certificate in the local trust bundle
- TLS with authentication
For option one and two, when restoring images use the --insecure-registry flag.
For the third option, there is no change required.
For the fourth option, you should create a ~/.docker/config.json file with valid credentials for the server
There is no need to install a Docker daemon to do this. You can use the faas-cli to generate a valid Docker credential file:
Create a password.txt file with the password required to log in, and then set the USERNAME variable:
export USERNAME=openfaas
export REGISTRY=probable-stargazer.local:5000

mkdir -p ~/.docker/

cat ./password.txt | faas-cli registry-login \
    --username $USERNAME \
    --server $REGISTRY \
    --password-stdin
Restore the images into the private registry:
export REGISTRY=probable-stargazer.local:5000
airfaas restore ./images/openfaas/openfaas/images.json --prefix $REGISTRY
The final output of the command will print re-mapped image names from the upstream URLs to the ones in your private registry.
Save that file to values-air.yaml, for instance..
gatewayPro:
  image: probable-stargazer.local:5000/openfaasltd/gateway:0.4.27
autoscaler:
  image: probable-stargazer.local:5000/openfaasltd/autoscaler:0.3.6
dashboard:
  image: probable-stargazer.local:5000/openfaasltd/openfaas-dashboard:0.5.11
gateway:
  image: probable-stargazer.local:5000/openfaas/gateway:0.27.6
queueWorkerPro:
  image: probable-stargazer.local:5000/openfaasltd/queue-worker:0.4.0
Prepare the OpenFaaS namespaces
kubectl create ns openfaas
kubectl create ns openfaas-fn
If you are using authentication for your private registry, then create a pull secret and bind it to the default service account.
You can skip this step if there is no authentication required for your private registry.
export REG=probable-stargazer.local:5000
export NS=openfaas

kubectl create namespace $NS || "echo Namespace: $NS already exists"

kubectl create secret docker-registry private-registry-creds \
  --docker-server=$REG \
  --from-file .dockerconfigjson=$HOME/.docker/config.json \
  -n $NS

kubectl patch serviceaccount -n $NS default -p '{"imagePullSecrets": [{"name": "private-registry-creds"}]}'
Repeat the above, changing openfaas to openfaas-fn if you are intending on hosting functions within the same registry.
Create a secret for the OpenFaaS license
kubectl create secret generic \
  -n openfaas \
  openfaas-license \
  --from-file license=$HOME/.openfaas/LICENSE
Install OpenFaaS with Helm
First, run ls chart/openfaas/openfaas to see which chart versions you have available, then pick one for the installation:
helm upgrade --install openfaas ./chart/openfaas/openfaas/openfaas-14.2.34.tgz \
    --namespace openfaas \
    --set openfaasPro=true \
    --set operator.create=true \
    --set clusterRole=true \
    -f ./values-air.yaml
Alternatively, you can use the values-pro.yaml file from the OpenFaaS documentation, then provide values-air.yaml to set the images only:
helm upgrade --install openfaas ./chart/openfaas/openfaas/openfaas-14.2.34.tgz \
    --namespace openfaas \
    --set openfaasPro=true \
    --set operator.create=true \
    --set clusterRole=true \
    -f ./values-pro.yaml \
    -f ./values-air.yaml
As you can see, there are no special chart options required for OpenFaaS to run in an offline environment, with a private registry.
Deploy and invoke a sample function
Port-forward and log into the gateway with the instructions from arkade info openfaas.
Now, restore the sample function to your registry:
export REG=probable-stargazer.local:5000
crane push ./images/samples/alpine.tar $REG/openfaas/alpine:latest
Deploy it:
export REG=probable-stargazer.local:5000
faas-cli deploy --name env --fprocess=env --image $REG/openfaas/alpine:latest
Invoke the function:
faas-cli invoke env <<< ""
Handling connection for 8080
PATH=/usr/local/sbin:/usr/local/bin:/usr/sbin:/usr/bin:/sbin:/bin
HOSTNAME=env-6f95bcc679-qv7dp
OPENFAAS_NAME=env
fprocess=env
KUBERNETES_SERVICE_PORT_HTTPS=443
KUBERNETES_PORT=tcp://10.43.0.1:443
KUBERNETES_PORT_443_TCP=tcp://10.43.0.1:443
KUBERNETES_PORT_443_TCP_PROTO=tcp
KUBERNETES_PORT_443_TCP_PORT=443
KUBERNETES_PORT_443_TCP_ADDR=10.43.0.1
KUBERNETES_SERVICE_HOST=10.43.0.1
KUBERNETES_SERVICE_PORT=443
Offline function development
You can adapt a template from the OpenFaaS template store by downloading its Git repository, mirroring any base images and copying it across to the private registry.
Take the golang-middleware template for instance. Its Dockerfile uses two public images:
-FROM --platform=${TARGETPLATFORM:-linux/amd64} ghcr.io/openfaas/of-watchdog:0.9.15 as watchdog
+FROM --platform=${TARGETPLATFORM:-linux/amd64} probable-stargazer.local:5000/openfaas/of-watchdog:0.9.15 as watchdog
-FROM --platform=${BUILDPLATFORM:-linux/amd64} golang:1.22-alpine as build
+FROM --platform=${BUILDPLATFORM:-linux/amd64} probable-stargazer.local:5000/golang:1.22-alpine as build
Simply mirror those images with crane pull and crane push, then add a prefix to the Dockerfile and you’ll be able to build, push and deploy functions within your airgap.
Bear in mind that most templates use package managers like pip, npm, gradle, or Gomodules. These packages will need to be mirrored into a separate private package repository for completely offline development.
Alternatively, you could do all your function development outside of the airgap on a public network, then export individual function images as required, to be copied into the private network.
Wrapping up
As explained in the introduction, no special tooling is required to run a commercial version of OpenFaaS in an airgap, however tooling can improve the experience. Not only can we download the images, charts, and supporting tooling very quickly, but we can perform the initial installation and subsequent updates with a few CLI commands, that have been tested together and are supported by the OpenFaaS team.
What’s next?
All the tooling included in OpenFaaS Standard and OpenFaaS for Enterprises is designed to work on any Kubernetes cluster, whether online or offline - including OpenShift. Just mirror any additional connectors or components that you may need, and decide whether you’re going to build functions within the airgap, or outside of it, and then to synchronise them as required.
Day two operations are simply a case of running:
airfaas download chart
airfaas download images
Then on the private network, doing a helm upgrade using the instructions from above.
So it’s over to you. Get in touch with us if you’d like to try OpenFaaS in an airgap, or if you’re already a licensed customer running in an airgap, we’d be happy to hear your feedback on how to improve airfaas for you.

Alex Ellis
Founder of @openfaas.