Cluster Autoscalers add and remove Nodes to match the demand for resources. But they often leave no room for new Pods, adding an extra 1-2 minutes of latency.
That’s latency that you don’t want to pass onto your users.
In addition, when using spot instances, you’re given a very a short window to reschedule Pods from reclaimed nodes.
In this post we’ll introduce the new Headroom Controller developed and supported by the OpenFaaS team to help solve this problem. It’s installed via Helm, configured natively via its own Custom Resource Definition (CRD), with commercial support included.
It’s built for Kubernetes and works with any autoscaler. OpenFaaS isn’t required, but we think your users will appreciate the quicker scaling and start-up times.
Contents:
- What kind of autoscaling does OpenFaaS provide?
- What is a Cluster Autoscaler?
- What are spot instances?
- What is headroom?
- How does the headroom controller work?
- Getting started with the headroom controller
- Next steps
What is a Cluster Autoscaler?
A cluster autoscaler works differently to the OpenFaaS autoscaler. Instead of scaling the number of replicas or Pods for a function, it measures the demand in the cluster for CPU and RAM, then adds or removes nodes to match the demand.
When you combine a Pod autoscaler such as OpenFaaS or HPAv2 with a cluster autoscaler, you can optimise for cost and efficiency. You pack the most amount of Pods into the least amount of nodes.
For instance, if you run mainly batch jobs, file conversions, async workloads or ETL jobs - you may be able to scale down to zero Pods overnight, on the weekends or over the holidays. Over time the costs for compute add-up, even if you are using spot instances (mentioned below).
Two popular open source autoscalers are Cluster Autoscaler - a mature and well supported project maintained by the Kubernetes Autoscaling SIG, and Karpenter - a modern and fast autoscaler developed by AWS for Elastic Kubernetes Service (EKS) and Azure Kubernetes Service (AKS).
Many cloud services have their own autoscaling groups or managed node pools, these should work just as well with the Headroom Controller.
What kind of autoscaling does OpenFaaS provide?
OpenFaaS is a serverless platform for Kubernetes that provides an enterprise-grade self-hosted alternative to AWS Lambda.
It implements its own horizontal scaling for functions. Functions are implemented as Kubernetes Deployments, with a .replicas field in its spec. The autoscaler works by setting that field, and Kubernetes does the rest.
Unlike a generic autoscaler such as HPAv2 or KEDA, the OpenFaaS autoscaler is purpose built to scale functions. It can scale based on Requests Per Second (RPS), Inflight requests (capacity), CPU, RAM, Queue Depth, or any custom metric in Prometheus.
As additional replicas of a function are added into the cluster - they benefit from load balancing across multiple processes and machines to increase performance and to distribute work.ple.
The autoscaler will also scale idle functions to “zero” which causes all Pods to be terminated and the resources to be freed up.
What are spot instances?
OpenFaaS and its autoscaler can work on-premises, or in the cloud, but spot instances are really a feature of the cloud.
Providers such as AWS and GCP sell excess capacity within their infrastructure at a discount - up to 90% off the regular price. But this does come at a cost - the instance could be terminated at any time, and you may have a very short window to relocate your Pods to another node.
If an autoscaler like Karpenter has packed all your Pods into a single very large node, then you have a large failure domain and could incur significant disruption when the instance is terminated.
The best workloads for spot instances are stateless, and complete their work within a short period of time. Anything that may be stateful or run for a long time, should be avoided or made immutable, and able to restart from a checkpoint or the beginning.
Headroom can also help when spot instances are reclaimed, especially if you use a spread constraint, so the headroom is reserved over a number of instances.
You can learn more about OpenFaaS and Karpenter on the blog. We’ll include links in the conclusion.
What is headroom?
Cluster autoscalers tend to pack workloads into nodes as tightly as possible, meaning that if a new Pod is deployed or a workload scales up, a new node may have to be added to the cluster.
Adding a node can take 1-2 minutes, or even longer depending on the cluster and the cloud provider.
With headroom, a buffer of configurable size is added to the cluster with Pods which request resources, but simply run a sleep process. They run in a very low priority class, so that when a normal workload comes along, instead of waiting for a new node, the headroom Pods are evicted and the Pod starts immediately.
Then, the cluster autoscaler will request a new node in the background to add the headroom Pods back into the cluster.
In this way, the cluster maintains a buffer so resources can be added instantly when needed.
How does the headroom controller work?
The Headroom Controller can be installed via Helm from the OpenFaaS chart repository.
Once installed, you can create a default and a low-priority class for the Kubernetes scheduler to use.
All Pods will assume the default priority class unless otherwise specified, which means they can always evict a headroom Pod.
Next, you can define one or more Headroom resources.
kind: Headroom
apiVersion: openfaas.com/v1
metadata:
  name: headroom
spec:
  priorityClassName: headroom
  requests:
    cpu: 250m
    memory: 250Mi
Now set up two priority classes.
- Create a default priority priorityClassName
  kubectl apply -f - << EOF
  apiVersion: scheduling.k8s.io/v1
  kind: PriorityClass
  metadata:
    name: default
  value: 1000
  globalDefault: true
  description: "Default priority class for all pods"
  EOF
- Create a low priority class for the headroom Custom Resources
  kubectl apply -f - <<EOF
  apiVersion: scheduling.k8s.io/v1
  kind: PriorityClass
  metadata:
    name: headroom
  description: Low priority class for headroom pods
  globalDefault: false
  preemptionPolicy: Never
  value: -10
  EOF
Within a short period of time, a new Deployment will be created with the request values you specified.
If these Pods cannot be scheduled, the autoscaler you’re using should request one or more new nodes to be added to the cluster to host them.
Then, whenever a new Pod is scheduled or updated which requires more resources than the cluster has available, the headroom Pods will be evicted and the new Pod will start immediately.
Watch a video demo of the Headroom Controller in action with the Cluster Autoscaler, K3s and Firecracker VMs managed by our Slicer product.
Spreading headroom over multiple nodes
If you are using a cluster autoscaler like Karpenter, you can spread the headroom over multiple nodes by using a spread constraint.
The below example will spread the headroom over 5 different nodes, with a hard constraint making sure that if a spot instance is terminated, you should have an immediate buffer available for the Pods that need to be relocated.
This can be a hard rule with whenUnsatisfiable: DoNotSchedule which won’t allow more than one headroom Pod on a node, or a soft rule with whenUnsatisfiable: ScheduleAnyway which will try its best to spread the Pods out across the cluster, but won’t block them if that’s not possible.
kind: Headroom
apiVersion: openfaas.com/v1
metadata:
  name: headroom-spread
spec:
  replicas: 5
  topologySpreadConstraints:
    - maxSkew: 1
      topologyKey: kubernetes.io/hostname
      whenUnsatisfiable: DoNotSchedule
      labelSelector:
        matchLabels:
          headroom: headroom-spread
  priorityClassName: headroom
  requests:
    cpu: 500m # 0.5 vCPU
    memory: 512Mi # 512MB RAM
All Pods created by the Headroom Controller will have the label headroom: $NAME_OF_HEADROOM which can be used to select them in a selector.
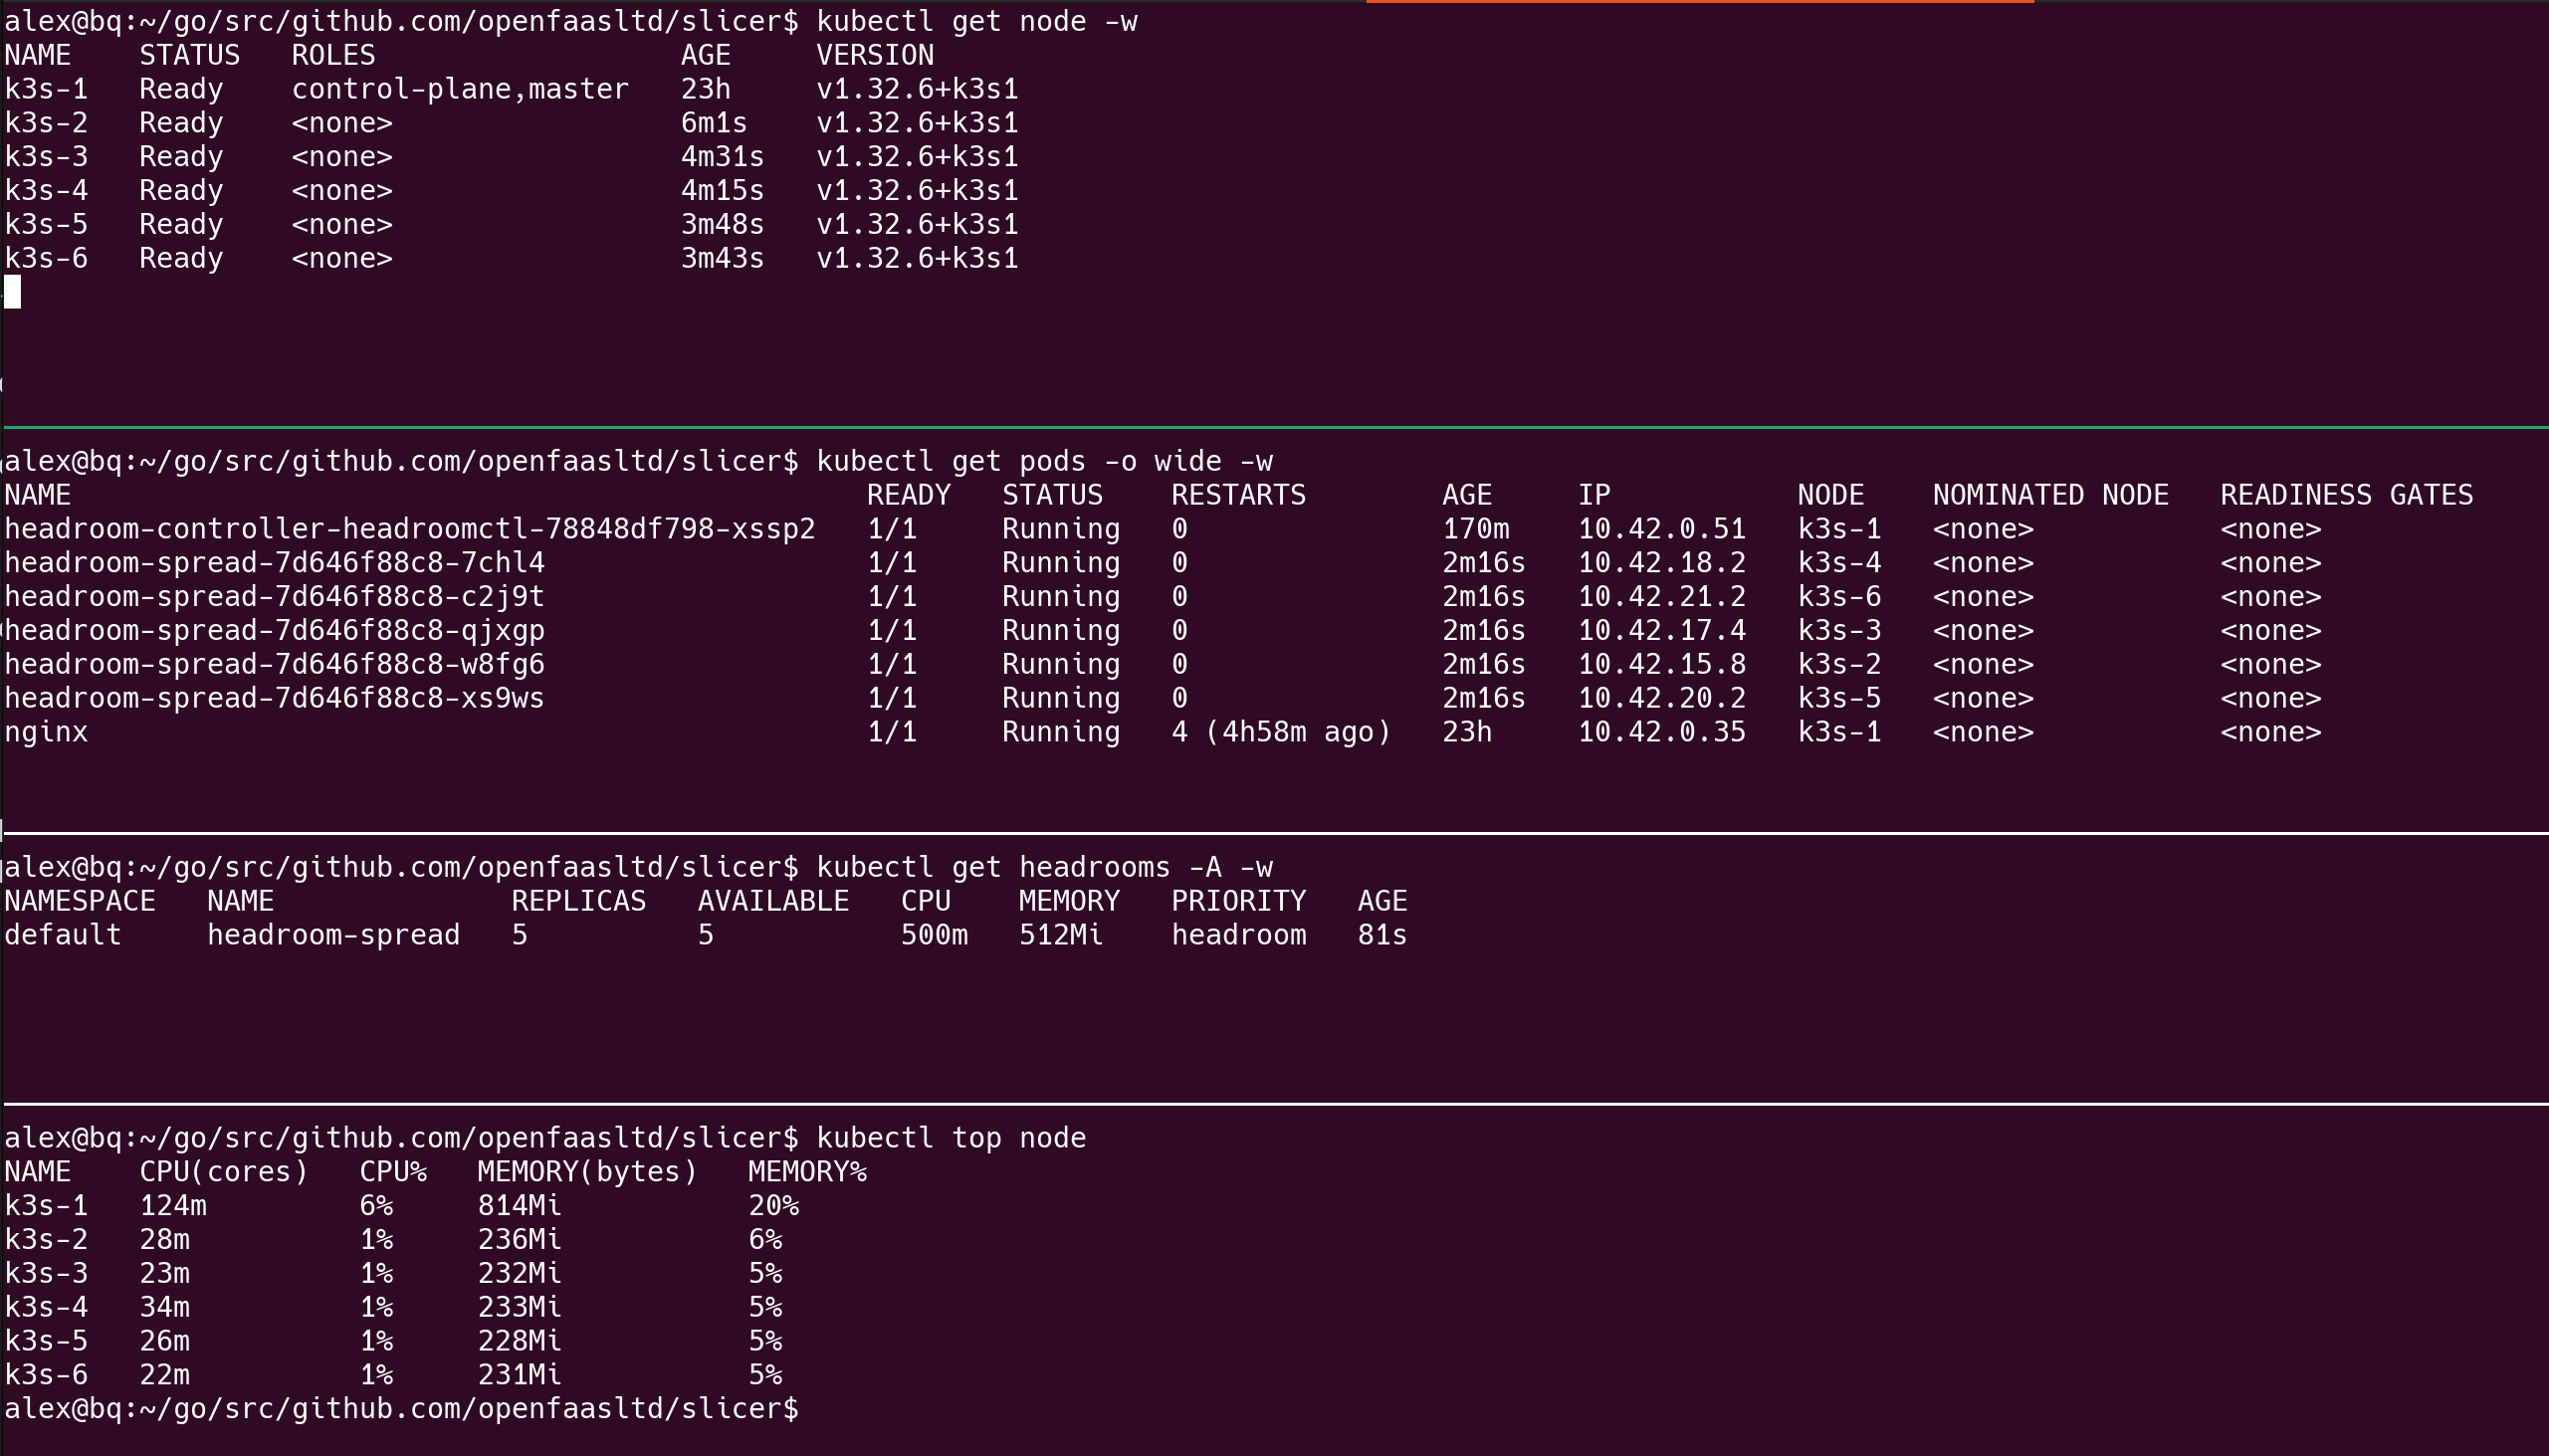
The following screenshot shows a K3s cluster with one master, and 5 additional nodes which have been added to the cluster to satisfy the spread constraint.
Scaling the headroom
The Headroom resource also has a .replicas field which works with kubectl scale, so that you can adjust the headroom according to your needs.
spec:
  replicas: 10
You could also write a simple Kubernetes Cron Job to scale the headroom down during the holidays, or overnight - if your product tends to be used more during the day.
Assuming that you create a service account for the Cron Job named i.e. headroom-scaler with permission to update the Headroom resource, it would look something like this:
kind: CronJob
apiVersion: batch/v1
metadata:
  name: scale-headroom
spec:
  restartPolicy: OnFailure
  schedule: "0 0 * * *"
  jobTemplate:
    spec:
      template:
        spec:
          serviceAccountName: headroom-scaler
          containers:
            - name: kubectl
              image: alpine/kubectl:latest # Or a specific version
              command:
              - "/bin/sh"
              - "-c"
              - |
                apk add --no-cache kubectl
                kubectl scale headroom/openfaas-fn-buffer --replicas=0
The Cron Job will scale the headroom down to 0 replicas at midnight every day.
You’d just need another one to set it back to the desired state later on.
A full example is available in the README for the headroom controller’s Helm chart.
What if Headroom Pods need a securityContext?
If you are running Kyverno, Gatekeeper, it’s likely that Pods cannot be scheduled without some kind of securityContext. We’ve thought of that already and have added a .podSecurityContext field to the Headroom resource.
spec:
  podSecurityContext:
    runAsNonRoot: true
    runAsUser: 1000
    runAsGroup: 1000
    fsGroup: 1000
Tolerations for node groups and spot instances
Spot instances are used by many OpenFaaS customers in production for running functions. A taint is applied to the node group to prevent control plane workloads from running on them, then a toleration is required on the Function Pods to allow them to run on the node group. For Functions, this is achieved through a Profile. Headroom resources specify it directly on their .Spec.
Here’s what we used during testing for AWS EKS with Karpenter, so that headroom Pods ran on spot instances.
spec:
  tolerations:
    - key: "karpenter.sh/node-group"
      operator: "Equal"
      value: "spot"
      effect: "NoSchedule"
For a self-hosted HA K3s cluster with SlicerVM.com running with our modified Cluster Autoscaler, you could try something like this:
kubectl taint node k3s-cp-1 cp:NoSchedule
kubectl taint node k3s-cp-2 cp:NoSchedule
kubectl taint node k3s-cp-3 cp:NoSchedule
Or if there are no agents yet:
kubectl taint node --all cp:NoSchedule
Followed by adding:
spec:
  priorityClassName: headroom
  replicas: 2
  requests:
    cpu: 500m
    memory: 512Mi
  tolerations:
  - effect: NoSchedule
    key: cp
    operator: Equal
    value: "1"
In that case, if you have no agents, the autoscaler will provision a new node to host the two new replicas of the headroom Pods.
Getting started with the headroom controller
You can get started right away, even if you’re not an OpenFaaS customer. OpenFaaS is not a pre-requisite, but we’ve put it under the brand to signal to customers that this is something we are supporting, and think is an important add-on for any cluster autoscaler.
helm repo add openfaas https://openfaas.github.io/faas-netes/
helm repo update
Write a values-custom.yaml file.
Decide whether you want it to run across all namespaces in the cluster:
rbac:
  role: ClusterRole
Or to operate only in the namespace given to helm via the --namespace flag.
role: Role
There are some other flags to play with, but the defaults should be fine for most use cases.
You could install it into the kube-system namespace, the openfaas namespace, or a custom one.
helm upgrade --install headroom-controller openfaas/headroom-controller \
	--namespace kube-system \
	-f ./values-custom.yaml
Once you’ve got some confidence in how the controller works, you could add it to your GitOps repository with ArgoCD or Flux along with your other infrastructure tools such as cert-manager, ingress-nginx, external-secrets, and so forth.
Next steps
Whilst this is a new project, we’ve tested it with Karpenter, and Cluster Autoscaler, and it worked as expected.
You will need to spend some time fine-tuning your Headroom resources to get the best performance for your clusters and applications.
Feel free to reach out with your comments, questions, and suggestions.
During the beta period, anyone can try out the Headroom Controller for free without signing up for a subscription.
After the beta period, OpenFaaS customers get free access to the Headroom Controller as part of their subscription. For everyone else, you can purchase a license for 300 USD/year per cluster - which is less than 1 USD per day for near-instant scaling and scheduling of Pods.
Even if you wanted to make your own controller for fun, you have to factor in the continued maintenance and support, and what happens when you leave the company. We’ve priced the controller at the point where it makes sense to outsource it.
You may also like these past blog posts:
- Save costs on AWS EKS with OpenFaaS and Karpenter
- Scale to zero GPUs with OpenFaaS, Karpenter and AWS EKS
- How to Build and Scale Python Functions with OpenFaaS
- Integrate a FaaS capability into your product

Alex Ellis
Founder of @openfaas.