Learn how to enable Istio for your OpenFaaS functions to take advantage of Mutual TLS and more
Last updated: Tested and updated on 26 March 2025
Introduction
Service meshes have become popular add-ons for Kubernetes, so much so that they have their own ServiceMeshCon days at KubeCon, the official Kubernetes conference.
A service mesh can be used to apply policies to network communication, encrypt traffic between endpoints and for advanced routing.

Istio is one of the most popular service meshes available for use with Kubernetes and with help from the team at Google, we’ve recently updated the support and documentation for using Istio with OpenFaaS.

Istio’s mesh created by injecting Envoy proxies into each Pod to encapsulate networking
The value for users is:
- Providing more advanced and flexible policy than Kubernetes’ NetworkPolicies
- Encrypting traffic between all OpenFaaS components and functions for “zero trust”
- Providing advanced networking like retries, and weighting for canaries and gradual rollouts of new functions
Thank you to John Howard from the Istio team for helping us with reviewing this blog post.
In this blog post we’ll give you a quick introduction so that you can start integrating Istio with OpenFaaS. We’ll then go on to show you how to measure the resource consumption of the cluster, and how to create a TLS certificate for the Istio Gateway.
There are many service mesh products available. Other popular options include: Linkerd, Kuma and Consul.
You may also like the workshop we created to show how to do mutual TLS and traffic shifting with OpenFaaS and Linkerd.
Tutorial
We are using arkade, the open source marketplace to download CLIs and to install the apps we need. You can also do this the hard way if you prefer, just refer to the documentation or the helm chart for more.
You’ll need OpenFaaS Standard or Enterprise for Istio to work. OpenFaaS CE does its own load-balancing with Pod IPs instead. Reach out to us if you want to talk about options.
Bootstrap the cluster
Create a local cluster for testing:
arkade get kind

kind create cluster \
  --name openfaas-istio
Install Istio first
Once the KinD cluster has started, install Istio:
arkade get istioctl@1.25.0
istioctl install \
  --set meshConfig.defaultConfig.holdApplicationUntilProxyStarts=true
The holdApplicationUntilProxyStarts option is important to counter delays and race conditions from latency that Istio introduces from injecting its sidecar into each meshed container.
If you are able to use Istio’s native sidecars, that can be use as an alternative, but requires Kubernetes 1.28 or higher.
See other options for: istioctl.
Install OpenFaaS
OpenFaaS can be installed via Helm using the instructions below, or via arkade by passing in various --set flags.
Download values-pro.yaml from the OpenFaaS Helm chart repository.
Then add/change:
gateway:
+  directFunctions: true
+  probeFunctions: true
If you wish to enable mTLS for the openfaas and openfaas-fn namespaces, then also add:
+istio:
+  mtls: true
Then run the the rest of the commands from the docs to create the initial namespaces, add the license key, and to install the OpenFaaS chart with Helm.
Access OpenFaaS with an Istio Gateway
Create an Istio Gateway so that we can connect to the OpenFaaS Gateway and log in.
# gateway.yaml
cat > gateway.yaml <<EOF
apiVersion: networking.istio.io/v1alpha3
kind: Gateway
metadata:
  name: openfaas-gateway
  namespace: openfaas
spec:
  selector:
    istio: ingressgateway # use istio default controller
  servers:
  - port:
      number: 80
      name: http
      protocol: HTTP
    hosts:
    - "*"
---
apiVersion: networking.istio.io/v1alpha3
kind: VirtualService
metadata:
  name: openfaas-api
  namespace: openfaas
spec:
  hosts:
  - "*"
  gateways:
  - openfaas-gateway
  http:
  - match:
    - uri:
        prefix: /
    route:
    - destination:
        host: gateway
        port:
          number: 8080
EOF

kubectl apply -f gateway.yaml
Port-forward the Istio Ingress Gateway:
kubectl port-forward -n istio-system \
  svc/istio-ingressgateway \
  8080:80 \
  8443:443 &
Log in:
PASSWORD=$(kubectl get secret -n openfaas basic-auth -o jsonpath="{.data.basic-auth-password}" | base64 --decode; echo)
echo -n $PASSWORD | faas-cli login --username admin --password-stdin
Deploy a test function
# Find something you are interested in with:
faas-cli store list

# Deploy one of the functions
faas-cli store deploy nodeinfo
Invoke the function via the Istio Ingress gateway:
echo | faas-cli invoke nodeinfo
Describe the Function’s deployment, so you can see that the Istio proxy (Envoy) has been configured:
kubectl describe pod -n openfaas-fn

Events:
  Type    Reason     Age   From               Message
  ----    ------     ----  ----               -------
  Normal  Scheduled  48s   default-scheduler  Successfully assigned openfaas-fn/nodeinfo-857d9c469b-ww66k to openfaas-istio-control-plane
  Normal  Pulling    47s   kubelet            Pulling image "docker.io/istio/proxyv2:1.9.1"
  Normal  Pulled     46s   kubelet            Successfully pulled image "docker.io/istio/proxyv2:1.9.1" in 938.690323ms
  Normal  Created    46s   kubelet            Created container istio-init
  Normal  Started    46s   kubelet            Started container istio-init
  Normal  Pulling    46s   kubelet            Pulling image "ghcr.io/openfaas/nodeinfo:latest"
  Normal  Pulled     38s   kubelet            Successfully pulled image "ghcr.io/openfaas/nodeinfo:latest" in 8.160064746s
  Normal  Created    38s   kubelet            Created container nodeinfo
  Normal  Started    38s   kubelet            Started container nodeinfo
  Normal  Pulling    38s   kubelet            Pulling image "docker.io/istio/proxyv2:1.9.1"
  Normal  Pulled     37s   kubelet            Successfully pulled image "docker.io/istio/proxyv2:1.9.1" in 925.80937ms
  Normal  Created    37s   kubelet            Created container istio-proxy
  Normal  Started    37s   kubelet            Started container istio-proxy
You can also use istioctl to explore the status of the proxy:
istioctl proxy-status

NAME                                                   CDS        LDS        EDS        RDS        ISTIOD                      VERSION
alertmanager-7cb8f6487d-ch4fp.openfaas                 SYNCED     SYNCED     SYNCED     SYNCED     istiod-865fd47fcc-24vdp     1.9.1
basic-auth-plugin-565b7cbc48-h9t8d.openfaas            SYNCED     SYNCED     SYNCED     SYNCED     istiod-865fd47fcc-24vdp     1.9.1
gateway-5fb6bf58dd-74j8c.openfaas                      SYNCED     SYNCED     SYNCED     SYNCED     istiod-865fd47fcc-24vdp     1.9.1
istio-ingressgateway-5bcdc9b77f-knrpz.istio-system     SYNCED     SYNCED     SYNCED     SYNCED     istiod-865fd47fcc-24vdp     1.9.1
nats-76b689f8d8-mkwtl.openfaas                         SYNCED     SYNCED     SYNCED     SYNCED     istiod-865fd47fcc-24vdp     1.9.1
nodeinfo-857d9c469b-ww66k.openfaas-fn                  SYNCED     SYNCED     SYNCED     SYNCED     istiod-865fd47fcc-24vdp     1.9.1
prometheus-5664d7cbb9-kchff.openfaas                   SYNCED     SYNCED     SYNCED     SYNCED     istiod-865fd47fcc-24vdp     1.9.1
queue-worker-5b7c5b898d-fqkv5.openfaas                 SYNCED     SYNCED     SYNCED     SYNCED     istiod-865fd47fcc-24vdp     1.9.1
Running the following will open a dashboard, and you can run istioctl dashboard --help to see how to launch the Grafana or Envoy UI.
istioctl dashboard controlz deployment/istiod.istio-system
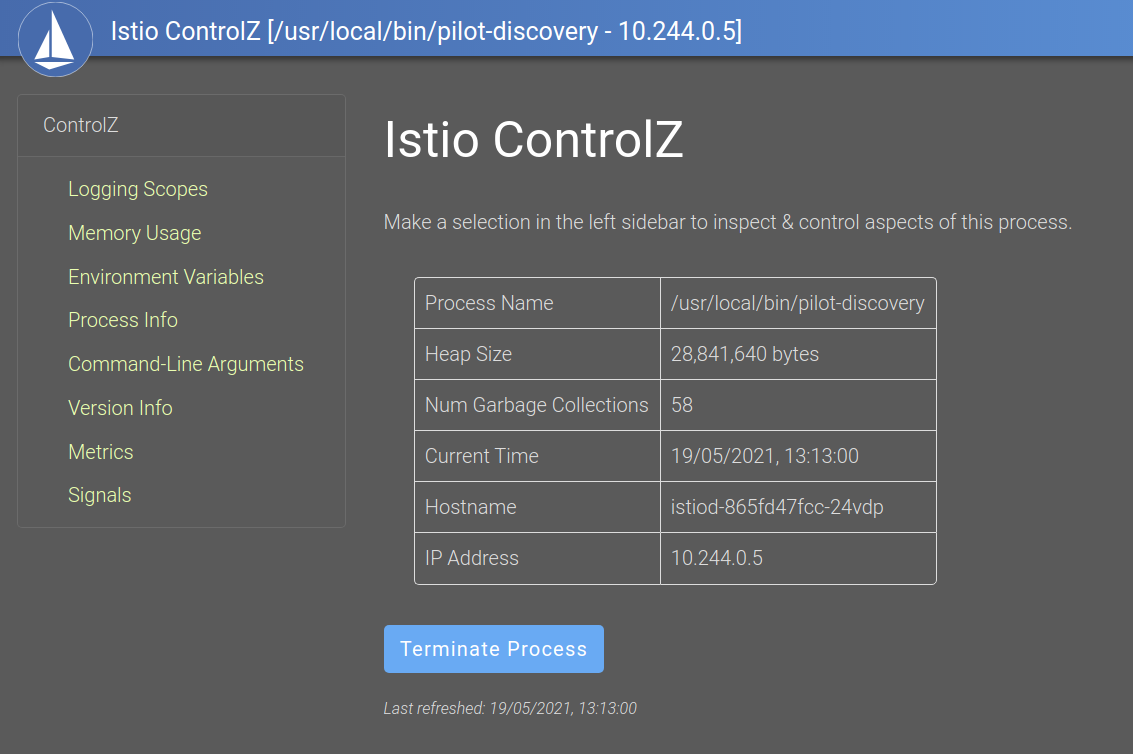
Istio controlz dashboard
I was also able to verify that the OpenFaaS gateway was receiving encrypted messages. To do this, I reinstalled Istio using the instructions in the docs in privileged mode. Then I restarted the gateway and observed encrypted messages with tcpdump:
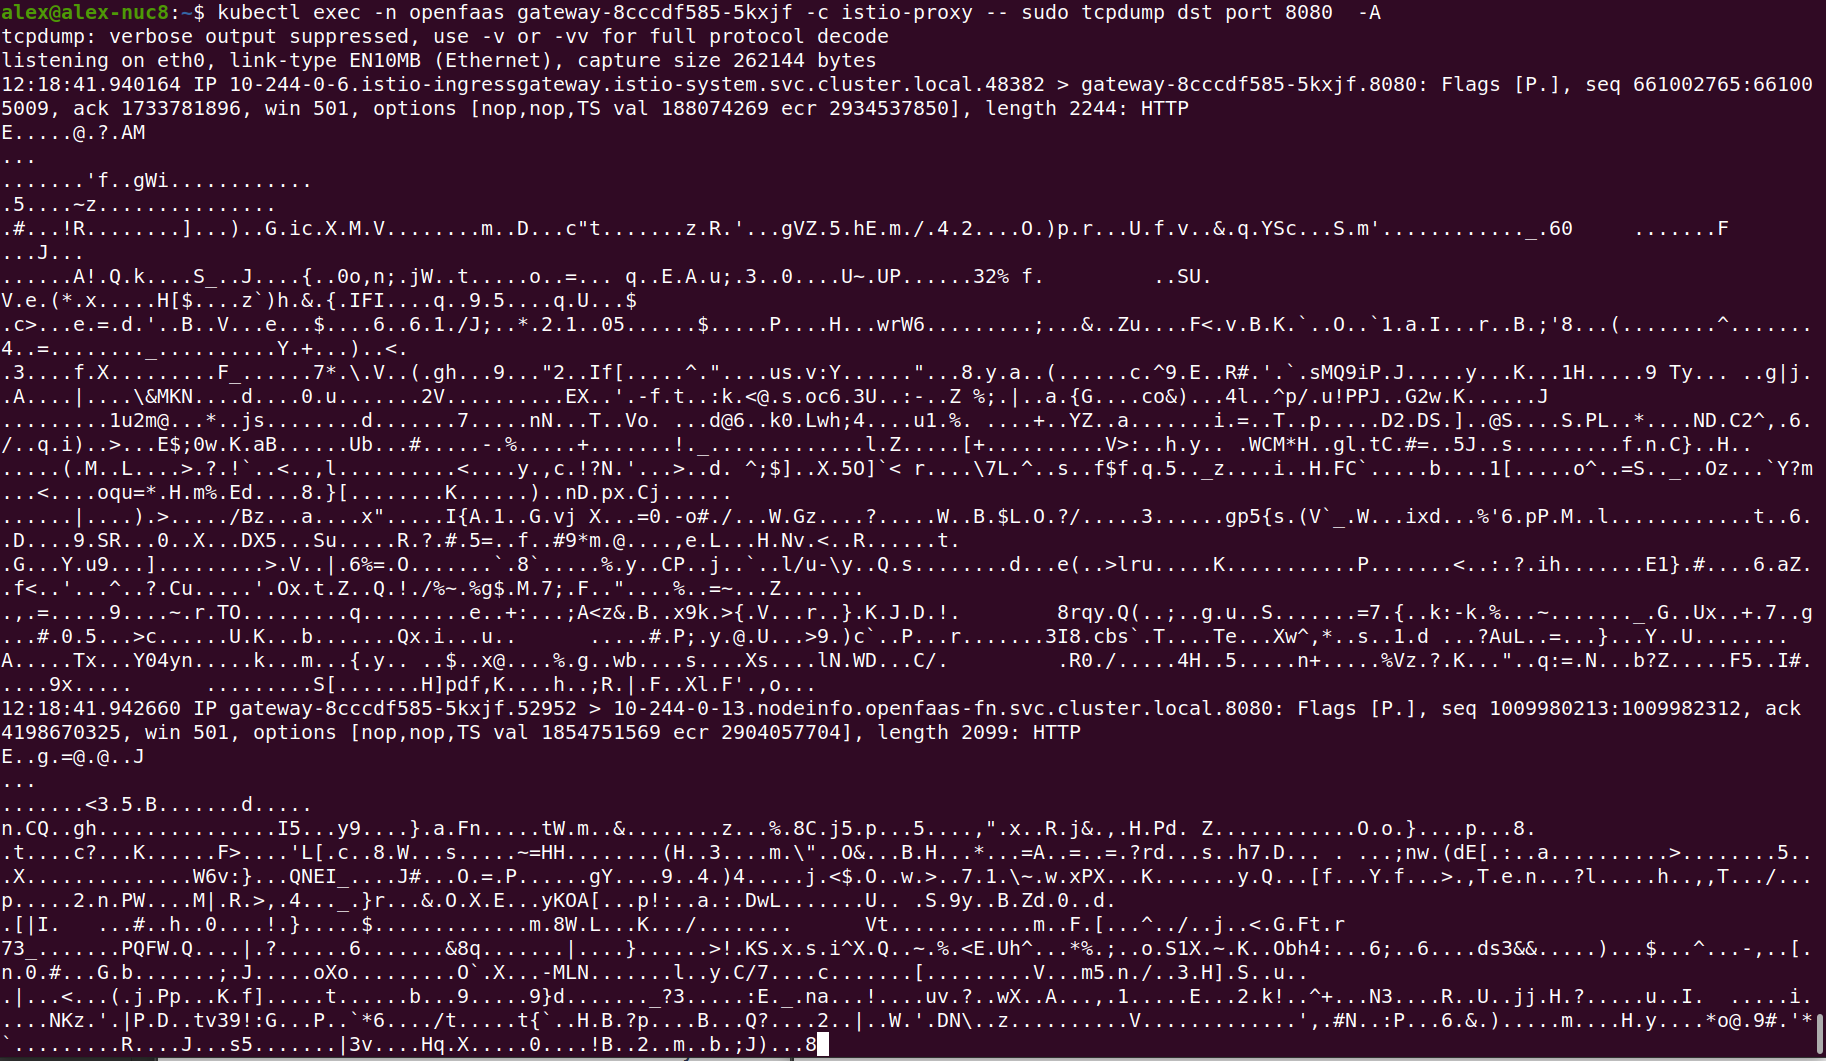
Encrypted messages observed with tcpdump
You can detect the presence of Envoy within your function by looking at the HTTP headers passed on:
faas-cli deploy \
  --name env \
  --image ghcr.io/openfaas/alpine:latest \
  --fprocess="env"
Now invoke the function and view the headers injected by the Envoy sidecar:
echo | faas-cli invoke env

HOSTNAME=env-58bd77889c-k8h76
Http_User_Agent=curl/7.68.0
Http_X_Forwarded_Host=faas.o6s.io
Http_X_B3_Spanid=2b4e331b2d6ce20b
Http_X_B3_Parentspanid=9d7bf1a36bdb2462
Http_X_B3_Sampled=0
Http_X_Envoy_Attempt_Count=1
Http_Accept=*/*
Http_X_Call_Id=64d75811-958e-4865-9694-b09806a3685e
Http_X_Forwarded_Proto=https
Http_X_Request_Id=aeffe73e-eee1-431a-af96-8259bca8facb
Http_Accept_Encoding=gzip
Http_X_B3_Traceid=657ff91f248b8ca562effe793263c602
Http_X_Forwarded_For=10.244.0.16
Http_X_Start_Time=1621427147315051123
Http_Content_Length=0
Http_X_Envoy_Internal=true
Http_X_Forwarded_Client_Cert=By=spiffe://cluster.local/ns/openfaas-fn/sa/default;Hash=0fcbc9f3aad0c8bc4b122e9f972a278f35865c92f3bdbdb9312162ada17ea3cc;Subject="";URI=spiffe://cluster.local/ns/openfaas/sa/openfaas-controller
Http_Method=GET
Http_ContentLength=0
Http_Path=/
Http_Host=env.openfaas-fn.svc.cluster.local:8080
Going Further
Measuring the effects
There is a cost involved with installing a service mesh like Istio. There will be additional RAM required, additional control-plane components to configure and keep updated, along with additional latency and cold-start times for scaling functions from zero.
If you would like to understand the quiescent load on the cluster, you can install the Kubernetes metrics-server through arkade:
arkade install metrics-server
Wait a few minutes for data collection, then run:
bash
kubectl top node
kubectl top pod -A
These are my results after having completed the whole tutorial including: KinD, cert-manager, openfaas, inlets-operator and the metrics-server itself.
kubectl top node
NAME                           CPU(cores)   CPU%   MEMORY(bytes)   MEMORY%
openfaas-istio-control-plane   399m         4%     1693Mi          5%

kubectl top pod -A
NAMESPACE            NAME                                                   CPU(cores)   MEMORY(bytes)
cert-manager         cert-manager-7998c69865-ljf2h                          7m           22Mi
cert-manager         cert-manager-cainjector-7b744d56fb-5blx4               3m           40Mi
cert-manager         cert-manager-webhook-7d6d4c78bc-k58l8                  3m           14Mi
default              inlets-operator-65d855b646-d7hrb                       1m           14Mi
istio-system         istio-ingressgateway-5bcdc9b77f-knrpz                  12m          41Mi
istio-system         istio-ingressgateway-tunnel-client-8676784869-wcbdc    1m           6Mi
istio-system         istiod-865fd47fcc-24vdp                                4m           48Mi
kube-system          coredns-f9fd979d6-8mr5v                                4m           11Mi
kube-system          coredns-f9fd979d6-gbmjz                                5m           11Mi
kube-system          etcd-openfaas-istio-control-plane                      32m          66Mi
kube-system          kindnet-mjntd                                          1m           9Mi
kube-system          kube-apiserver-openfaas-istio-control-plane            83m          412Mi
kube-system          kube-controller-manager-openfaas-istio-control-plane   19m          52Mi
kube-system          kube-proxy-jfgtc                                       1m           17Mi
kube-system          kube-scheduler-openfaas-istio-control-plane            4m           18Mi
kube-system          metrics-server-56c4ff648b-jzkrq                        2m           15Mi
local-path-storage   local-path-provisioner-78776bfc44-tgr64                2m           8Mi
openfaas             alertmanager-7cb8f6487d-ch4fp                          9m           53Mi
openfaas             basic-auth-plugin-565b7cbc48-h9t8d                     10m          51Mi
openfaas             gateway-5fb6bf58dd-74j8c                               15m          65Mi
openfaas             nats-76b689f8d8-mkwtl                                  10m          51Mi
openfaas             prometheus-5664d7cbb9-kchff                            20m          101Mi
openfaas             queue-worker-5b7c5b898d-fqkv5                          7m           47Mi
openfaas-fn          nodeinfo-857d9c469b-ww66k                              12m          63Mi
If this seems like a lot of infrastructure for running a single function, then you may be interested in taking a look at a more minimal stack with faasd. faasd runs on a single host and makes different tradeoffs so that it requires very minimal resources to run functions.
Getting a TLS certificate
Let’s now get a TLS certificate so that we can serve traffic to clients securely.
First, create a DNS A record for the IP address of the Istio Ingress gateway using your preferred cloud dashboard and DNS service.
kubectl get svc -n istio-system istio-ingressgateway
NAME                   TYPE           CLUSTER-IP       EXTERNAL-IP
istio-ingressgateway   LoadBalancer   10.106.200.195   <pending>
![]()
Inlets can enable LoadBalancers and Controllers for local and private Kubernetes clusters
If you’re running within a private VPC, on-premises or on your laptop, then you will need to get a public IP for Istio through the inlets-operator. See a full guide to setting up the inlets-operator with Istio to provide an IP via a secure tunnel. That will then change <pending> to a fully accessible IP.
Otherwise, copy the IP or CNAME issued to you under EXTERNAL-IP and create your DNS entry. I’ll be using the domain faas.o6s.io.
![]()
cert-manager is a CNCF project for obtaining, renewing and managing TLS certificates
You can get a TLS certificate to serve traffic over HTTPS using cert-manager.
arkade install cert-manager
Now create an Issuer and register it with Let’s Encrypt:
export EMAIL="you@example.com"

cat > issuer.yaml <<EOF
apiVersion: cert-manager.io/v1
kind: Issuer
metadata:
  name: letsencrypt-prod
  namespace: istio-system
spec:
  acme:
    server: https://acme-v02.api.letsencrypt.org/directory
    email: $EMAIL
    privateKeySecretRef:
      name: letsencrypt-prod
    solvers:
    - selector: {}
      http01:
        ingress:
          class: istio
EOF
kubectl apply -f issuer.yaml
Define a certificate:
export DOMAIN="faas.o6s.io"

cat > cert.yaml <<EOF
apiVersion: cert-manager.io/v1alpha2
kind: Certificate
metadata:
  name: ingress-cert
  namespace: istio-system
spec:
  secretName: ingress-cert
  commonName: $DOMAIN
  dnsNames:
  - $DOMAIN
  issuerRef:
    name: letsencrypt-prod
    kind: Issuer
EOF
kubectl apply -f cert.yaml
You can then check the status of the issuer and certificate:
kubectl get issuer -n istio-system -o wide
NAME               READY   STATUS                                                 AGE
letsencrypt-prod   True    The ACME account was registered with the ACME server   2m22s

kubectl get certificate -n istio-system -o wide
NAME           READY   SECRET         ISSUER             STATUS                                          AGE
ingress-cert   True    ingress-cert   letsencrypt-prod   Certificate is up to date and has not expired   30s
Now finally update the IngressGateway we created earlier so that it uses the domain we have defined such as faas.o6s.io.
# gateway.yaml
cat > gateway.yaml <<EOF
apiVersion: networking.istio.io/v1alpha3
kind: Gateway
metadata:
  name: openfaas-gateway
  namespace: openfaas
spec:
  selector:
    istio: ingressgateway
  servers:
  - port:
      number: 443
      name: https
      protocol: HTTPS
    tls:
      mode: SIMPLE
      credentialName: ingress-cert
    hosts:
    - faas.o6s.io
EOF

kubectl apply -f gateway.yaml
At this point you can log into OpenFaaS via its public URL and access the nodeinfo function:
export OPENFAAS_URL="https://faas.o6s.io"
echo -n $PASSWORD | faas-cli login --username admin --password-stdin

Calling the OpenFaaS server to validate the credentials...

credentials saved for admin https://faas.o6s.io
Invoke the function:
curl -s -d "" $OPENFAAS_URL/function/nodeinfo

You can also see the certificate if you open your browser
Wrapping up
In a short period of time we were able to deploy Istio and OpenFaaS Pro on a local KinD cluster and see Envoy’s sidecar providing mutual TLS encryption. We then went on to explore the additional resource consumption added by using Istio, and finally showed you how to create a TLS certificate for external traffic using a free certificate from Let’s Encrypt.
Istio is feature-rich, with extensive documentation and examples.
I found the FAQ answered many questions I had whilst preparing this tutorial and recommend taking a read: Istio FAQ.
A good place to start exploring what is possible, would be the Task-based section of the documentation. For instance, you could look into more advanced policies for routing and traffic shifting or partial weighting using VirtualServices for individual functions.
You may also like the workshop we created to show how to do mutual TLS and traffic shifting with OpenFaaS and Linkerd.
Do you have questions, comments or suggestions?
- Find out more about Istio
- Browse the OpenFaaS documentation
Do you have questions, comments or suggestions? Tweet to @openfaas.
If you’d like to use Istio with OpenFaaS, you can find out about options for OpenFaaS Pro here.

Alex Ellis
Founder of @openfaas.