It was time to migrate our GitHub bot from Docker Swarm to faasd. Here’s how and why we did it including the Terraform we used that you can try out for yourself. There’s also some credit that you can use to try out the bare-metal from Equinix Metal cloud where we host Derek.
Introduction
The story of OpenFaaS goes back to 2016 when I was learning more about serverless functions. I cut my teeth on AWS Lambda by writing functions for different Alexa skills, but something didn’t feel right. I wanted to be able to run functions in containers on my own hardware and with Lambda that option just wasn’t available. I felt locked-in and restricted by the limits, zip files and general workflow of the platform.
What did I do about it? I went about creating a prototype that eventually became OpenFaaS. I knew that it needed to be open source and that community contributions were important, but I quickly found myself having to explain the same things over and over again.
That was the moment I realised I needed to create Derek. He has a human name so that he’s more relatable.

An example of Derek’s governance feature for the DCO
Derek is a GitHub bot written in Go and deployed to OpenFaaS as a function. He responds to webhooks from comments, pull requests and other actions and can delegate permissions to other users.
- He can validate the Developer Certificate of Origin (DCO) is present and correct
- He can allow a list of curators to add labels, close PRs, issues and assign reviewers using slash commands
- He can mark PRs as invalid if someone deletes the PR template or decides to send a PR with “(no description)”
- He can print out canned messages like
/msg: slackto print the URL to join your community or/msg: sponsorwhen you’ve gone the extra mile for a user and want to suggest that they support your work - He generates detailed release notes with each commit and PR so that everyone gets credit
A complete user-guide for Derek’s functionality is available here: Derek’s user-guide
Basically, he’s there to make my life easier and less repetitive. I also found that it deflected negative user responses away from me and towards Derek, and he has a thicker skin than I do, so everyone was a winner.
Derek started as a project to help me and the OpenFaaS community, but now other maintainers are using Derek and similar tools to help them too.
Huge fan of letting robots do repetitive tasks for me ❤️🤖 https://t.co/dRvpfrENZ0 https://t.co/aYjiOdExSp
— Ramiro Berrelleza (@rberrelleza) March 3, 2020
The Okteto team use Derek to create their release notes. Rather than having to integrate a GitHub Action to every one of your repositories, or run a language-specific tool like Goreleaser, Derek works on any public or private repository and every language.
Derek (@derekapp). He’ll do your release notes too.
— Richard Gee (@rgee0) May 12, 2021
If you want to customise the format, you can fork the code and tune to your liking. As we’ll see later on, Derek can run on a very modest VM with faasd and is easy to automate with Terraform.
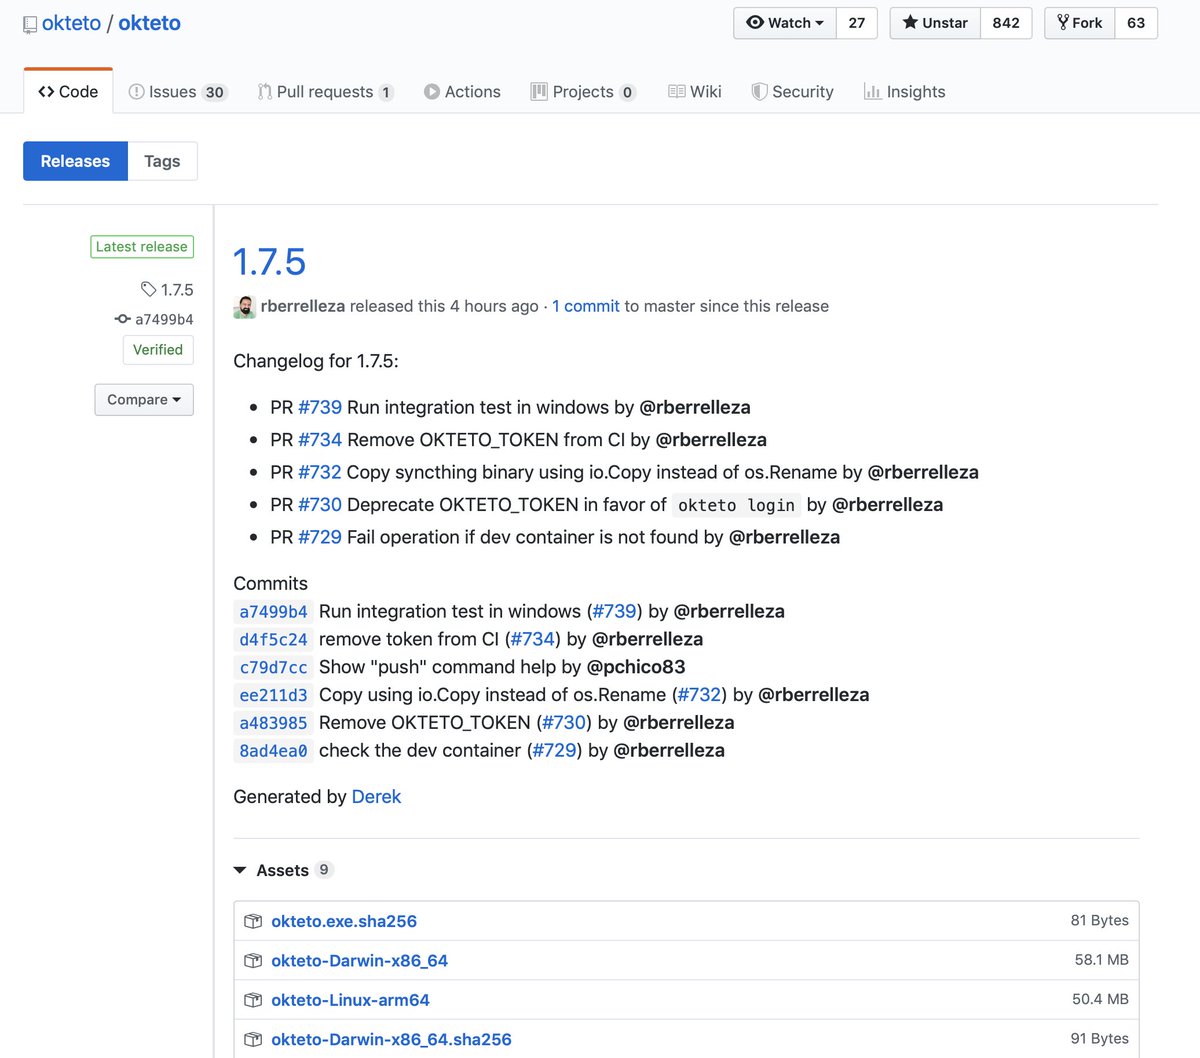
Okteto using Derek for their release notes and to credit their contributors
Over time Derek’s had contributions from various members of the OpenFaaS community and most of the regular contributors have had at least one pull request merged into his codebase. Derek works as a GitHub App, and these are notoriously difficult to set up, not because they are inherently complicated, but because they have so many moving parts - secrets, permissions, a public URL for the webhooks and so forth.
Why are we saying goodbye to Docker Swarm?
So I launched a managed service for Derek and offered it for free to the community. Since Derek dates back to 2016, Equinix Metal (then Packet) gave me a bare-metal server to run it on and I installed Docker Swarm there which was one of the supported platforms for OpenFaaS at the time.
Things change quickly in the industry, and I am sure that some people even consider containers and Docker to be a legacy technology at this point. Docker Swarm was Docker’s play for orchestrating containers over networks of Docker hosts. For various reasons, Google’s Kubernetes project became dominant and pushed out Docker Swarm and the other more established technologies like Apache Mesos.
I’m sure that there are still customers on Docker Swarm, and the fact that this week Derek was happily working way is probably a proof point for that. For the OpenFaaS project, which receives no funding or revenue from end-user companies, maintaining code to support Docker Swarm and Kubernetes created too much of an overhead. It was clear that our energies were better focused on where the industry was heading.
At the same time, individuals adopting Kubernetes struggled with the complexity and the sheer volume of additional services required to run hello-world. We’re probably talking of close to 30-40 containers to ship a REST API with a TLS endpoint. That’s where faasd comes into the picture. It uses the same low-level primitives as Kubernetes such as containerd and Container Networking Initiative (CNI), but has none of the extra clustering code. That makes it extremely cheap and simple to run a number of REST APIs or functions on a cheap VM or server.
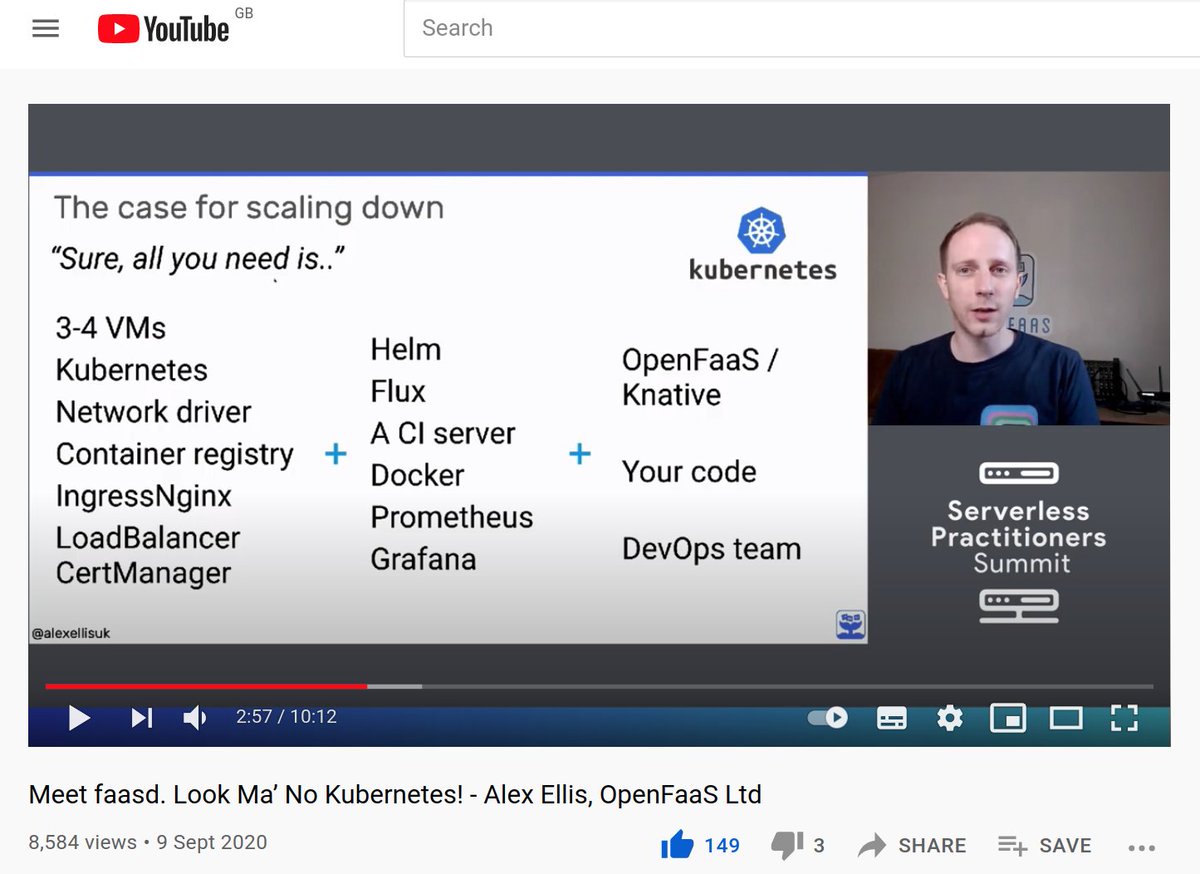
The case for scaling down from my talk at KubeCon
You can learn about faasd and how we were able to get it so much smaller and easier to use than OpenFaaS on Kubernetes.
Walk-through
I’ll now show you how to set up faasd on Equinix Metal’s bare-metal platform. If you’re a new customer you can get 200 USD of credit for free to kick the tires and see how it all works. faasd can also be deployed to any other developer cloud or a local VM using a tool like multipass.
Bootstrap faasd with terraform
We’re using Johan Siebens’ module for faasd and Equinix Metal. It abstracts and automates the installation of faasd using cloud-init and will return the URL and username/password for OpenFaaS after the machine is provisioned.
There is also an example for DigitalOcean in the faasd repository.
- Create an account on Equinix Metal, you’ll also create a project, so note down the project ID. Projects are the logical separation used on the platform and are required for API calls.
- Run
export PROJECT_ID="..."so that you can use it later on. - Create a Personal API key and save it
- Navigate to your project and create an SSH key at the project level, you can find your public key at
~/.ssh/id_rsa.pub - Install the
metalCLI with a package manager orarkade get metal, then runmetal init -
Install the Terraform CLI with a package manager or
arkade get terraform - Clone the Derek repository:
git clone https://github.com/alexellis/derek
cd derek/contrib/terraform-equinixmetal
You’ll find example.main.tfvars here along with several other terraform files that we need to edit in order to provision a server with faasd installed.
- Run
cp example.main.tfvars main.tfvarsto create your own version to work on. Now edit the configuration including your domain name and email address
auth_token   = "redacted" // your Equinix Personal API Key
project      = "redacted" // your Equinix Project name

name         = "derek"
#domain       = "derek.example.com"
#email        = "redacted@gmail.com"
metro        = "am"
plan         = "c3.small.x86"
ufw_enabled = true
The project field needs to be the name of the project as seen via the CLI or API, you can run metal project get to see a list of projects.
When I used to operate Derek on Docker Swarm, I used nginx and cert-bot to provide a reverse proxy, caching and a TLS certificate. With faasd we found it easier to use Caddy v2, so Johan’s automation script will set that up for us automatically, if we will out the domain and email fields.
I’ve picked the cheapest host c3.small.x86, but there are plans for developer pricing on the Equinix Metal roadmap. Follow them on Twitter if you want to keep up to date with news.
Then the metro field is equivalent to a region in other platforms. am stands for Amsterdam because I’m in Europe. You can use the metal CLI to view other metros:
$ metal metro get

+--------------------------------------+----------------+------+
|                  ID                  |      NAME      | CODE |
+--------------------------------------+----------------+------+
| 96a57b6d-c62c-41b5-ab8e-f8d63a7f9887 | Washington DC  | dc   |
| a04e45e4-4356-458c-b25a-b72cc54bdad1 | Atlanta        | at   |
| d50fd052-34ec-4977-a173-ad6f9266995d | Hong Kong      | hk   |
| 108b2cfb-246b-45e3-885a-bf3e82fce1a0 | Amsterdam      | am   |
....
....
Note: Do not commit this file to source control, it contains secrets that can be used to create bare-metal machines.
Equinix Metal have their own terraform provider, you can view the code here: equinix/terraform-provider-metal and the documentation is published here: Equinix Metal - Global, Automated Bare Metal Server Provider
- Now edit
main.tf:
terraform {
  required_providers {
    metal = {
      source = "equinix/metal"
    }
  }
}

# Configure the Equinix Metal Provider.
provider "metal" {
  auth_token = var.auth_token
}

data "metal_project" "project" {
  name = var.project
}

module "faasd" {
  source = "github.com/jsiebens/terraform-equinix-faasd"

  project_id = data.metal_project.project.id
  name       = var.name
  domain     = var.domain
  email      = var.email

  plan                = var.plan
  metro               = var.metro
  ufw_enabled         = var.ufw_enabled
  project_ssh_key_ids = []
}
By leaving project_ssh_key_ids empty, all available project-level SSH keys will be added to the host. You can look up the project-level SSH keys using this endpoint. I suggested to the team that they add this functionality to the metal CLI
-
Now run
terraform initso that the various modules can be downloaded -
Next, run
terraform plan -var-file=main.tfvars -
If everything looks good, run
terraform apply -var-file=main.tfvarsto create the bare-metal machine and have faasd provisioned on it. -
As soon as your machine is up and running, Caddy will attempt to resolve your DNS record so that it can obtain a TLS certificate from Let’s Encrypt
-
Whilst you’re waiting for the machine to be bootstrapped, look up the IP address that you’ve been allocated via the UI dashboard.
-
Use the public IP address to create a DNS A record on your domain i.e.
derek.example.comorfaasd.example.comand enter the IP you saw from the command above
Exploring the system
At this point you should have the following printed out: the domain name and gateway URL for OpenFaaS, the username and the password. The TLS certificate for the domain should be valid too.
Use the command given to you to log in with the faas-cli, if you don’t have it yet, you can download it with arkade get faas-cli or using the instructions in the docs
You’ll get an output like the following:
Outputs:

basic_auth_password = <sensitive>
summary = <<EOT

Your faasd instance "derek is ready.

    IP Address: 147.75.33.105

To continue, use the IP address above create a DNS A record for your domain ""
Give Caddy a moment to get a certificate and when ready, the faasd gateway is available at:

    http:/147.75.33.105:8080

Authenticate with faas-cli:

    export PWD=$(terraform output -raw basic_auth_password)
    export OPENFAAS_URL=http:/147.75.33.105:8080
    echo $PWD | faas-cli login -u admin --password-stdin

EOT
If you want to open the OpenFaaS UI in a web-browser, you can do so by running echo $(terraform output -raw basic_auth_password).
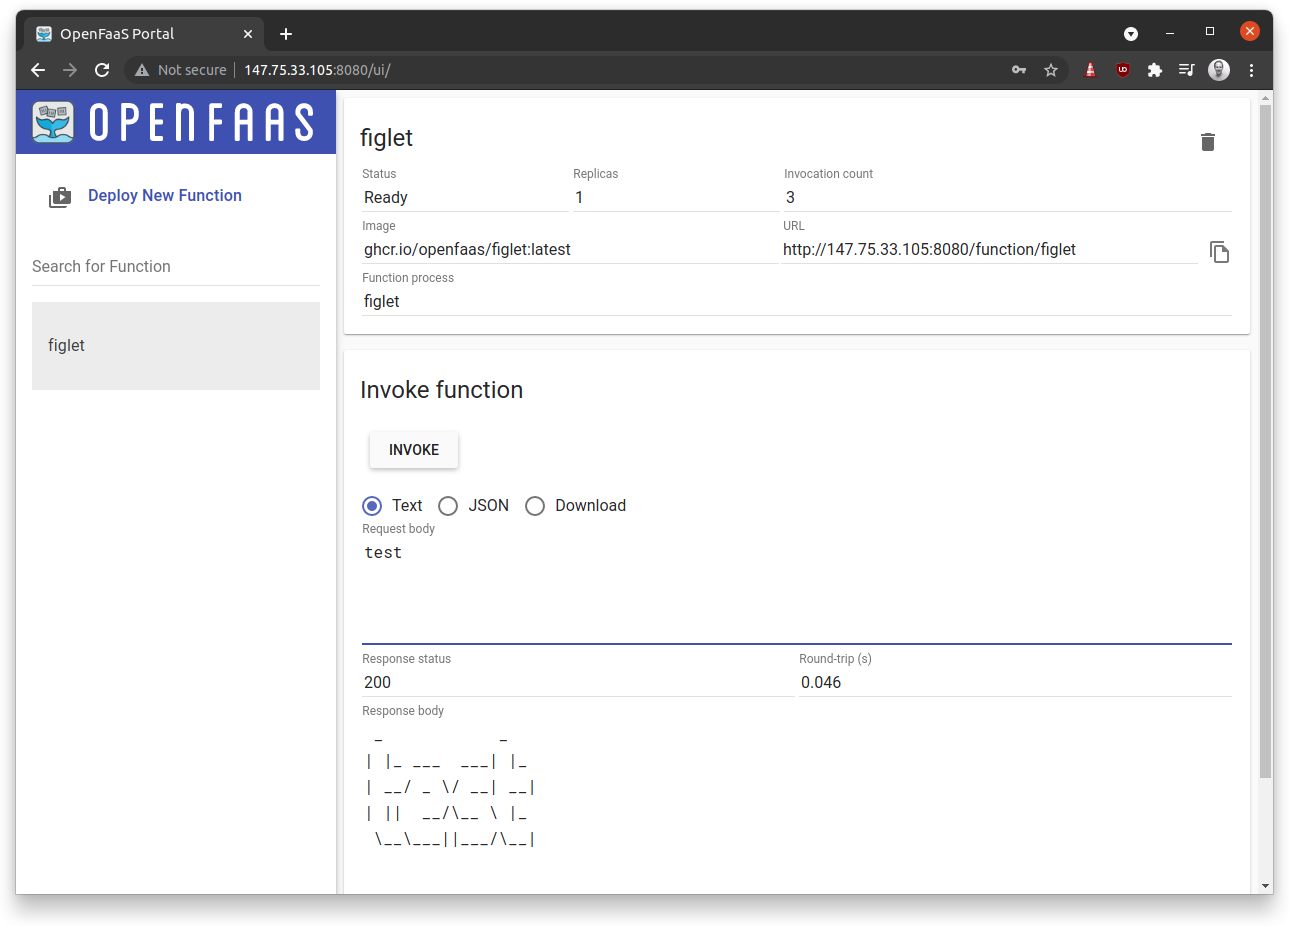
faasd accessed via the OpenFaaS UI with the figlet function
In this test-run, I removed the Let’s Encrypt integration so you can just see an IP address. For the real migration I updated this and so my URL was something more like: https://derek.example.com.
Deploying Derek
Fortunately, each OpenFaaS provider, whether that was the deprecated provider for Docker Swarm, the new one for Kubernetes, or faasd itself are all compatible with each other, despite the underlying orchestrator being very different.
This is due to using a “provider model” whereby each provider for OpenFaaS is a REST API that conforms to a number of specific HTTP endpoints. You can find out more about the provider model:
There’s also a certification tool to prove that each provider is compliant with the interface: openfaas/certifier.
So deploying Derek was simply a case of creating the two required secrets: a private key for the GitHub App integration and a shared webhook secret from GitHub. Then cloning the Derek repo, and running: faas-cli deploy.
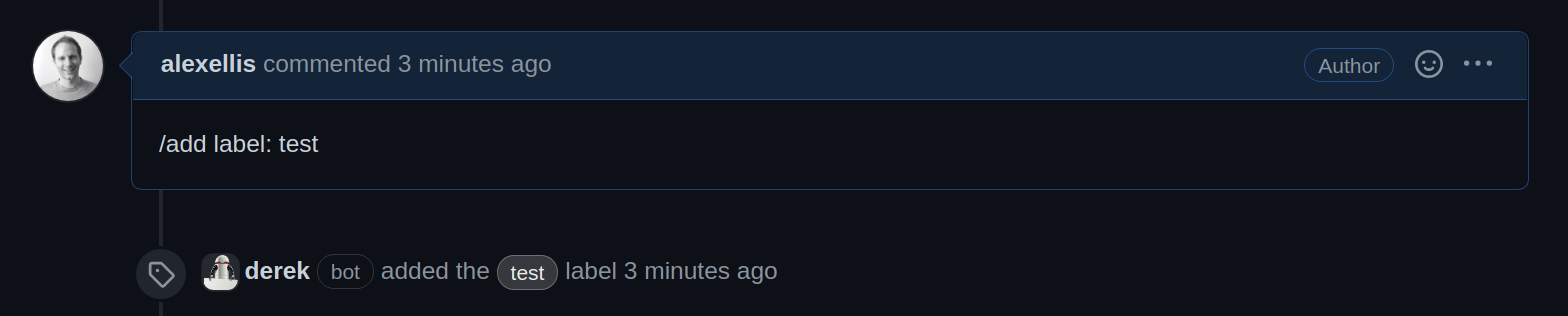
Adding a label to an issue with a slash-command
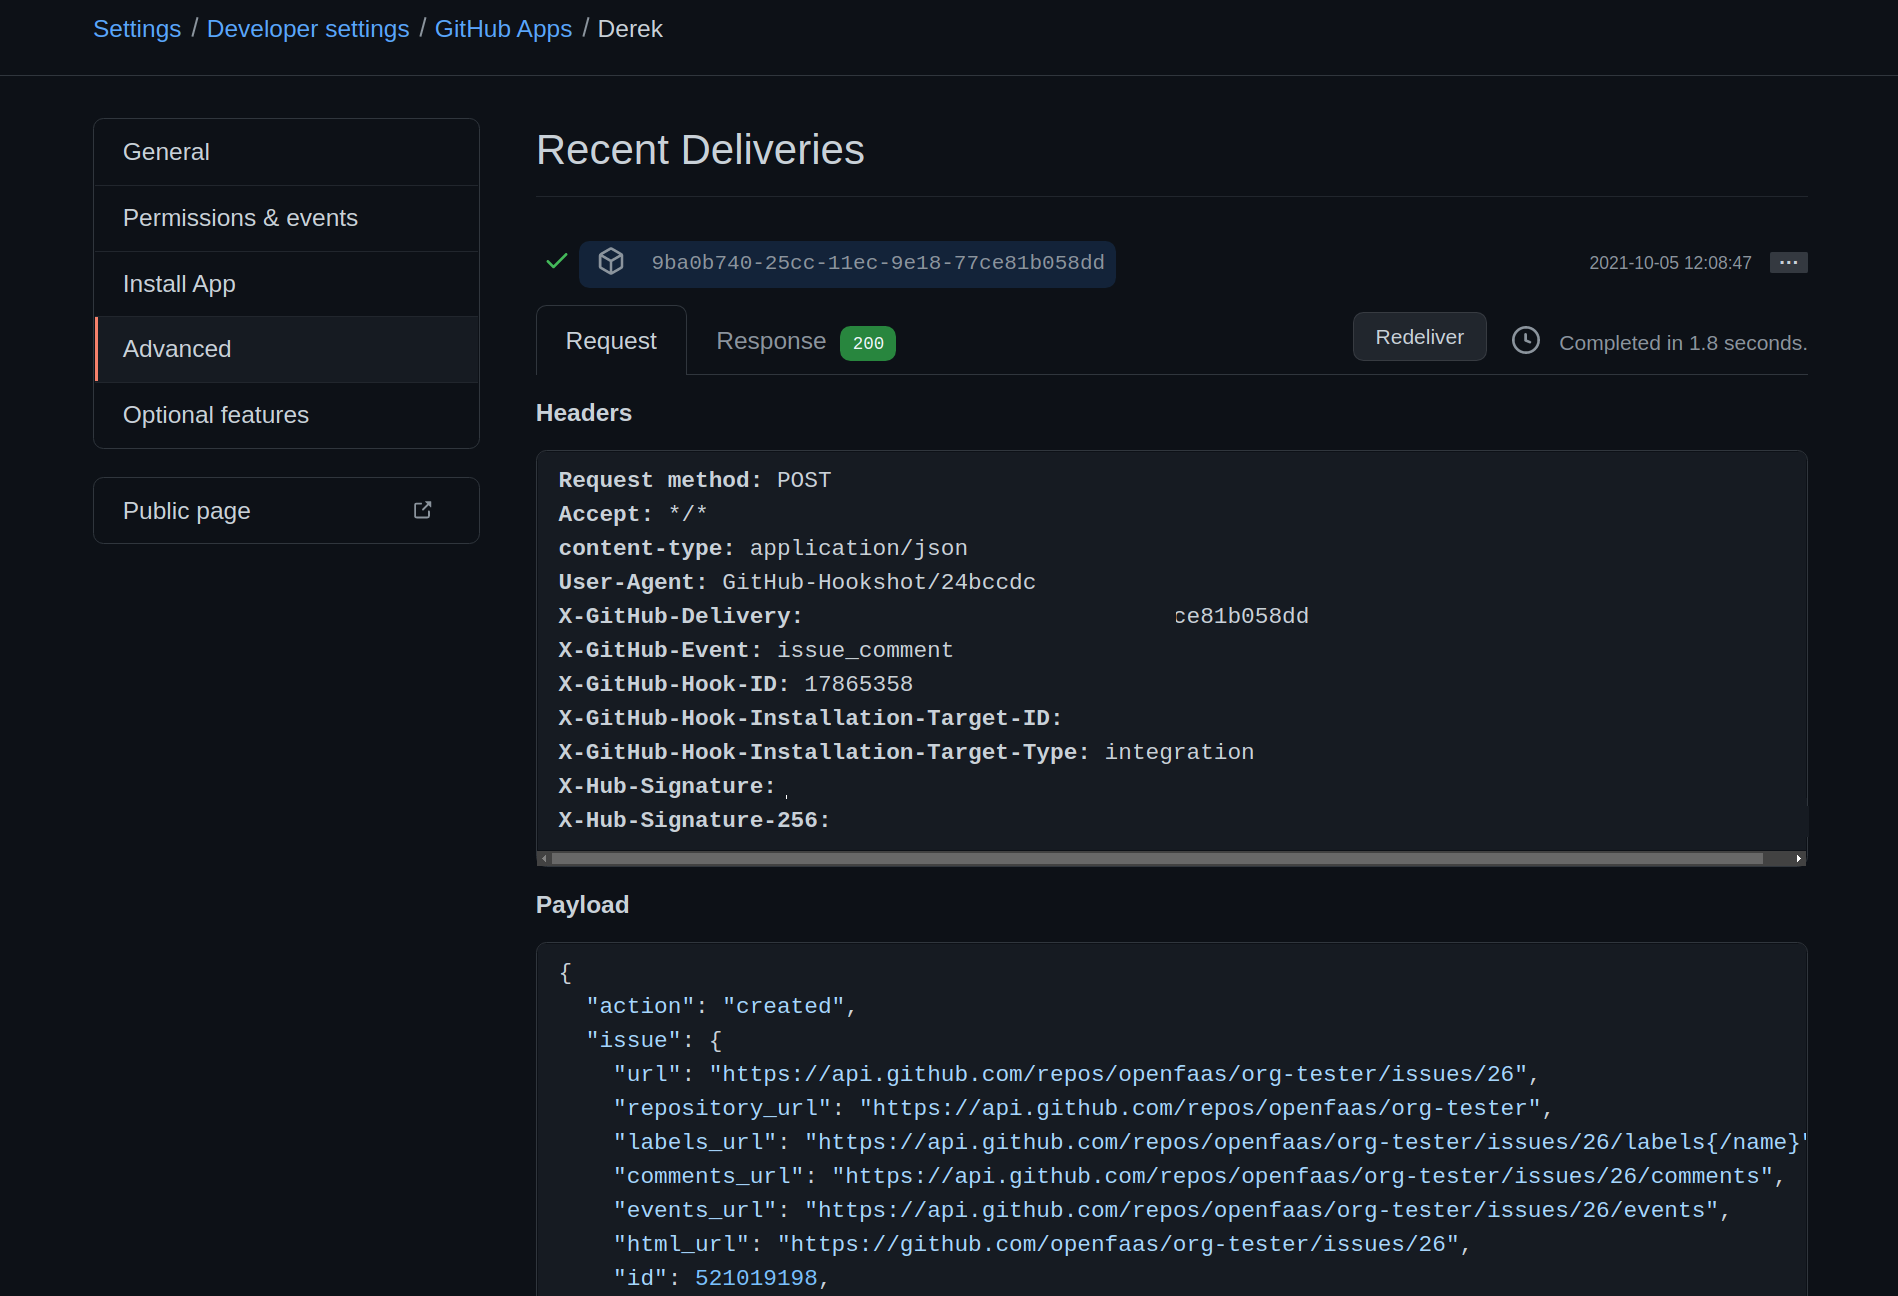
Derek’s first response after the migration
Did you know? There is also a Work In Progress (WIP) terraform provider for the OpenFaaS REST API.
The final step for moving over was to update the GitHub App so that it sent its webhooks to the new domain name.
If you ran the example and want to remove the resources allocated by terraform, you can run terraform destroy -var-file=main.tfvars.
Taking it further
The new #k3sup sticker and #arkade - @derekapp gains his own magnet.
— Alex Ellis (@alexellisuk) August 20, 2020
What should i do with them? pic.twitter.com/EGaIT8L1wj
You can try out Derek on your repos by becoming a sponsor for OpenFaaS, then sending a Pull Request to add your organisation or repository to the “CUSTOMERS” file.
A complete user-guide for Derek’s functionality is available here: Derek’s user-guide
GitHub Apps provide a much more granular (secure) way to integrate with GitHub than using personal access tokens. So even if you are not planning on deploying or trying out Derek, we have a guide on how you can write your own GitHub bots with OpenFaaS: How to integrate with GitHub the right way with GitHub Apps.
Derek is Open Source and there’s been 30 people who’ve contributed so far. That means that you can also help to improve the project either to learn more about GitHub and bots, or for your own use. Pull requests are also accepted, but please raise an issue first to discuss and propose any ideas or improvements that you have in mind. The contributing guide is deliberately short and sweet.
New customers can kick the tires with bare-metal hosts from Equinix Metal by using code: johngage for 200 USD of credit.
Taking it further
You may also like “The Internet is my computer” where I show you how to deploy a cloud IDE to Equinix Metal that you can access from anywhere, with more RAM than you’re ever likely to need.
A cloud IDE launched with VSCode on Equinix Metal.
Use your credit to provision a HA, multi-master Kubernetes cluster using Terraform and K3s: Bare-metal Kubernetes with K3s -
Disclosure: Equinix Metal is a client of OpenFaaS Ltd and sponsors the compute and bandwidth for the hosted Derek service.

Alex Ellis
Founder of @openfaas.