In this guide we’ll show you how to setup and configure K3s for production use with Akamai Cloud Computing. Then we’ll set up OpenFaaS so that we can deploy functions to the cluster.
Did you know? Linode was acquired by Akamai, and is now being branded as “Akamai Cloud Computing”. The rebranding is still in-progress, so we’ll be referring to Linode throughout this article.
K3s is a production-ready distribution of Kubernetes that was originally developed by Darren Shepherd at Rancher Labs, before donating it to the Cloud Native Computing Foundation (CNCF). It’s become one of the most popular ways to run Kubernetes on-premises, at the edge, and on IoT devices. So why would you run it on Linode when Linode already offers its own Linode Kubernetes Engine (LKE)?
Both K3s and LKE can be used on Linode to run Kubernetes, but they have different use-cases. LKE is a managed service, so Linode is responsible for maintaining the control plane and upgrading it for you. K3s is a lightweight distribution of Kubernetes that is designed to be easy to install and maintain, and is ideal for running on smaller hosts. Using K3s also means that whatever we setup on Linode, can be set up on-premises or even in our homelab too.
OpenFaaS is one of the earliest Functions As a Service (FaaS) frameworks for Kubernetes, is listed on the CNCF Landscape, and has many open source and commercial adopters running in production.
When you write a function, you focus on a HTTP handler, rather than on boiler-plate coding. You tend to get functions triggered by event sources like Cron, HTTPS requests, asynchronous queues and messages buses like Apache Kafka or RabbitMQ.
A quick example function in Python, which reads all rows from a Postgresql users table:
import psycopg2

def handle(event, context):
    password = get_secret("db_password")
    try:
        conn = psycopg2.connect("dbname='main' user='postgres' port=5432 host='192.168.1.35' password='{}'".format(password))
    except Exception as e:
        print("DB error {}".format(e))
        return {
            "statusCode": 500,
            "body": e
        }

    cur = conn.cursor()
    cur.execute("""SELECT * from users;""")
    rows = cur.fetchall()

    return {
        "statusCode": 200,
        "body": rows
    }
Here’s what people tend to value in OpenFaaS over a hosted functions service:
- Portability - it can be installed on any cloud where there is a managed Kubernetes service, or into VMs or on bare-metal using K3s, as well as on-premises
- Developer experience - you can write functions in any language, and they build into container images, meaning you get the same experience on your laptop as in production
- Ecosystem - there are dozens of language templates, and you can write your own too, so long as it works in Docker, it’s fair game. You’ll also find plenty of sample functions in the Function Store
- REST API - the REST API is a first-class citizen, and you can use it to deploy functions, invoke them, and even to get metrics and logs
- Predictable costs - whether you’re using an open source version or a commercial version, the cost per month is exactly the same and doesn’t increase with usage, in these times that’s a big deal for CFOs and budget holders
Finally, we often hear that teams can both get into production with OpenFaaS in a very short period of time (days) and that they often save costs. In one case, a US-based satellite company saved 180k USD over three years after switching away from AWS Lambda.
You can find a list of companies and their use-cases in the ADOPTERS file, however this is only a very small sub-set of users.
Disclosure: at the time of writing, Linode sponsors the OpenFaaS homepage and provides credits for testing the OpenFaaS project. This article was commissioned by Linode/Akamai.
New customers can get free credit with Linode to try out this tutorial.
The 10,000 ft overview
There are many knobs and dials to configure Kubernetes or K3s for production. We won’t be covering each and every option, because each team’s requirements will vary so much. Instead we’ll focus on creating a High Availability (HA) cluster, secure Ingress with TLS encryption, and then we’ll deploy OpenFaaS to it.
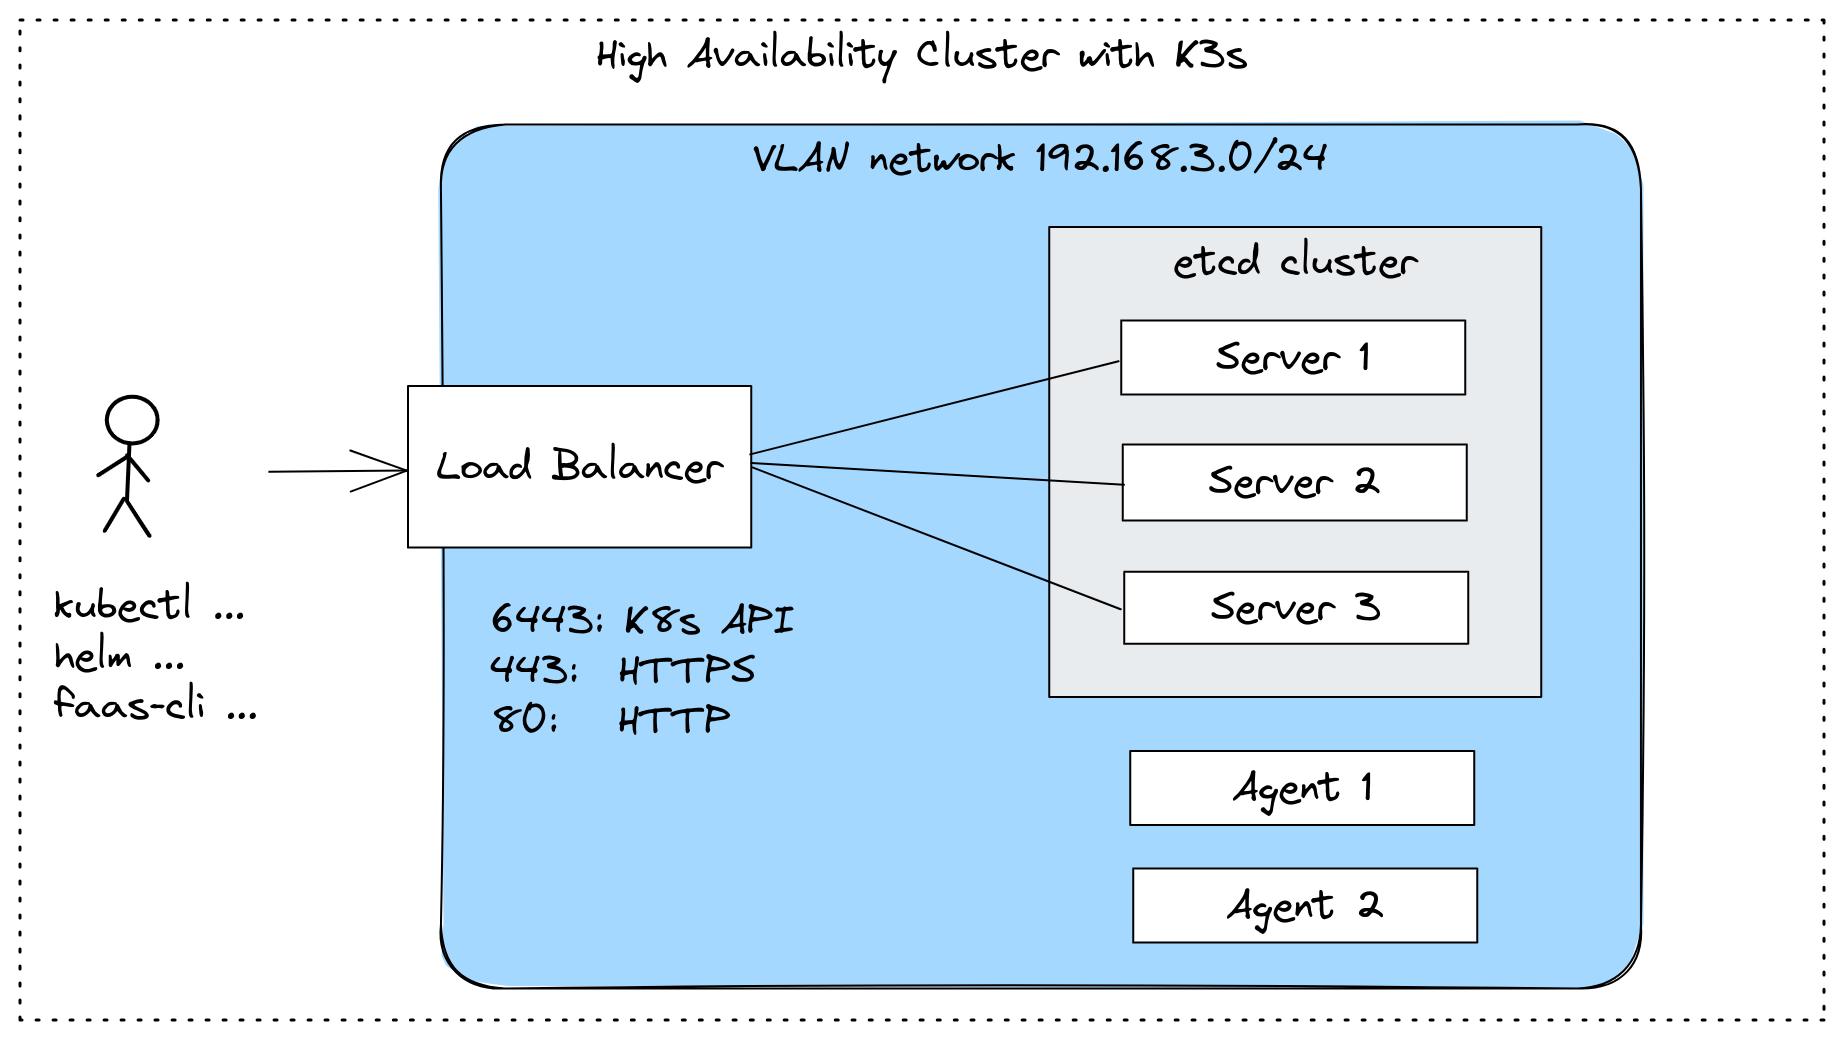
Highly Available K3s cluster, with a Load Balancer
For a HA control-plane, K3s supports using a database or an embedded etcd cluster.
We’ll go through the following steps:
- Create a HA K3s cluster with K3sup - using the etcd option
- Join additional worker nodes to the cluster
- Install an Ingress Controller and configure TLS encryption
- Install OpenFaaS and deploy a function
- Access the function via a HTTPS URL
From there it’s up to you to decide which parts you may want to automate with a GitOps or IaaC tool such as Flux for the Helm charts, or Terraform for the VMs themselves.
Before we get started, I’d advise using my arkade tool to download all the various CLIs that we’re going to need.
curl -sLS https://get.arkade.dev | sh
Follow the command to move arkade to /usr/local/bin/ using sudo.
Then:
arkade get \
  terraform \
  faas-cli \
  kubectl \
  helm
arkade is a time-saver for both downloading developer tools, but also for installing Helm charts, which we will see in the later steps, when we’ll run commands like arkade install cert-manager. If you look carefully at the output, you’ll see that it’s a wrapper for the Helm command itself.
See also: Use Terraform to Provision Infrastructure on Linode
Create the VMs
On Linode, VMs are called “Linodes”, but we will be referring to them as VMs to avoid ambiguity.
We will need to configure both private and public networking for the VMs, so that K3s itself doesn’t send all of its control-plane traffic over the public internet. I didn’t do this with my initial testing and saw over 250GB of traffic between the three VMs over the course of a week. This is normal for Kubernetes, but it needs to run over a private network which is free and unmetered.
I didn’t realise this initially, but if you use a private IP address for your VMs on Linode, they end up being exposed to every other VM in that region, but hidden from the Internet. So what we actually want is a VLAN, along with a private IP address, that way they’re private within our own account.
Linode VLANs operate at Layer 2 of the OSI model, and you can have up to 10 of them per region. Each VM can belong to a maximum of three separate VLANs.
The Terraform to create the VMs is rather verbose and complicated, however here’s the gist of it:
- Create N server VMs with a tag of “k3s-server” using the
g6-dedicated-2plan for 2x dedicated vCPUs and 4GB RAM - Attach them each to a VLAN and the public Internet
- Create a NodeBalancer to load-balance the Kubernetes API server on port 6443 for VMs tagged as “k3s-server”
- Collect and print out their VLAN and public IP addresses
The complete Terraform script is available here: alexellis/k3s-linode
See also:
You can find more detailed documentation on Linode’s interface configuration here: Guides - Create a Private Network with VLANs Using Linode’s API
You’ll also want to create a main.tfvars file with the token created from within the Linode dashboard:
api_token = "xyz"
It doesn’t seem possible to create a VLAN via Terraform, so you’ll need to create an instance, attach a VLAN, and then delete the instance. The VLAN will remain, and can then be referenced by Terraform. If the Linode team is listening, it’d be nice to have an API or CLI command for this in the future.
“VLANs can be configured when creating new instances or by modifying the network interfaces on the Configuration Profile of an existing instance” (source)
To create the VMs, run:
terraform apply -var-file ./main.tfvars
You’ll get the server IPs printed out as follows - bear in mind that the values may not be ordered alphabetically, so pay extra attention when copying and pasting values.
Outputs:

nodebalancer = "139.144.247.125"
servers = {
  "48521666" = {
    "label" = "k3s-server-3"
    "public_ip" = "139.162.250.98"
    "vlan_ip" = "192.168.3.3"
  }
  "48521667" = {
    "label" = "k3s-server-2"
    "public_ip" = "176.58.106.122"
    "vlan_ip" = "192.168.3.2"
  }
  "48521668" = {
    "label" = "k3s-server-1"
    "public_ip" = "176.58.106.241"
    "vlan_ip" = "192.168.3.1"
  }
}
Now that you have the IP addresses for the VMs, you can build the k3sup commands to perform the installation.
Setup Kubernetes using K3sup
K3sup is an open-source tool I wrote to install K3s over SSH, it makes managing all the configuration much simpler, and within a very short period of time, you can have a HA cluster up and running, with a Load Balancer providing a stable IP address for accessing the cluster via kubectl.
With k3sup, there is no need to log into your VMs, or to run any commands on them. K3sup does everything, including fetching a kubeconfig file and merging it into your existing one, so that you can access the cluster with kubectl.

Example installation of K3s with K3sup
Setup the first server:
export CHANNEL="latest"
export USER=root

export TLS_SAN="139.144.247.125"

export SERVER_IP="176.58.106.241"
export SERVER_VLAN_IP="192.168.3.1"

k3sup install \
    --cluster \
    --ip $SERVER_IP \
    --user $USER \
    --k3s-channel $CHANNEL \
    --merge \
    --local-path $HOME/.kube/config \
    --context k3s-openfaas \
    --k3s-extra-args "--node-ip $SERVER_VLAN_IP --node-external-ip $SERVER_IP --flannel-iface eth1 --disable=traefik" \
    --tls-san $TLS_SAN
We specify additional arguments for the kubelet including:
- Node IP for internal traffic (goes over eth1, the VLAN adapter)
- Node External IP for external traffic (goes over eth0, the public adapter)
- Flannel interface for the private network, which is eth1 because it was the second item in our terraform script
- Sets the TLS SAN record to the NodeBalancer instead of this server for kubectl access.
This creates your KUBECONFIG and merges the cluster under a new context name:
kubectx k3s-openfaas
If you get anything wrong, log in with SSH and remove k3s using sudo /usr/local/bin/k3s-uninstall.sh. You shouldn’t need to reboot, but it may help if things are not working as expected.
Running sudo systemctl cat k3s is also useful for checking that the server IP and node local IP addresses are set correctly.
Confirm that the INTERNAL-IP and EXTERNAL-IP fields are populated with the VLAN IP and Public IP respectively:
kubectl get node -o wide
NAME           STATUS   ROLES                       AGE   VERSION        INTERNAL-IP   EXTERNAL-IP      OS-IMAGE             KERNEL-VERSION      CONTAINER-RUNTIME
k3s-server-1   Ready    control-plane,etcd,master   6s    v1.27.4+k3s1   192.168.3.1     176.58.106.241   Ubuntu 22.04.2 LTS   5.15.0-73-generic   containerd://1.7.1-k3s1
Then install the second server:
export EXTRA_SERVER_IP="176.58.106.122"
export EXTRA_SERVER_VLAN_IP="192.168.3.2"

k3sup join \
    --server \
    --server-ip $SERVER_IP \
    --ip $EXTRA_SERVER_IP \
    --user $USER \
    --k3s-channel $CHANNEL \
    --k3s-extra-args "--node-ip $EXTRA_SERVER_VLAN_IP --node-external-ip $EXTRA_SERVER_IP --flannel-iface eth1 --disable=traefik" \
    --tls-san $TLS_SAN
Verify that the server was added as expected with: kubectl get node -o wide --watch.
Confirm that the IP addresses are correct and that the second server is in a Ready status:
kubectl get node -o wide
NAME           STATUS   ROLES                       AGE     VERSION        INTERNAL-IP   EXTERNAL-IP      OS-IMAGE             KERNEL-VERSION      CONTAINER-RUNTIME
k3s-server-1   Ready    control-plane,etcd,master   6m57s   v1.27.4+k3s1   192.168.3.1     176.58.106.241   Ubuntu 22.04.2 LTS   5.15.0-73-generic   containerd://1.7.1-k3s1
k3s-server-2   Ready    control-plane,etcd,master   10s     v1.27.4+k3s1   192.168.3.2     176.58.106.122    Ubuntu 22.04.2 LTS   5.15.0-73-generic   containerd://1.7.1-k3s1
Now, finally add the third server:
export EXTRA_SERVER_IP="139.162.250.98"
export EXTRA_SERVER_VLAN_IP="192.168.3.3"

k3sup join \
    --server \
    --server-ip $SERVER_IP \
    --ip $EXTRA_SERVER_IP \
    --user $USER \
    --k3s-channel $CHANNEL \
    --k3s-extra-args "--node-ip $EXTRA_SERVER_VLAN_IP --node-external-ip $EXTRA_SERVER_IP --flannel-iface eth1 --disable=traefik" \
    --tls-san $TLS_SAN
As before, verify that the third server has been added.
Add some agents (optional step)
With K3s, the costs can be kept quite low because the servers running the control-plane can also run user workloads. However, if you expect very heavy use or I/O intensive applications, then you could also add some agents to the cluster.
This exercise is left for the reader, you could either duplicate the terraform, and replace the word “server” for “agent”, or adapt it so that you input the number of servers and the number of agents separately. Another option is to create an agent via the Linode CLI or UI.
Once your VM is created, use the server IP of any of the three machines under the --server-ip flag. After it joins the cluster, K3s will tell it about the other server IPs in the case that one of them goes down.
export SERVER_IP="176.58.106.241"

export AGENT_IP="109.74.199.152"
export AGENT_VLAN_IP="192.168.3.4"
export USER=root
export CHANNEL="latest"

k3sup join \
    --server-ip $SERVER_IP \
    --ip $AGENT_IP \
    --user $USER \
    --k3s-channel $CHANNEL \
    --k3s-extra-args "--node-ip $AGENT_VLAN_IP --node-external-ip $AGENT_IP --flannel-iface eth1"
The agent will show up on the output from kubectl get node:
kubectl get node

NAME           STATUS   ROLES                       AGE   VERSION
k3s-agent-1    Ready    <none>                      18s   v1.27.4+k3s1
k3s-server-1   Ready    control-plane,etcd,master   8d    v1.27.4+k3s1
k3s-server-2   Ready    control-plane,etcd,master   8d    v1.27.4+k3s1
k3s-server-3   Ready    control-plane,etcd,master   8d    v1.27.4+k3s1
Install the control plane
In this section we’ll install the control-plane components, and OpenFaaS.
Then we’ll deploy a function in the following section.
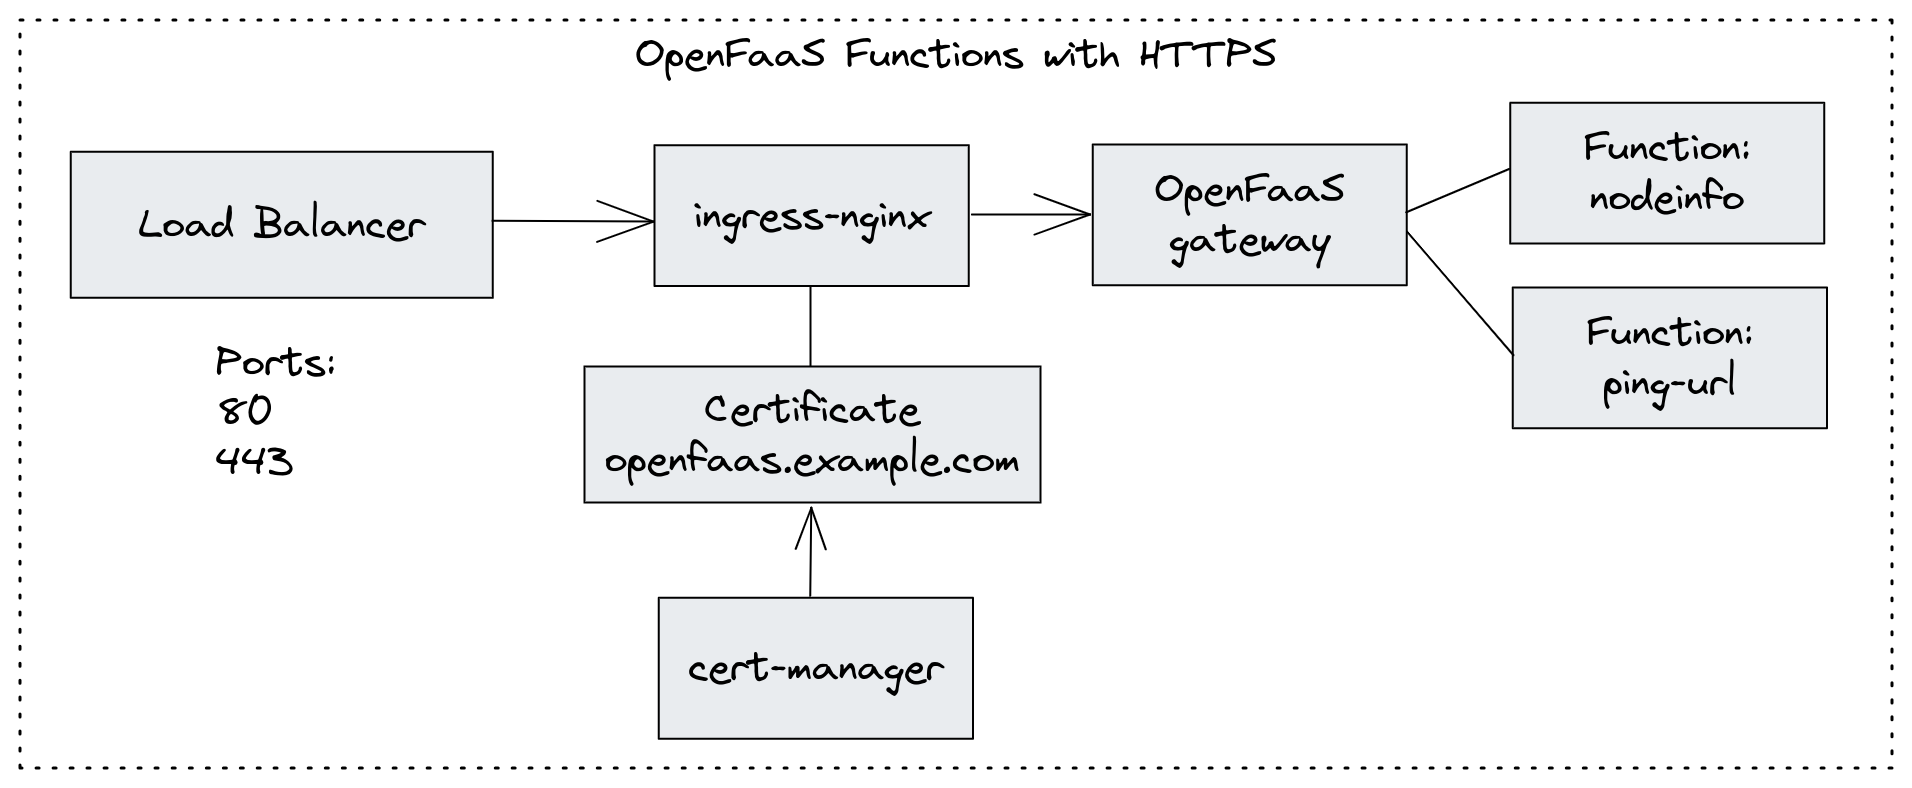
Conceptual architecture for OpenFaaS control-plane
OpenFaaS will deploy several other components that are not pictured above:
- Prometheus - for autoscaling and metrics collection
- NATS - for asynchronous invocations, the commercial version includes an upgrade to NATS JetStream
- Alertmanager - to trigger autoscaling, only in Community Edition, the commercial version includes a more sophisticated autoscaler and scale to zero
Setup Ingress
We’ll use ingress-nginx for our Ingress Controller and cert-manager to obtain and renew Let’s Encrypt TLS certificates for our Ingress Controller. This will allow us to access our functions over HTTPS, along with anything else we may want to deploy to the cluster.
arkade install ingress-nginx
Follow this up with:
arkade install cert-manager
This is an important step, and due to the way that cert-manager does its self-checks for ACME HTTP01 challenges.
Edit the service for Ingress Nginx, then add the following to the spec:
kubectl edit svc/ingress-nginx-controller
spec:
+  externalIPs:
+  - 139.144.247.125
Replace 139.144.247.125 with the IP address of the NodeBalancer.
cert-manager will be used in the next stage to obtain a TLS certificate for the OpenFaaS Gateway and UI.
Install OpenFaaS
Next install OpenFaaS with either the Community Edition (CE) or one of the versions designed for production and commercial use: OpenFaaS Standard or OpenFaaS for Enterprises.
For commercial versions of OpenFaaS, we recommend installing via the OpenFaaS Helm chart, and keeping a copy of your values.yaml file safe for future upgrades.
OpenFaaS CE can also be installed very quickly with the arkade tool. arkade is a wrapper for the Helm chart which reduces all the steps down to a single command:
arkade install openfaas
Now, create a DNS A record for the NodeBalancer’s IP address i.e. openfaas.example.com.
Next, you can create a TLS record for the OpenFaaS Gateway and UI:
export DOMAIN=example.com

arkade install openfaas-ingress \
    --email webmaster@$DOMAIN \
    --domain openfaas.$DOMAIN
If you want to create Kubernetes YAML files for the Ingress, instead of using arkade, then see these instructions: [TLS for OpenFaaS]((https://docs.openfaas.com/reference/tls-openfaas/).
You can now run arkade info openfaas to get the instructions to log in with the CLI and to how to get the password to access the UI.
Instead of using the suggested port-forwarding, you’ll be able to use your TLS-enabled URL to access the UI and CLI.
echo Access the UI at: https://openfaas.$DOMAIN
echo Login in with:
PASSWORD=$(kubectl get secret -n openfaas basic-auth -o jsonpath="{.data.basic-auth-password}" | base64 --decode; echo)
echo $PASSWORD | faas-cli login --password-stdin --gateway https://openfaas.$DOMAIN
Check it worked by deploying the nodeinfo function from the store:
export OPENFAAS_URL=https://openfaas.example.com

faas-cli store deploy nodeinfo

faas-cli describe nodeinfo

echo | faas-cli invoke nodeinfo
You should see the invocation count increase when running the following:
faas-cli list

Function                        Invocations     Replicas
nodeinfo                        1               1
Create a custom function with Python
The aim of this tutorial is to focus on the infrastructure, however since it’s relatively quick, we’ll also create a custom Python function and deploy it to the cluster.
Every function will be built into a container image and published into a container registry, then when it’s deployed a fully qualified image reference is sent as to the Kubernetes node. Kubernetes will then pull down that image and start a Pod from it for the function.
In production, you’re going to need to use a private registry, or a public registry with authentication enabled.
Follow the steps here to set it up: Configure a private registry
Next, pull down the Python HTTP templates from the store:
faas-cli template store pull python3-http
Create a new function, then rename its YAML file to stack.yaml, we do this so we don’t need to specify the name using --yaml or -f on every command. A stack.yaml file can contain multiple functions, but we’ll only be using one right now.
See also: stack.yaml reference
# Change this line to your own registry:
export OPENFAAS_PREFIX="docker.io/alexellis2"

faas-cli new --lang python3-http \
  ping-url
We’ll use the requests library to make a HTTP request to any passed in URL to the function.
Edit ping-url/requirements.txt and add the following line:
requests
Next, edit ping-url/handler.py and replace the contents with the following:
import requests
import sys

def handle(event, context):

    url = event.body.decode("utf-8")
    if not url:
      return {
        "statusCode": 400,
        "body": "Please provide a URL to ping"
      }

    body = ""
    statusCode = 200

    try:
      res = requests.get(url)
      body = res.text
    except Exception as e:
      sys.stderr.write("Error reaching remote server {}".format(str(e)))
      sys.stderr.flush()
      return {
        "statusCode": 500,
        "body": "Error: " + str(e)
      }

    return {
        "statusCode": 200,
        "headers": {
          "Content-Type": "application/json",
          },
        "body": {
          "remoteBody": body,
          "remoteStatusCode": statusCode,
        }
    }
Run the following to test on your own machine:
faas-cli local-run
This is a convenient way to test functions without deploying them into the cluster, any secrets that you add to a function should be written into a .secrets folder, and most other things will work, apart from if you are connecting to services within the remote cluster itself. When using this mode, trim off the “/function/” prefix that is used to invoke OpenFaaS functions.
Or you can deploy it straight to the Kubernetes cluster using faas-cli:
faas-cli up
Then, invoke the function when ready.
Every time I change the function, I like to have a new image tag, to make sure Kubernetes will definitely update the function. You can do this by editing the image field in the YAML file, or by using the --tag digest command. If you’re making a git commit between each change, you can also use --tag sha to replace the tag with the commit SHA.
Here’s an example of the image name for --tag digest: docker.io/alexellis2/ping-url:d5f20526c2685e92bad718f54a74f338
We can access any website such as Wikipedia:
$ curl -i -s https://openfaas.example.com/function/ping-url -d "https://wikipedia.org"|head -c 500

HTTP/1.1 200 OK
Content-Length: 97541
Content-Type: application/json
Date: Fri, 18 Aug 2023 09:51:41 GMT
Server: waitress
X-Duration-Seconds: 0.226038

{"remoteBody":"<!DOCTYPE html>\n<html lang=\"en\" class=\"no-js\">\n<head>\n<meta charset=\"utf-8\">\n<title>Wikipedia</title>\n<meta name=\"description\" content=\"Wikipedia is a free online encyclopedia, created and edited by volunteers around the world and hosted by the Wikimedia Foundation.\">\n<script>\ndocument.documentElement.classN
Or, we can even access the built-in health check of the function itself:
$ curl -i https://openfaas.example.com/function/ping-url -d "http://127.0.0.1:8080/_/health"

HTTP/1.1 200 OK
Content-Length: 43
Content-Type: application/json
Date: Fri, 18 Aug 2023 09:49:25 GMT
Server: waitress
X-Duration-Seconds: 0.002562

{"remoteBody":"OK","remoteStatusCode":200}
This template uses Flask under the hood for efficiency, and you can get more instructions on how to use a database and so forth in its repository: openfaas/python-flask-template
You can find out how many invocations the function has had by running faas-cli list, or faas-cli describe ping-url.
There’s also a Grafana dashboard available for the Community Edition, and 4 extra ones available for OpenFaaS Standard and For Enterprises. We find this essential for finding out whether there are any issues with CPU/memory usage, running for too long, or any errors that are occurring.

Dashboard for OpenFaaS Standard
See also: OpenFaaS Grafana dashboards
Further reading and training for OpenFaaS
I have written two eBooks that cover writing functions for OpenFaaS, one specialises in Node.js / JavaScript and is called Serverless For Everyone Else, and the second uses primarily Golang (Go) and is called “Everyday Golang”. You can buy either or both in the OpenFaaS Store and GitHub sponsors on certain tiers get a 20% discount on them.
Wrapping up
In a relatively short period of time, we built a production-grade K3s cluster, with a High Availability control-plane, and an IP address that would balance traffic between each of the three servers. We then installed an Ingress Controller and obtained a TLS certificate for it, before finally installing OpenFaaS and deploying a custom function.
If you want to trigger a function on a timed basis, such as with Cron, you should check out the cron-connector, which is covered in detail in my eBook Serverless For Everyone Else.
As further work for the reader, you could adapt the Terraform script to also create a number of workers, or agents as K3s calls them. Do this either by adding a new section or by making a copy of the file, and replacing the word “server” with “agent”.
Today we only scratched the surface, there are many different event triggers, language templates and ways to run functions - both synchronously, or out of band in a queue with the highly parallelised async mode.
It’s also worth noting that if you plan on serving traffic in a bursty fashion, where there may be millions of requests per minute, followed by periods of almost no traffic, then Linode’s LKE service may be a better fit than K3s, because it’s possible to scale the amount of VMs automatically which make up the cluster. More nodes, means more capacity to serve traffic.
New Linode customers can get free credit to try out this tutorial with K3s or LKE.
Learn more:

Alex Ellis
Founder of @openfaas.