Flux is now in maintenance mode, learn how to upgrade to Flux v2 and keep OpenFaaS up to date
In this tutorial we’ll create a Kubernetes cluster, install Flux V2, link it to our GitHub Account and deploy OpenFaaS along with a number of functions using a GitOps approach. I’ll also touch on further areas to explore like how to keep functions updated with the Image reflector and automation controllers.
What is Flux
Flux is an open source project by WeaveWorks which enables application delivery using GitOps. Your cluster config is stored in Git and the Flux controllers continually work to ensure that the cluster config matches the state in Git. This allows us to take the “cattle not pets” mentality applied to modern cloud computing further and apply the same thinking to our clusters.
Flux is now in “V2” and the original implementation (or Flux v1) is now in maintenance mode. This post will explore using Flux V2 anf the GitOps Toolkit to automate deployments.
We no longer need to manually issue helm install or kubectl apply commands to manage our clusters and configuration changes are audited and easily reviewed as Git PullRequests.
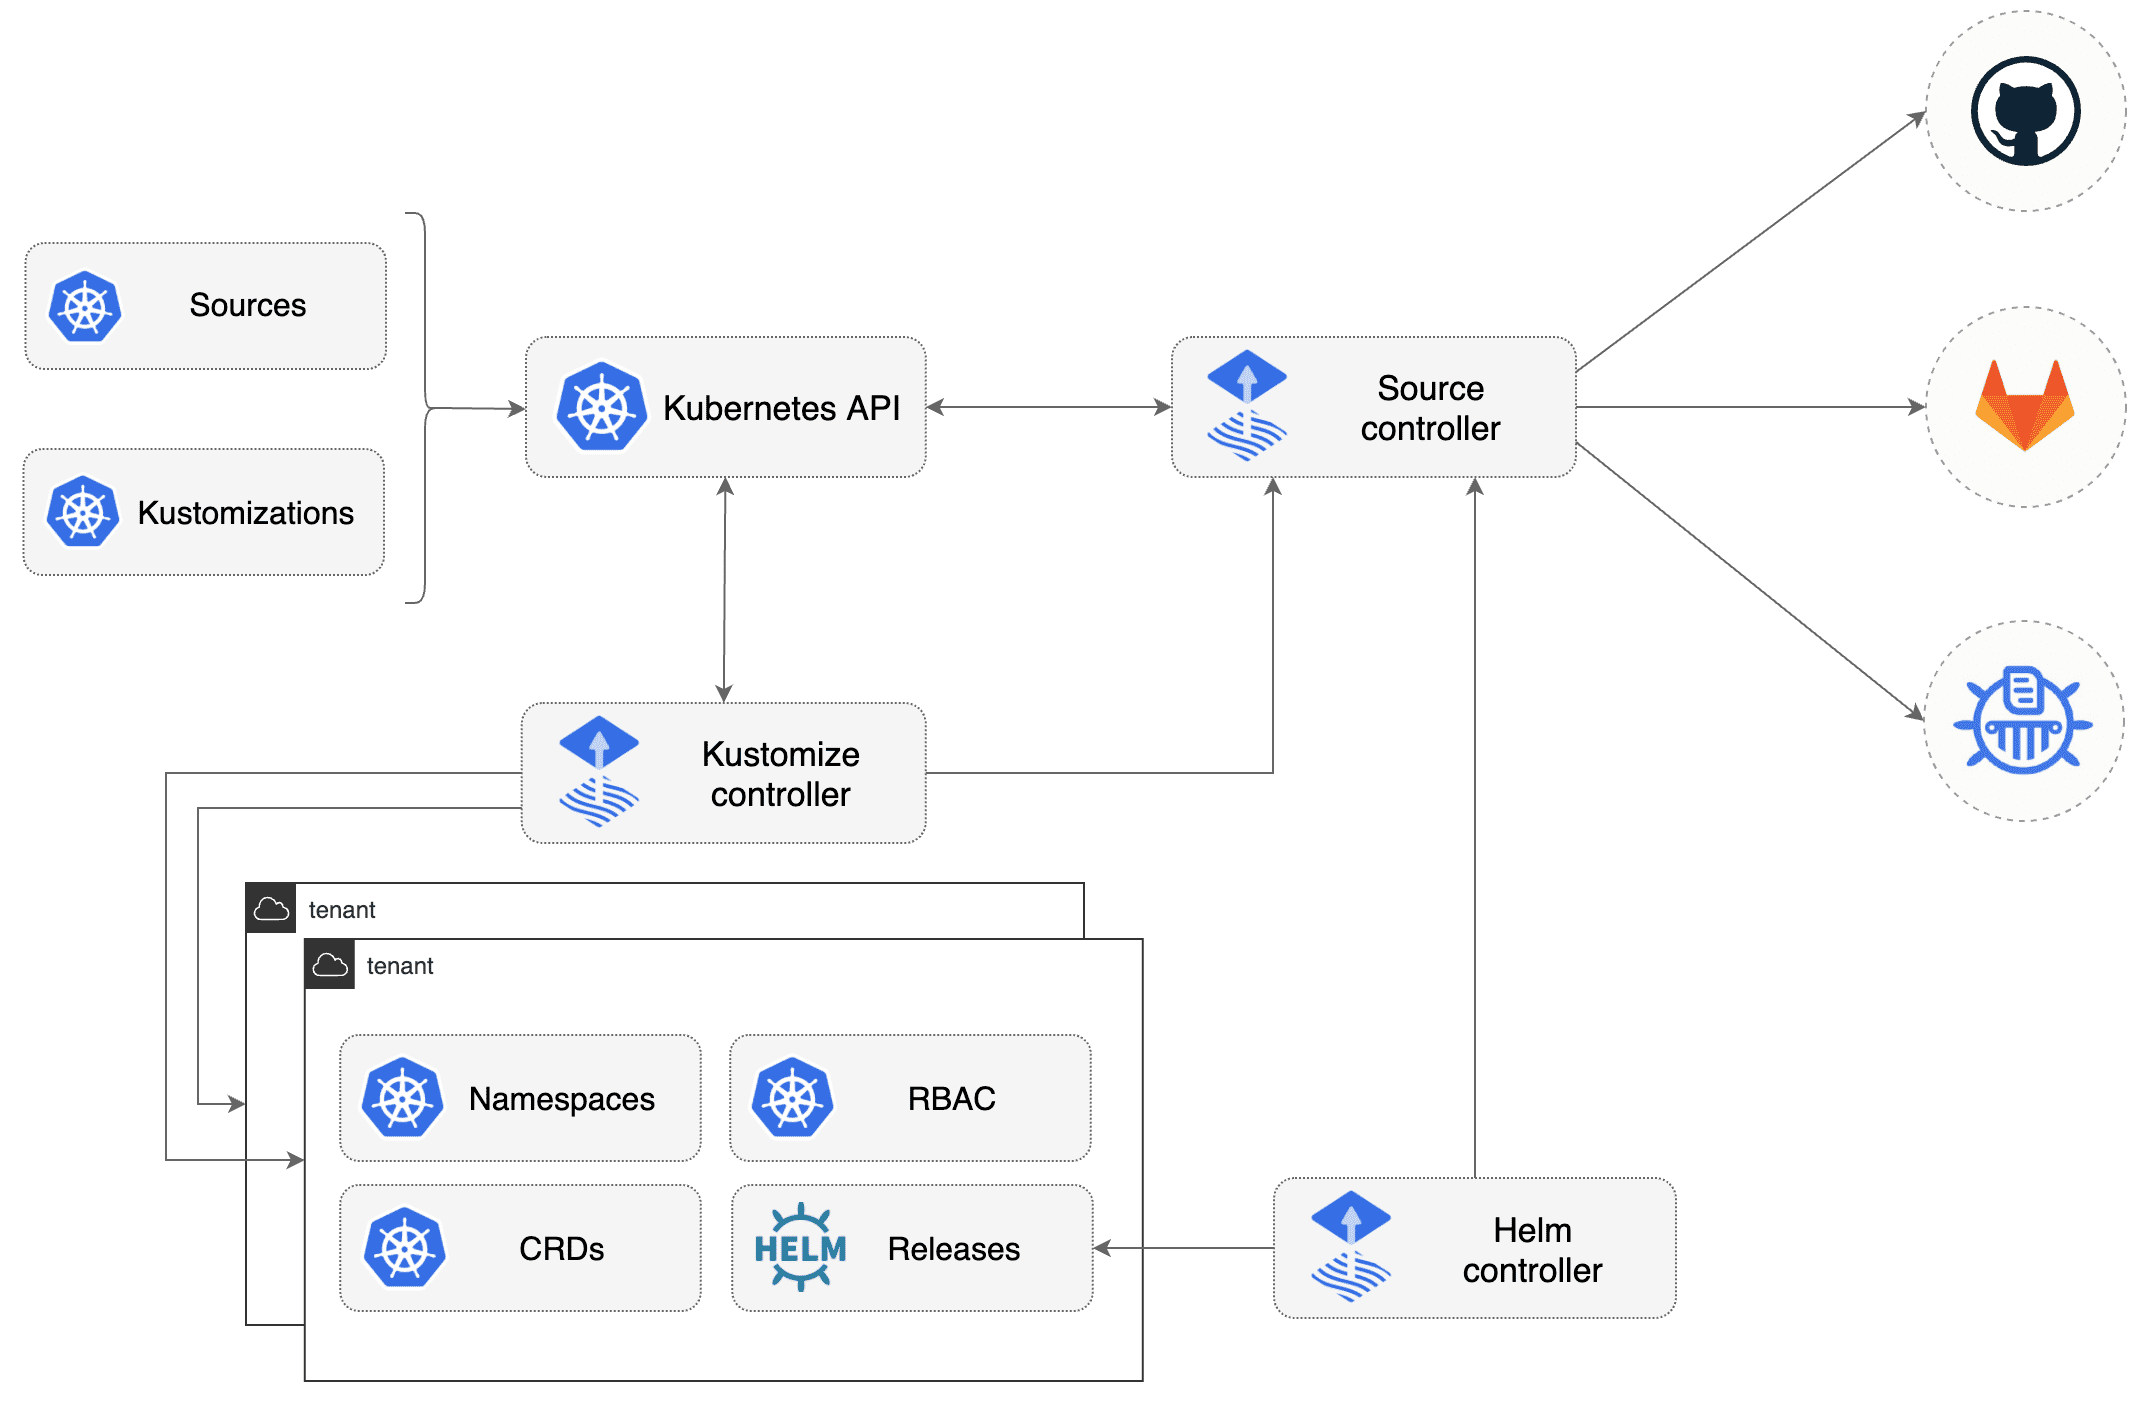 From the Flux documentation
What you need to try this tutorial
Tools
I’m using arkade to download the CLIs tools that we need. You could also download the tools with your favourite package manager or from the various project websites.
curl -SLs https://get.arkade.dev | sh

# For MacOS and Linux users:
sudo mv arkade /usr/local/bin/

# For Git Bash users:
mv arkade /usr/bin/
Now download kubectl, faas-cli and flux for use later, if you don’t have them already.
arkade get kubectl
arkade get faas-cli
arkade get flux
follow the instructions in the output from the commands above to add the tools to your $PATH
Get a Kubernetes cluster
Head on over to your favourite Kubernetes as a Service provider, I’m using Linode to provide us with our cluster.
You can also use kind, k3d or minikube to provision a cluster locally too.
Kubernetes on Linode
-
Create an account on Linode, this is the signup page. New users get $100 credit (at time of writing)
-
Click on the
Kubernetestab on the sidebar -
Create a cluster in a region close to you and select at least 3 nodes with 1cpu and 2GB ram. This should be enough for our applications (Flux, OpenFaaS and then a few Functions).
-
Download the
kubeconfigonce the cluster has been created and set theKUBECONFIGenvironment variable
In my case, this is how to set the environment variable.
export KUBECONFIG=~/Downloads/kubeconfig
Install Flux
Flux uses a CLI to setup and install the Flux controllers into the cluster. Once we have the CLI we can install the controllers and then start adding resources into our cluster. We installed the flux cli earlier, so we are ready to go.
We have the Flux cli we need to bootstrap the cluster and create a git repository.
For this section I’m using Github, you can find instructions for other Git providers in the Flux docs
Generate a github personal access token with repo permissions like this
Export this as an environment variable
export GITHUB_TOKEN=<your-token>
export GITHUB_USER=<your github username>
Run the bootstrap for a repository on your personal GitHub account:
flux bootstrap github \
  --owner=$GITHUB_USER \
  --repository=openfaas-flux \
  --path=openfaas \
  --personal
After a short time we should see the Flux controllers installed into the flux-system namespace:
$ kubectl get pods -n flux-system
NAME                                       READY   STATUS    RESTARTS   AGE
helm-controller-85bfd4959d-w5ccr           1/1     Running   0          38s
kustomize-controller-6977b8cdd4-gblq7      1/1     Running   0          38s
notification-controller-5c4d48f476-7tdkk   1/1     Running   0          38s
source-controller-85fb864746-gzrxq         1/1     Running   0          38s
This step has:
- Installed the
flux controllersinto your cluster - Created a Github repository, named
openfaas-flux(unless you changed that). - Added a
deploy keyto Github with access to that repository (a key that can pull from github for that repository)
These Flux controllers are using the deploy key to read changes in the github repository and install things based on changes. In the next section we will add some YAML manifests into the git repository and see Flux install these into the cluster.
Install OpenFaaS
Clone your git repository, for me the commands were
git clone git@github.com:$GITHUB_USER/openfaas-flux.git
cd openfaas-flux/openfaas
Our Flux controllers are syncing manifests we change in the openfaas directory that we specified as the path on installation.
We can now add a HelmRepository and HelmRelease to install the OpenFaaS Chart
You can get more information on the Flux components in the docs
Create our OpenFaaS namespaces by downloading the contents here and adding file with the contents to the repository called openfaas-namespaces.yaml
Add a HelmRepository which tells Flux where it can find the OpenFaaS helm chart:
flux create source helm openfaas \
  --url https://openfaas.github.io/faas-netes/ \
  --export > openfaas-helmchart.yaml
This creates a file with these contents:
---
apiVersion: source.toolkit.fluxcd.io/v1beta1
kind: HelmRepository
metadata:
  name: openfaas
  namespace: flux-system
spec:
  interval: 1m0s
  url: https://openfaas.github.io/faas-netes/
We need to make some changes to the default OpenFaaS chart installation, we are going to enable the openfaas operator
which allows us to manage our functions using the Functions CRD
Create a file called values.yaml and add these lines
operator:
  create: true

generateBasicAuth: true
Finally add a HelmRelease which uses the HelmRepository as the source of the helm chart.
flux create helmrelease openfaas \
  --source=HelmRepository/openfaas \
  --chart openfaas --values=values.yaml \
  --target-namespace=openfaas \
  --export > openfaas-helmrelease.yaml
This will create a file like this
---
apiVersion: helm.toolkit.fluxcd.io/v2beta1
kind: HelmRelease
metadata:
  name: openfaas
  namespace: flux-system
spec:
  chart:
    spec:
      chart: openfaas
      sourceRef:
        kind: HelmRepository
        name: openfaas
  interval: 1m0s
  targetNamespace: openfaas
  values:
    generateBasicAuth: true
    operator:
      create: true
Commit these files into your git repository and watch OpenFaaS get installed into your cluster. Don’t add the values.yaml as Flux will try to install this as a Kubernetes object.
git add openfaas*
git commit -m "Install openfaas into the cluster"
git push
After a few seconds you should see openfaas pods start to be created in the openfaas namespace.
$ kubectl get pods -n openfaas
NAME                                READY   STATUS    RESTARTS   AGE
alertmanager-6457d4c9-ptbqp         1/1     Running   0          31s
basic-auth-plugin-b9cd7fb66-6gm8c   1/1     Running   0          31s
gateway-dbfb888df-m75vz             2/2     Running   0          30s
nats-6b6564d858-sxtwn               1/1     Running   0          31s
prometheus-788d6cdd47-54dhl         1/1     Running   0          31s
queue-worker-5f6cb648db-8vbjg       1/1     Running   0          31s
Troubleshooting
Flux manages things through the use of CRDs, they usually have a good description of things that are not working, so below are some handy commands to check on the resources we created above if anything isn’t working.
# Check if Flux was able to install your manifests
# If this shows an error then you need to fix it. its usually formatting issues
# This is where flux stores the status of its runs, so its always a good place to start looking
kubectl get kustomization -n flux-system

# Check if we could download the helm chart for openfaas
# If this doesn't show "ready=True" then check the HelmRepository is correct
kubectl get helmchart -n flux-system

# To check the HelmRepository
kubectl get helmrepository -n flux-system

# Finally, check the HelmRelease, if this shows errors then you need to work out how to fix
kubectl describe helmrelease -n flux-system openfaas
Deploy our first Function
We are now going to generate a Function CRD which tells OpenFaaS to deploy a function, for speed we are going to use a
pre-built store function as an example. You can use your existing functions or build new ones if you prefer.
To generate Function CRD files for your existing stack.yaml functions you can use faas-cli generate --yaml stack.yaml
faas-cli generate --namespace openfaas-fn --from-store nodeinfo > nodeinfo.yaml
faas-cli generate --namespace openfaas-fn --from-store figlet > figlet.yaml
These files will look similar to this below
---
apiVersion: openfaas.com/v1
kind: Function
metadata:
  name: nodeinfo
  namespace: openfaas-fn
spec:
  name: nodeinfo
  image: ghcr.io/openfaas/nodeinfo:latest
  labels: {}
Add these custom resources for the NodeInfo and Figlet functions to git.
git add figlet.yaml nodeinfo.yaml
git commit -m "Add openfaas functions"
git push
You should see Flux pull the latest git revision and install these CRDs.
$ kubectl get functions
NAME       AGE
figlet     89s
nodeinfo   89s

$ kubectl get pods -n openfaas-fn
NAME                        READY   STATUS    RESTARTS   AGE
figlet-56475b7d8-8xwcq      1/1     Running   0          27s
nodeinfo-6b54b47769-g7gkk   1/1     Running   0          27s
Update our function
To see the power of Flux and GitOps in action we can delete the functions CRDs from our cluster and
watch as Flux puts them right back for us.
$ kubectl delete functions -n openfaas-fn --all
function.openfaas.com "figlet" deleted
function.openfaas.com "nodeinfo" deleted


$ kubectl get functions -n openfaas-fn
No resources found in openfaas-fn namespace.

# Reconcile our Flux kustomization, for speed, but this will happen
# automatically every 10 minutes (which is configurable)

$ flux reconcile kustomization flux-system
► annotating Kustomization flux-system in flux-system namespace
✔ Kustomization annotated
◎ waiting for Kustomization reconciliation
✔ Kustomization reconciliation completed
✔ applied revision main/8dd6da7a8deaec21d3c7036f35caaaebf547177b

$ kubectl get functions -n openfaas-fn
NAME       AGE
figlet     37s
nodeinfo   37s
The functions were re-added by Flux, it recognised that the objects that existed in Git didn’t exist in the cluster and added them back.
As you can see, there is no more wondering if you applied the latest changes to a cluster, go and check Git and the Flux CRD objects to see what git revision was applied and if it succeeded.
Wrapping up
We have seen how we can use Git as our “single source of truth” about the state of our cluster and how GitOps tools like flux can keep our cluster in-sync with our config.
We have shown this by configuring the Flux controllers to constantly reconcile against a Git repository, working to always keep the cluster state in-sync with the Git repository. We have seen how adding YAML manifests can install the components specified and how removing something from the cluster (with a kubectl delete on our Functions) will cause Flux to add these items back in when it reconciles.
Future Work
At this point we have only really explored how to setup and deploy our first sample functions. This is a good first step on our GitOps journey. However, this example won’t get you very far towards to coveted “Continuous Delivery” (where changes make their way straight to production after passing various testing and validation steps)
To achieve a more advanced setup where new versions of our services make it onto the cluster automatically we can use another part of GitOps ToolKit components called the Image reflector and automation controller.
These components scan an Image repository, like Dockerhub, and when new tags are found they can update your Git repository and change the deployed version of the component.
This new change is then reconciled by the components we have installed in this tutorial and cause a new version to be deployed.
Further reading
We have written about GitOps and Flux before, you may also like:

Alistair Hey
Former Core Team @openfaas. Cloud native Platform Engineer.