Learn how to set up fine-grained access control for the OpenFaaS dashboard, CLI and API via OpenID Connect (OIDC).
IAM for OpenFaaS is best suited for regulated companies, service providers and SaaS companies. Single Sign-On (SSO) makes it easier for teams to manage, control access and to increase security through the use of an Identity Provider in place of a password.
- Fine-grained access control for functions and namespaces
- SSO for the OpenFaaS dashboard and CLI
- Web Identity Federation to CI (Continuous Integration) systems like GitHub Actions and GitLab CI for keyless deployments
- Auditing of operations via webhook
IAM for OpenFaaS walkthrough
This is a tutorial and walkthrough of how to configure an OIDC-compatible Identity Provider (Iap) with OpenFaaS.
We’ll be walking through each of the steps to install OpenFaaS for Enterprises, and to configure it with self-hosted Keycloak.
The IAM feature covers:
- Single Sign-On (SSO) for the OpenFaaS dashboard
- Single Sign-On (SSO) via the OpenFaaS CLI
- Fine-grained access control for the OpenFaaS API
- Web Identity Federation to CI systems like GitHub Actions and GitLab CI
Users can assume roles, roles may bind to one or more policies, and policies contain permissions for specific resources and namespaces. We drew inspiration from AWS IAM and Kubernetes RBAC whilst developing the system. All IAM objects are defined as Kubernetes Custom Resources (CRDs) and are stored in the openfaas namespace, which means you can manage them with a GitOps tool like ArgoCD, Flux or Helm.
So far, we’ve have tested Auth0, Google OAuth, Okta, Keycloak and Azure Active Directory but any other provider that supports OIDC should work. If it doesn’t, let us know and we’ll help you to get it working.
IAM rules are configured through a set of custom Kubernetes resources:
- JwtIssuer - defines a trusted identity provider for OpenFaaS IAM
- Policy - defines a set of permissions and objects on which they can be performed
- Role - defines a set of policies that can be matched to a particular user or identity
During authentication an OIDC access token from a trusted IdP is exchanged for an OpenFaaS access token. This token can be used to access the OpenFaaS REST API.
- The OpenFaaS CLI or dashboard performs an OAuth flow with your identity provider to get an OIDC access token.
- The token is sent to the internal OpenFaaS identity provider to exchange it for an OpenFaaS token.
- The OpenFaaS identity provider checks if the token is coming from a trusted provider.
- If the token is valid, Roles are matched for the particular identity.
- An OpenFaaS token is issued with a claim for all policies associated with the matched roles.
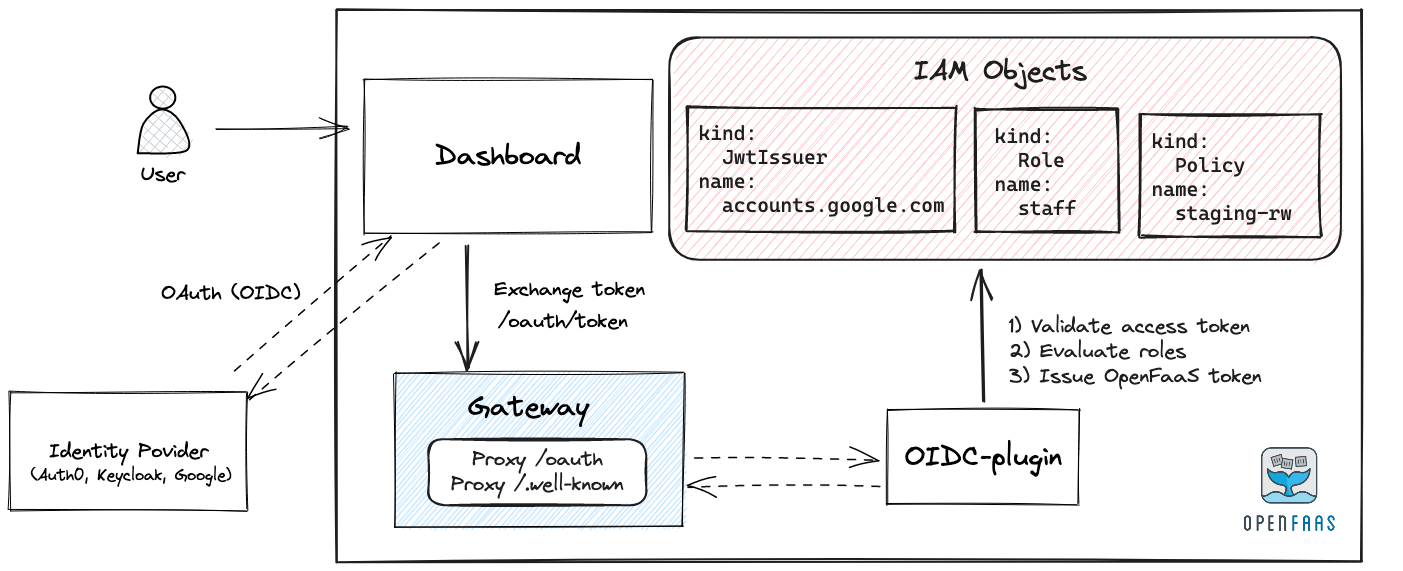
Conceptual authentication flow for the OpenFaaS dashboard
In the next sections we are going to:
- Configure two sub-domains -
gateway.openfaas.example.comanddashboard.openfaas.example.com- these can be public or internal to your network/VPC. - Setup ingress and all other prerequisites to deploy OpenFaaS.
- Configure your identity provider and register it with OpenFaaS.
- Create roles and policies for fine grained access to the OpenFaaS API.
- Configure and deploy the OpenFaaS dashboard.
- Authenticate and manage functions using the faas-cli
OpenFaaS IAM also supports Web Identity Federation from CI providers to OpenFaaS using GitHub Actions, GitLab CI, etc. We’ve already covered it in the docs, and have a link in the conclusion.
You’ll also need an OpenFaaS for Enterprises license, but if you don’t have one, you can reach out to us for more information.
Deploy OpenFaaS for Enterprises
Create the namespaces for OpenFaaS and its functions:
kubectl apply -f https://raw.githubusercontent.com/openfaas/faas-netes/master/namespaces.yml
Create a secret for your OpenFaaS license:
kubectl create secret generic \
  -n openfaas \
  openfaas-license \
  --from-file license=$HOME/.openfaas/LICENSE
Add the OpenFaaS helm chart repo:
helm repo add openfaas https://openfaas.github.io/faas-netes/
Follow the instructions below to set up TLS for the gateway and the dashboard using certificates from Let’s Encrypt:
Whilst following these instructions, you’ll create a tls.yaml file, which will be added to the helm upgrade command.
Create a signing key for the OpenFaaS issuer. It is used by the OIDC plugin to sign access tokens issued by OpenFaaS.
# Generate a key
openssl ecparam -genkey -name prime256v1 -noout -out issuer.key

# Store in a secret in the openfaas namespace
kubectl -n openfaas \
  create secret generic issuer-key \
  --from-file=issuer.key=./issuer.key
Create a values-iam.yaml file with your OpenFaaS configuration:
openfaasPro: true

operator:
  create: true

clusterRole: true

gateway:
  replicas: 3

queueWorker:
  replicas: 3

queueWorkerPro:
  maxInflight: 50

queueMode: jetstream

iam:
  enabled: true
  # The system issuer url is the public url the gateway is accessible at.
  systemIssuer:
    url: https://gateway.openfaas.example.com
In addition to the configuration for IAM this values-iam.yaml file contains the recommended parameters for running OpenFaaS Pro.
We are now ready to deploy the chart with helm:
helm repo update \
 && helm upgrade openfaas \
  --install openfaas/openfaas \
  --namespace openfaas  \
  -f values-iam.yaml \
  -f tls.yaml
As part of OpenFaaS for Enterprises we’ll be enabling multi namespace for functions. Multiple namespaces can be used for logical separation between stages like dev, staging and production or for various teams or tenants.
Create an additional function namespace, we are going to name it staging:
kubectl create namespace staging

kubectl annotate namespace/staging openfaas="1"
Configure your identity provider
Your identity provider should be OpenID Connect (OIDC) compatible. We have tested with Auth0, Google, Okta, Keycloak and Azure Active Directory but any other provider that supports OIDC should work.
You must configure your provider and create a new client app for OpenFaaS.
OpenFaaS uses your identity provider to get an access token when logging in with the OpenFaaS CLI or in the OpenFaaS dashboard. The token is automatically exchanged for an OpenFaaS access token that can in turn be used to access the OpenFaaS REST API.
The dashboard has support for the following OIDC authentication flows:
- Authorization Code Flow
- Authorization Code Flow with Proof Key fo Code Exchange (PKCE)
For the CLI we recommend using the Authorization Code Flow with PKCE. The implicit grant flow can also be used if your provider does not support PKCE.
Make sure the required flows are enabled in your provider.
Finally add the following to the list of valid redirect URIs in your provider configuration:
http://127.0.0.1:31111/oauth/callback, this is the callback url usd by the faas-cli.- If you are deploying the OpenFaaS dashboard add the redirect URI for your dashboard, e.g
https://dashboard.openfaas.example.com/auth/callback
In this tutorial we will be using Keycloak as the identity provider.
- Create a new client in your Keycloak realm with Client Type OpenID Connect.

- Enable the Standard Flow (Authorization Code Flow) for the client.

- Add the callback URLs for the cli and dashboard to the list of valid redirect URIs.

Register a provider with OpenFaaS
There must be at least one registered OIDC provider for human users to authenticate but additional issuers can be defined for e.g. Web Identity Federation
A provider can be registered with OpenFaaS by creating a JwtIssuer object in the openfaas namespace. JwtIssuer objects are used to define trusted issuers for OpenFaaS IAM.
Example issuer for a Keycloak provider:
---
apiVersion: iam.openfaas.com/v1
kind: JwtIssuer
metadata:
  name: keycloak.example.com
  namespace: openfaas
spec:
  iss: https://keycloak.example.com/realms/openfaas
  aud:
    - openfaas
  tokenExpiry: 12h
In the spec the iss field needs to be set to the url of your provider, eg. https://accounts.google.com for google or `https://example.eu.auth0.com/ for Auth0.
The aud field needs to contain a set of accepted audiences. The set is used to validate the audience field in an OIDC access token and verify OpenFaaS is the intended audience. The audience is usually the gateway’s public URL although for some providers it can also be the client id.
The tokenExpiry field can be used to set the expiry time of the OpenFaaS access token issued in the token exchange. For user-logins via the dashboard or CLI, we’d recommend making this value long enough for a full day’s work, but for CI, you can set it to a shorter value like 15-30 minutes.
In addition to the JwtIssuer there are two other object that need to be defined before we can try and access the gateway API:
- Policy - defines a set of permissions and objects on which they can be performed
- Role - defines a set of policies that can be matched to a particular user or identity
Create a sample Role and Policy
Once a JWTIssuer has been registered you can start creating Roles and Policies. Policies are used to describe permissions on resources. A Role must be created to map users within the Issuer to a set of Policies based on conditions.
Create a policy:
apiVersion: iam.openfaas.com/v1
kind: Policy
metadata:
  name: staging-rw
  namespace: openfaas
spec:
  statement:
  - sid: 1-rw-staging
    action:
    - Function:List
    - Function:Get
    - Function:Create
    - Function:Update
    - Function:Delete
    - Function:Logs
    - Namespace:List
    effect: Allow
    resource: ["staging:*"]
Permission can be scoped cluster wide or to specific namespaces. In this example the policy only applies for the staging namespace. To apply a policy cluster wide use resource: ["*"].
For an overview of the supported actions see: permission
Create a Role:
apiVersion: iam.openfaas.com/v1
kind: Role
metadata:
  name: staging-staff-deployers
  namespace: openfaas
spec:
  policy:
  - staging-rw
  principal:
    jwt:sub:
     - aa544816-e4e9-4ea0-b4cf-dd70db159d2e
  condition:
    StringEqual:
      jwt:iss: [ "https://keycloak.example.com/realms/openfaas" ]
The policy field contains a set of Policies to apply for this Role. The set of policies is included as a claim in the OpenFaaS access token when it is issued. If policies are added or removed from a Role these changes will only be reflected after the user re-authenticates and receives a new access token.
The condition field can be used to limit permissions by matching fields in the jwt access token.
Every condition must return true for the Role to be considered as a match.
Valid conditions include: StringEqual or StringLike
A user’s email could also be fuzzy matched with a condition, for example:
condition:
    StringLike:
      jwt:email: ["*@example.com"]
The principal field is optional, however if it is given, both the principal and the condition must match. If the principal contains multiple items only one must match the token for it to be considered a match.
This Role will match for 1 staff member with sub aa544816-e4e9-4ea0-b4cf-dd70db159d2e only if it was issued by https://keycloak.example.com/realms/openfaas.
Setup the OpenFaaS dashboard
The classic UI is deprecated for OpenFaaS for Enterprises. If you want a UI to make operating and understanding OpenFaaS easier you can deploy the OpenFaaS dashboard. It was designed to work with IAM and allows users to login through your IdP.
The dashboard requires two keys to be created and stored in Kubernetes secrets:
- JWT signing key - to sign and verify user session cookies.
- AES key - to encrypt the OpenFaaS access token in your cookie.
Generate and store the JWT signing key:
# Generate a private key
openssl ecparam -genkey -name prime256v1 -noout -out jwt_key

# Then create a public key from the private key
openssl ec -in jwt_key -pubout -out jwt_key.pub

# Store both in a secret in the openfaas namespace
kubectl -n openfaas \
  create secret generic dashboard-jwt \
  --from-file=key=./jwt_key \
  --from-file=key.pub=./jwt_key.pub
Generate and store the AES encryption key:
# Generate a key
openssl rand -hex 16 > aes_key

# Store the key in a secret in the openfaas namespace
kubectl -n openfaas \
  create secret generic aes-key \
  --from-file=aes_key=./aes_key
To execute the Authorization Code Flow the dashboard will need the client secret that you received when you configured your IdP. If your IdP does not need a client secret this step can be skipped.
Store the OAuth client secret in a Kubernetes secret:
kubectl create secret generic \
    -n openfaas \
    keycloak-client-secret \
    --from-file client_secret=./client_secret
Add the following to the values-iam.yaml file you created earlier:
+dashboard:
+  enabled: true
+  publicURL: https://dashboard.openfaas.example.com
+  signingKeySecret: "dashboard-jwt"

iam:
  enabled: true
  systemIssuer:
    url: https://gateway.openfaas.example.com
+ dashboardIssuer:
+   url: "https://keycloak.example.com/realms/openfaas"
+   clientId: openfaas
+   # Leave blank if no client secret is required
+   clientSecret: "keycloak-client-secret"
+   scopes:
+     - openid
+     - profile
+     - email
Depending on your provider and setup you might need to request additional scopes. These can be set through the scopes parameter.
The clientSecret can be left blank if your OIDC provider does not require a secret.
Update the OpenFaaS deployment:
helm upgrade openfaas \
  --install openfaas/openfaas \
  --namespace openfaas \
  -f values-iam.yaml \
  -f tls.yaml
Authenticate with the faas-cli
The faas-cli can be used to obtain an access token. Authentication commands for the faas-cli are available through the pro plugin.
Install and enable the pro plugin:
faas-cli plugin get pro
faas-cli pro enable
You can authenticate with the pro auth command:
faas-cli pro auth \
  --authority https://keycloak.example.com/realms/openfaas \
  --client-id openfaas
The faas-cli will save the OpenFaaS access token and use it when you run commands that require authentication to the gateway.
Auth configuration flags are saved for each gateway after the initial authentication. You can re-authenticate by running faas-cli pro auth without any additional flags when your token has expired.
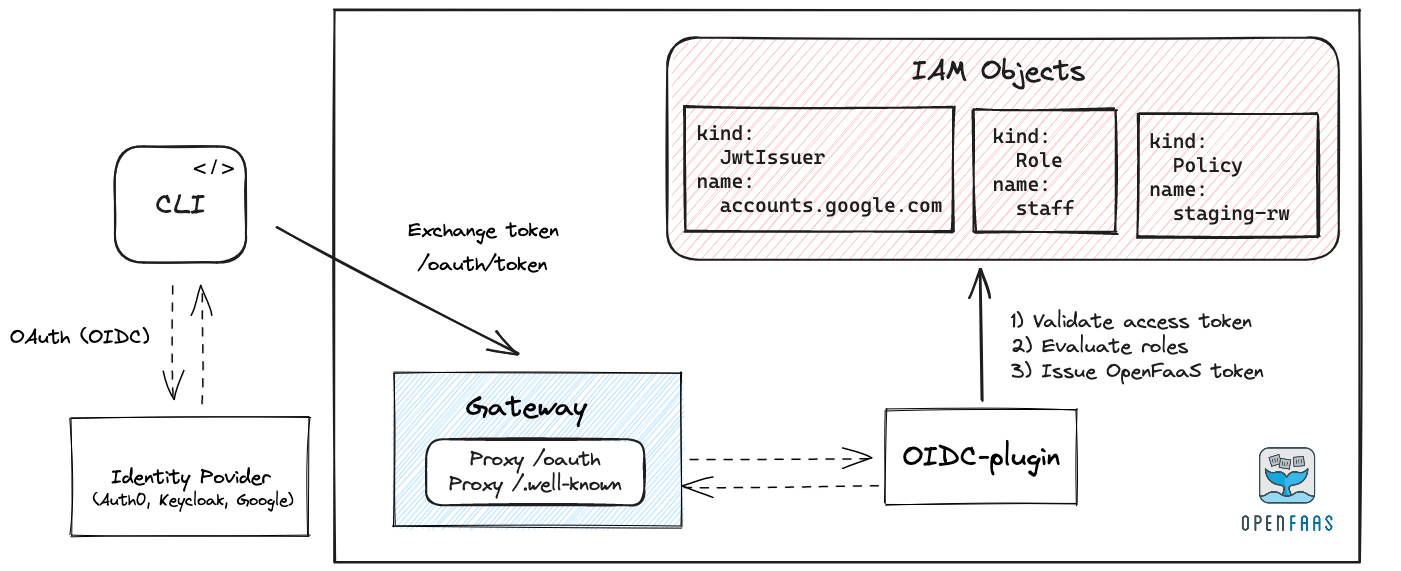
Conceptual authentication flow for the OpenFaaS CLI
Running the following command will list the namespace the authenticated user is allowed to operate on:
$ faas-cli namespaces

Namespaces:
 - staging
In this case the policy associated with the user’s role only allows operations on the staging namespace.
Running the following command will list functions in the staging namespace.
faas-cli list --namespace staging
If the authenticated user has insufficient permissions the operation will fail with a 403 Forbidden error:
$ faas-cli list --namespace openfaas-fn

Server returned unexpected status code: 403 - Unauthorized
The Role and Policy we have created does not allow the user to list functions in the openfaas-fn namespace.
Inspect JWT tokens
The faas-cli can be used to get an access token from your IdP and print it out for inspection. This can be useful to see what fields are available when creating Roles.
To print the token you need to set two extra flags, --no-exchange and --print-token. The --no-exchange flag is required to stop the CLI from exchanging the access token for an OpenFaaS token. Running the same command without the --no-exchange flag will print out the OpenFaaS access token.
$ faas-cli pro auth \
  --authority https://keycloak.example.com/realms/openfaas \
  --client-id openfaas \
  --no-exchange \
  --print-token
You can copy/paste the token into https://jwt.io/ to see what fields are available.
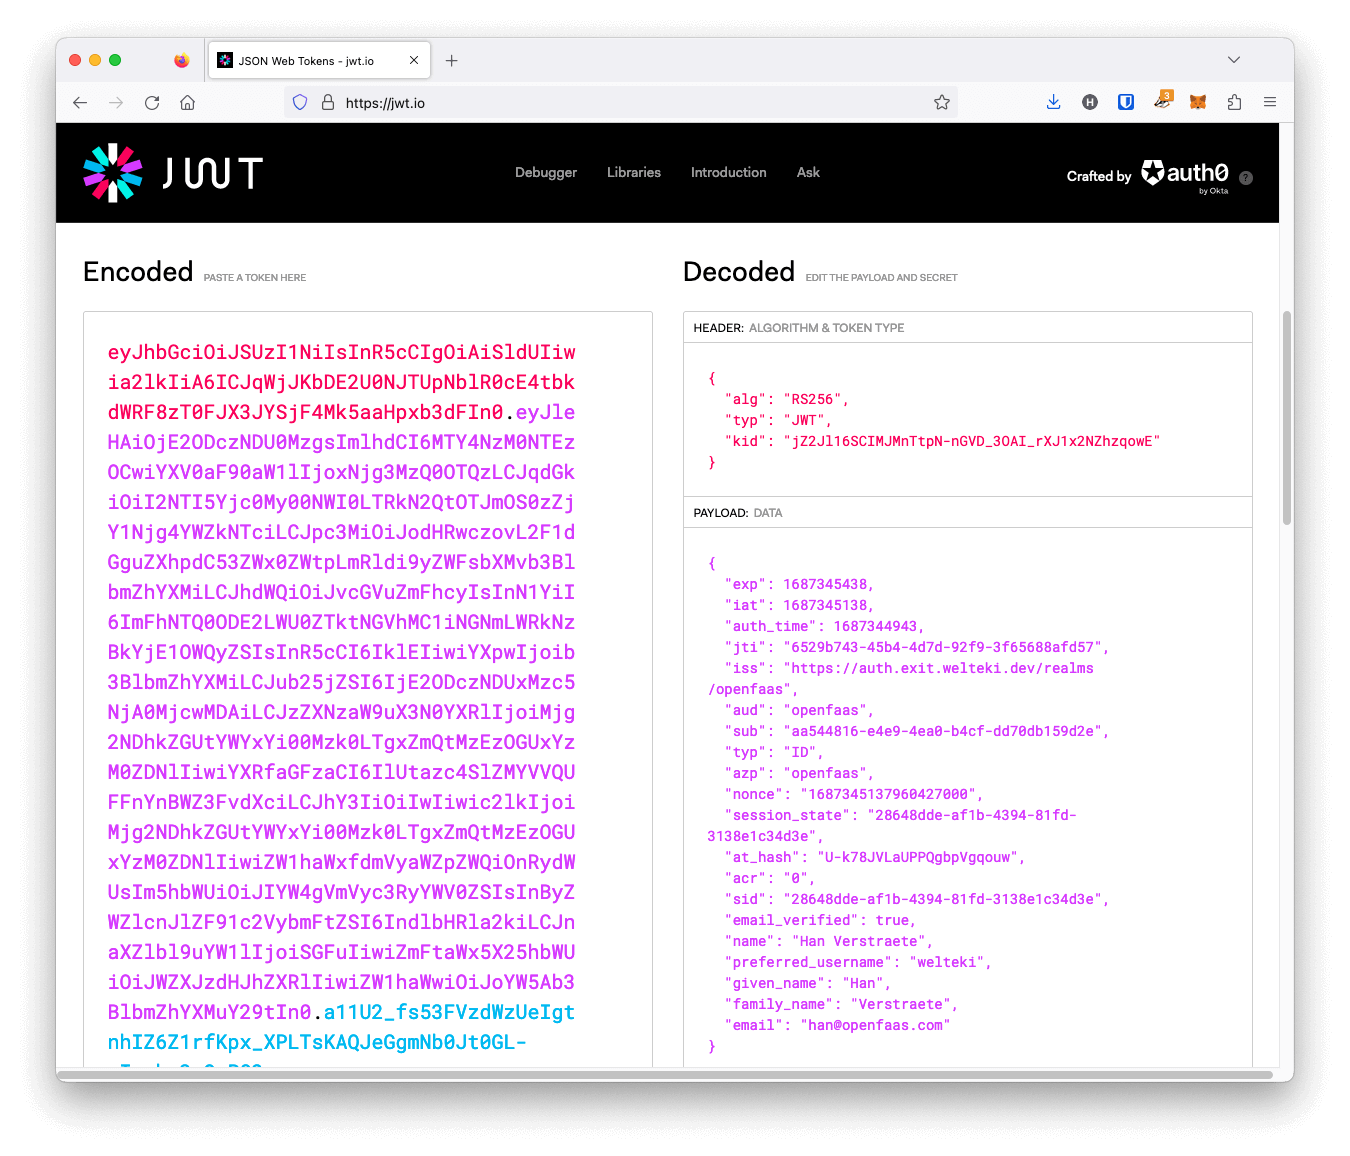
Example
id_tokenissued by Keycloak
If you’re not keen on pasting tokens into jwt.io, then we have an extra flag you can use to print out the decoded token.
Print the token from your OAuth provider, without doing an exchange:
$ faas-cli pro auth \
  --authority https://keycloak.example.com/realms/openfaas \
  --client-id openfaas \
  --no-exchange \
  --pretty
To print out the formatted OpenFaaS token after having done an exchange, remove --no-exchange from the command above.
Here’s an example of an OpenFaaS Token:
{
  "header": {
    "alg": "ES256",
    "kid": "ARyHBtoRuXRzCEqR_9NRr_HPP_s36vHKf9_X_Mjpad4x",
    "typ": "JWT"
  },
  "payload": {
    "at_hash": "F53gv7injmJ9hUGCOtDgBw",
    "aud": "https://gateway.example.com",
    "auth_time": 1706088607,
    "azp": "openfaas",
    "email_verified": true,
    "exp": 1706131945,
    "family_name": "Verstraete",
    "fed:iss": "https://keycloak.example.com/realms/openfaas",
    "given_name": "Han",
    "groups": [
      "openfaas-dev"
    ],
    "iat": 1706088745,
    "iss": "https://gateway.example.com",
    "jti": "81d42f43-8ebe-4d62-84f8-e1ecab5eb4b1",
    "name": "Han Verstraete",
    "nonce": "1706088744941521000",
    "policy": [
      "staging-rw"
    ],
    "preferred_username": "welteki",
    "session_state": "65c3df72-dad8-4b2f-95aa-f1556b40ab80",
    "sid": "65c3df72-dad8-4b2f-95aa-f1556b40ab80",
    "sub": "fed:a81bcb85-72a8-446a-9263-004944a4e9f4",
    "typ": "ID"
  }
}
Note the policy array which contains the policies associated with the user’s Role.
Wrapping up
We covered a lot of ground in this post including new API objects for OpenFaaS, how to configure an IdP, and then how to authenticate to OpenFaaS using the CLI and Dashboard.
Covering CI was out of scope, but you can learn about that in the docs for GitHub Actions and GitLab CI: Overview: Identity and Access Management (IAM)
You can reach out to us to see if OpenFaaS Standard or OpenFaaS for Enterprises is right for your team here.
FAQ:
-
Does OpenFaaS for Enterprises replace the previous Single Sign-On plugin?
Yes, we will no longer offer any updates for the previous generation of the SSO plugin. It was unable to offer fine-grained access or identity, but allowed users to assume the super-user role using an OpenID Connect IdP.
-
Is the classic OpenFaaS Portal supported?
No, the classic OpenFaaS Portal is legacy software and in code-freeze, so only the OpenFaaS Dashboard will be supported for OpenFaaS for Enterprises. It is more secure, has a better user experience, and is easier to maintain.
-
Will the OpenFaaS Dashboard get an “invoke” page?
The main difference between the classic OpenFaaS Portal and the OpenFaaS Dashboard is that the Dashboard doesn’t have a way to invoke functions. But we are changing that and already have a prototype working.
-
What Ingress records do I need?
The previous SSO plugin used its own Ingress, so you can now delete that. You’ll only need one for the gateway and another for the dashboard.
The Ingress can be public or private within a VPC/LAN.
-
Does OpenFaaS for Enterprises work with port-forwarding?
It is possible to use the super-user credentials to access the gateway via port-forwarding, but it is not recommended.
You should set up public or private DNS records and Ingress, and have your users access the gateway and dashboard using TLS certificates to ensure the traffic is encrypted.
-
Is Identity Provider X supported?
If your IdP conforms to the OpenID Connect then it should just work. OpenID Connect is a specification, however there can be nuances, so reach out to us if you’d like some help.
-
Is there any change for OpenFaaS Standard customers?
OpenFaaS Standard customers do not have Single Sign On included within their package, so there is no change. You’ll continue to use a shared user account and password to access the gateway and dashboard.
That said, if you’re also an actuated customer, then any OpenFaaS CE or OpenFaaS Standard cluster can use Keyless deployment to OpenFaaS with OIDC. This approach does not have fine-grained access control, but does mean that CI systems like GitHub Actions and GitLab CI can deploy without credentials. We built this for Kubiya.ai who use it to deploy to half a dozen different clusters from CI without managing credentials.

Han Verstraete
Associate Software Developer, OpenFaaS Ltd

Alex Ellis
Founder of @openfaas.