Dynamic scaling for Kubernetes clusters can save money and give you extra capacity when you need it.
If you’ve heard of or worked with OpenFaaS in the past, you’ll know that it has a built-in function auto-scaler which controls the amount of replicas or Pods for each function. But most managed Kubernetes engines come with a cluster auto-scaler, which can add and remove nodes from your cluster based on the CPU and memory requirements.
The two perform very difficult tasks, but in similar ways and should be configured properly to work in harmony.
I’ll show you how to setup OpenFaaS Pro with DigitalOcean’s managed Kubernetes service, and how to configure your functions to run there.
The concepts are going to very similar for other managed Kubernetes services too - like AWS EKS, GKE, Azure AKS and Linode Kubernetes. You’ll also see plenty of screenshots and extra links, as we also cover Google Cloud and AWS EKS.
By the end of the tutorial, you’ll have two node pools: one for the core services which shouldn’t be disrupted, and another for functions that can scale by adding in new nodes as required.
Even if your load is static and predictable, spot instances also rely on cluster autoscaling and are usually up to 50-70% cheaper than statically provisioned nodes.
Disclosure: From time to time, the DigitalOcean Open Source team has issued the OpenFaaS maintainers with cloud credit for open source enablement. If you’d like to try out the tutorial, you can get 200 USD of credit to use over 60 days, if you’re a new user. Use this referral link to claim it.
Overview
OpenFaaS Pro has its own auto-scaler that can adjust the amount of replicas for a function from zero to any given number. Through a little capacity planning, you can make sure that the total number of replicas for all your functions will never exceed the size of your cluster.
But what if you aren’t sure what the demand will be, or if the demand is season or unbalanced throughout the day or week? That’s where most managed Kubernetes services shine. Most of them have an add-on which can add and remove nodes from your cluster based on the CPU and memory requirements of the workloads within it.
This means the cluster will “right size” itself. You’re less likely to be paying for idle hosts, and you’ll have that extra capacity added when it’s needed most.
From the Kubernetes Cluster Autoscaler repository:
Cluster Autoscaler is a tool that automatically adjusts the size of the Kubernetes cluster when one of the following conditions is true:
- there are pods that failed to run in the cluster due to insufficient resources.
- there are nodes in the cluster that have been underutilized for an extended period of time and their pods can be placed on other existing nodes.
How does the Kubernetes cluster auto-scaler work?
Every time a new Pod is created, it goes into a Pending state then the Kubernetes scheduler will score the available nodes. If there’s a match, the node with the best score will be chosen to run the Pod. If there’s no match, the Pod will stay in the Pending state until a node is available.
That’s where the cluster auto-scaler comes in. If the cluster is under-provisioned, the auto-scaler will create a new node and add it to the cluster. If the cluster is over-provisioned, the auto-scaler will remove a node from the cluster.
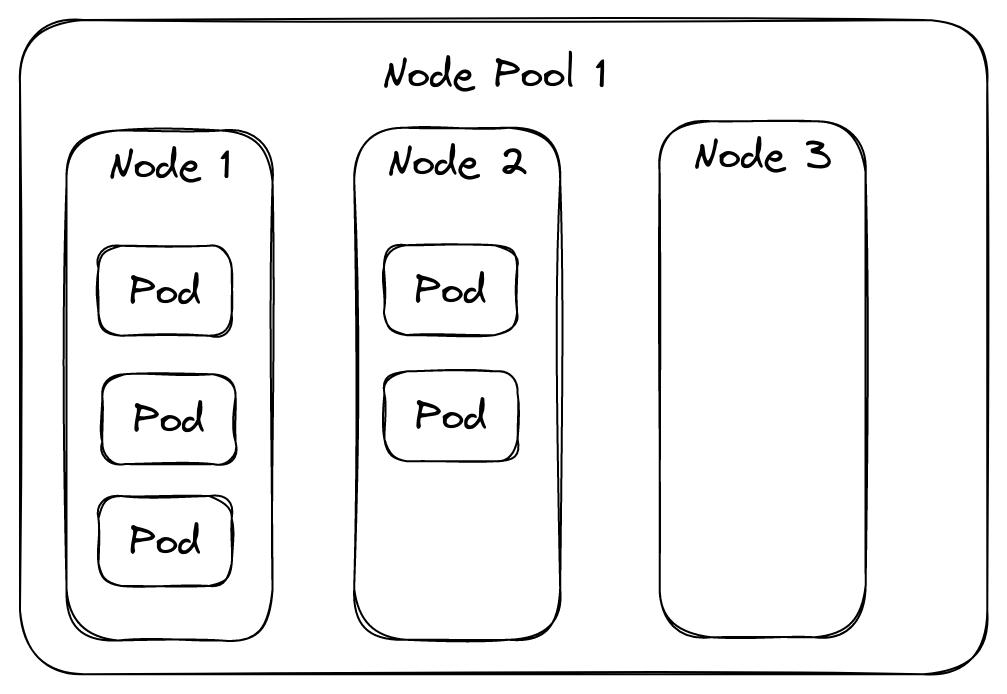
A node pool with some spare capacity
Each cluster auto-scaler is different, and in the case of DigitalOcean, you don’t need to install it - it’s managed for you. There didn’t seem to be a way to fine tune it when installed through the DigitalOcean UI.
See also:
Recommended configuration for OpenFaaS
For OpenFaaS, we recommend you have the core components such as the gateway, queue-worker, NATS JetStream, and Prometheus all running within a static node-pool, which the autoscaler cannot interfere with. These components can do a safe shutdown in the case of a node eviction, however they should not usually need to scale horizontally beyond what you’ve configured.
Then, create a second node pool for the functions. This is where the cluster auto-scaler will add and remove nodes as required and where functions may get interrupted and re-scheduled due to a node eviction.
The nodes you create within the functions node pool must have at least the same amount of memory available as the maximum memory limit or request that you’ve set on your biggest function.
If you only have one node-pool for functions, and the nodes have 1GB RAM of free RAM available for pods, you’d need to make sure your functions have a limit of under 1GB. The various official and third-party cluster autoscalers for AWS can right-size the nodes based upon the Pods in the cluster, adding dynamically-sized nodes that fit the workloads, but I couldn’t find any way to do this with DigitalOcean’s offering. You could always have multiple node pools - 1GB nodes for small functions and 2-4GB nodes for larger functions.
DigitalOcean Kubernetes cluster set-up
By default, Kubernetes clusters on DigitalOcean Kubernetes (DOKS) are not resilient or HA, which means if the control plane crashes, you could lose all of your work. For 40 USD / mo, you can pay a little extra and they’ll provision a production-quality cluster that can tolerate failure and recover.
DigitalOcean put the choice on the end-user, so that internal and experimental environments can be run at a lower cost, but with AWS EKS, you can only get a HA control-plane, which costs 75 USD / mo at present.
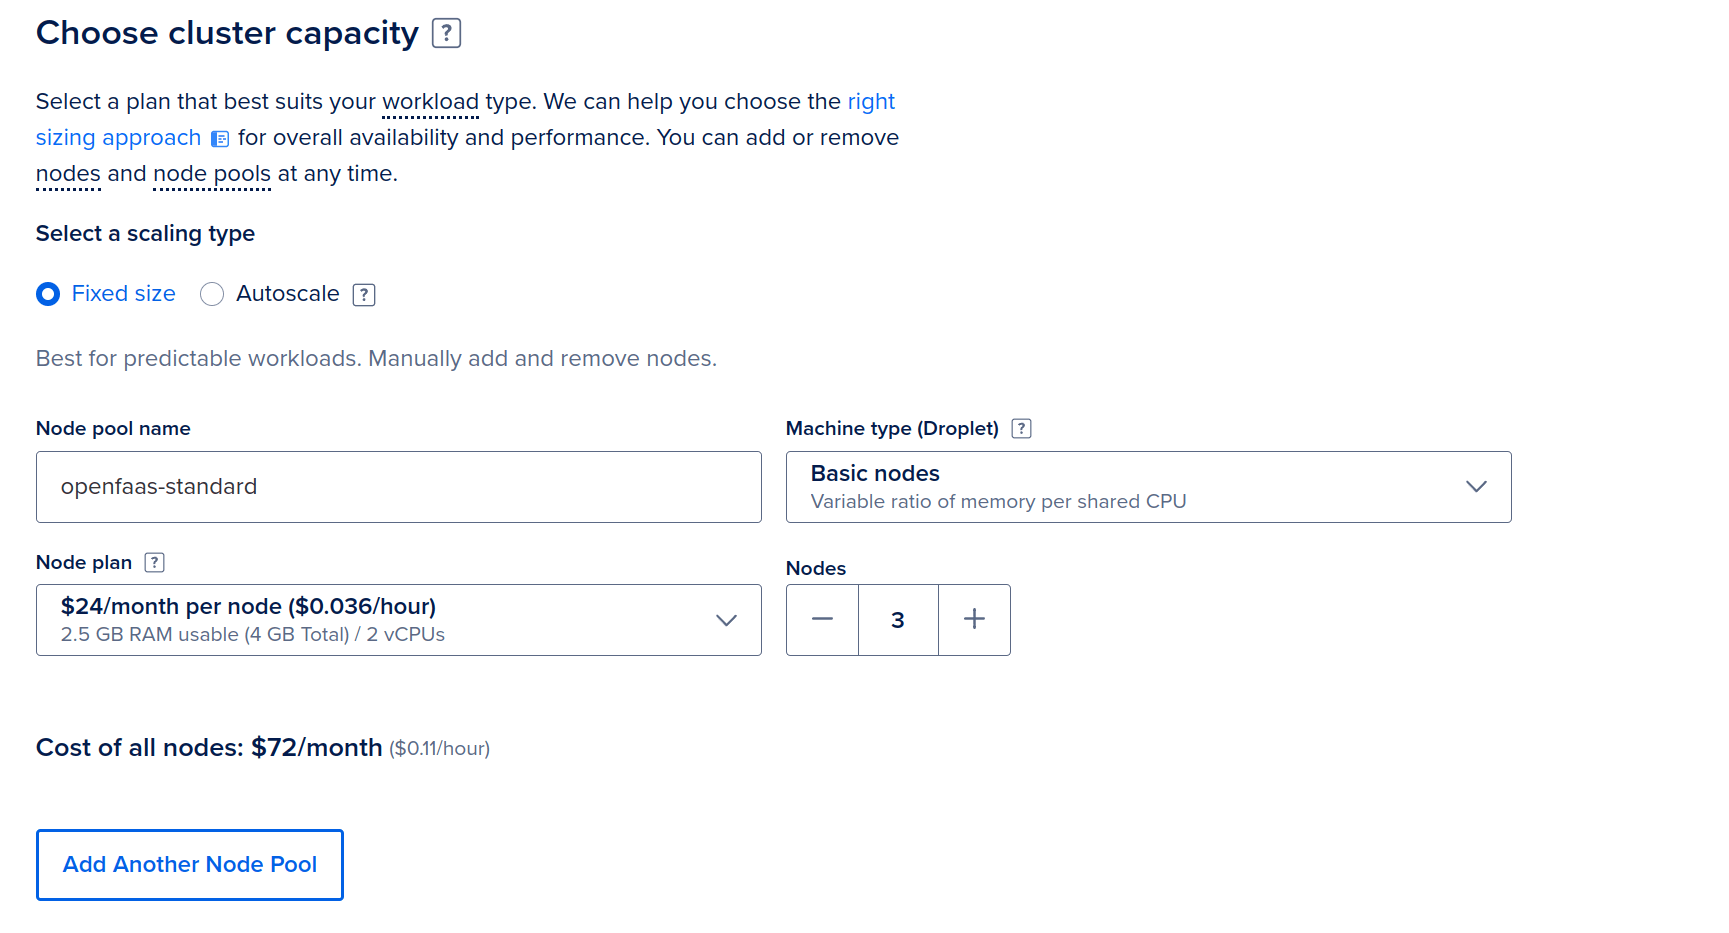
The first node pool is the default, and where the core OpenFaaS components will run
Next, click “Add Another Node Pool”
Remember to pick node sizes that match your maximum expected function memory and/or CPU requirements.
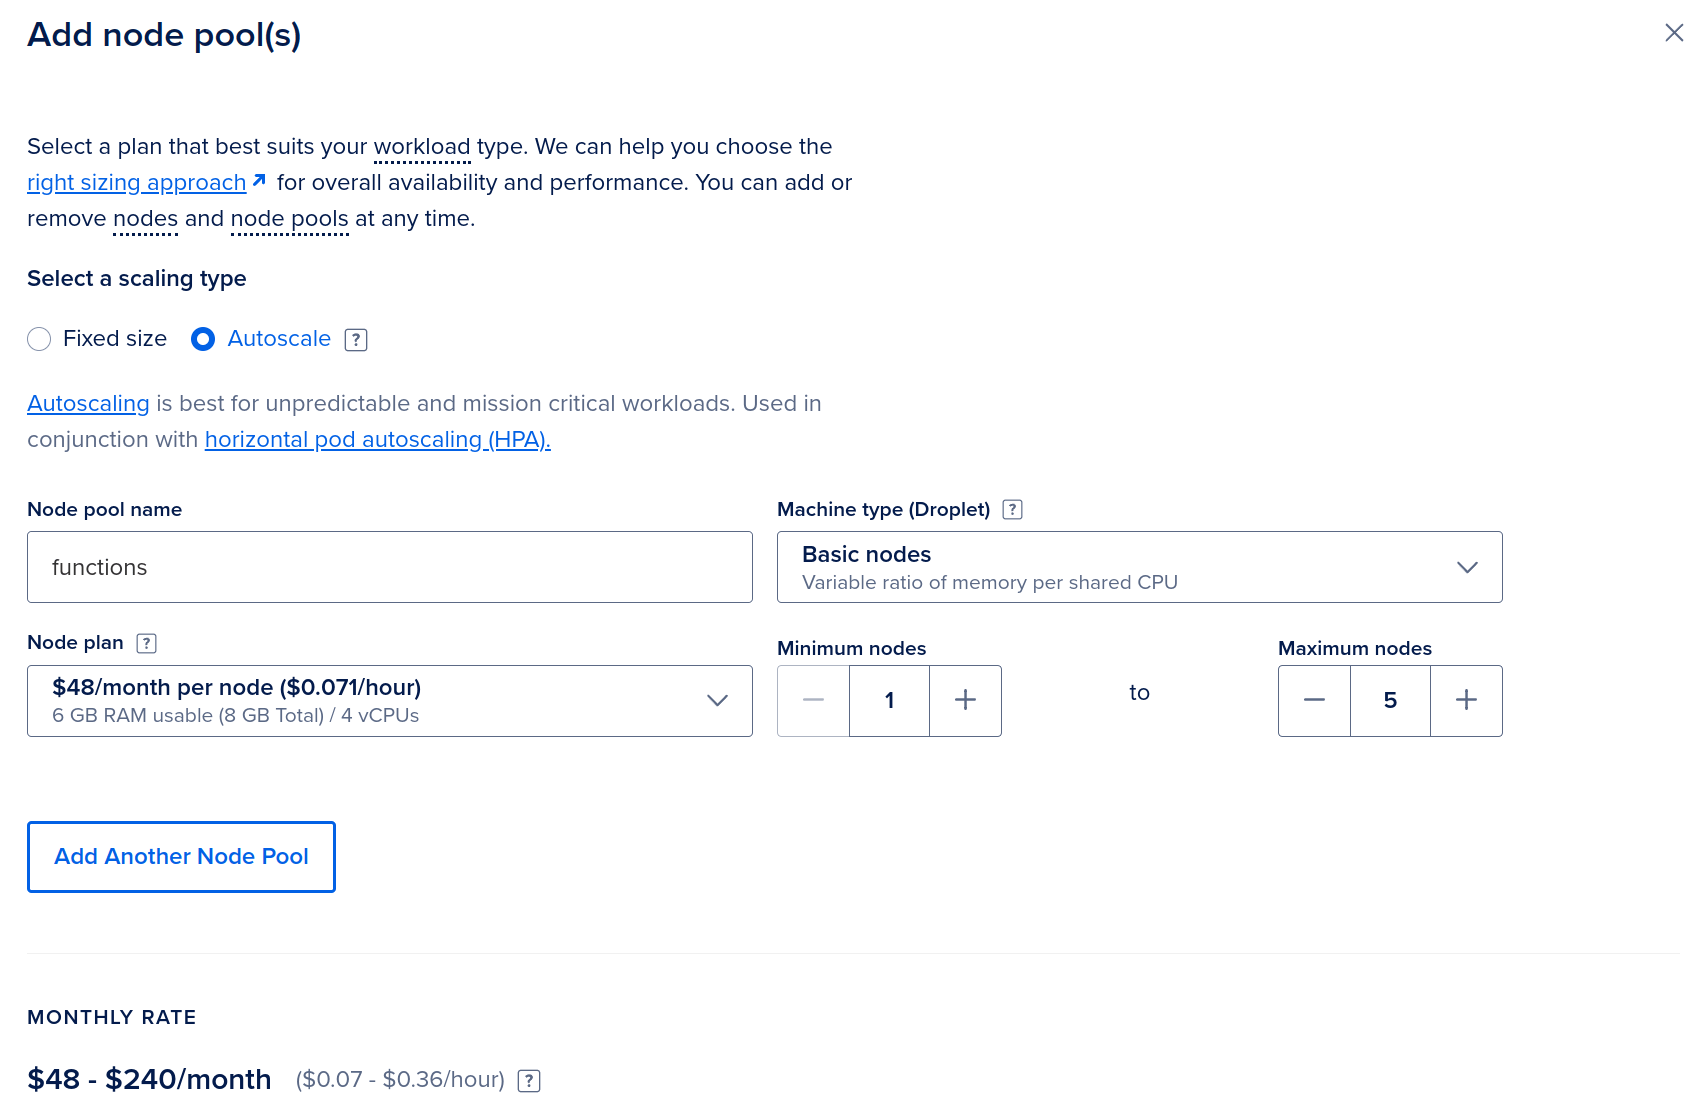
The second node pool will auto-scale and will be reserved for running functions
The minimum size is 1, and the maximum can be set rather high, because you’re unlikely to hit it. With some cloud providers, such as Google Cloud, you can set the minimum size to zero nodes, which is really convenient if you need multiple pools or are using Scale To Zero on your functions.
Next, install OpenFaaS Pro into the cluster using your license key.
We recommend using the deployment guide, then enabling Ingress via an Ingress Controller or Istio.
Configure a function for the pool
Before we create a function, we need to define a Profile with a scheduling constraint that tells Kubernetes to only run the function on nodes in the functions node pool.
kubectl apply -f- << EOF
kind: Profile
apiVersion: openfaas.com/v1
metadata:
  name: functions
  namespace: openfaas
spec:
    affinity:
      nodeAffinity:
        requiredDuringSchedulingIgnoredDuringExecution:
          nodeSelectorTerms:
          - matchExpressions:
            - key: doks.digitalocean.com/node-pool
              operator: In
              values:
              - functions
EOF
The label doks.digitalocean.com/node-pool is attached to all nodes in a DOKS cluster, this label will vary according to the managed Kubernetes engine that you’re using. If you’re using self-managed hosts with K3s or kubeadm, then you can apply your own labels to nodes and use that instead.
Learn more about Profiles here
Next, let’s create a function using the OpenFaaS Function custom resource, you could also use faas-cli and a stack.yaml file if you wish.
nodeinfo.yaml:
---
apiVersion: openfaas.com/v1
kind: Function
metadata:
    name: nodeinfo
    namespace: openfaas-fn
spec:
    name: nodeinfo
    image: ghcr.io/openfaas/nodeinfo:latest
    labels:
        com.openfaas.scale.min: "1"
        com.openfaas.scale.max: "10"
        com.openfaas.scale.target: "50"
        com.openfaas.scale.type: rps
    annotations:
      com.openfaas.profile: functions
    requests:
     cpu: 200m
     memory: 100Mi
There are three things we need for cluster-autoscaling to take place:
- We must configure the OpenFaaS autoscaler so that it knows when to create new pods. Learn more
- The
com.openfaas.profileannotation is set tofunctionswhich tells the OpenFaaS operator to apply thefunctionsProfile to the function. This will add the node affinity constraint to the function’s Pod spec at deployment time. - The function must have a
requestssection in the YAML, which tells Kubernetes how much CPU and memory to reserve for the function. This is important because the cluster autoscaler will only add nodes if there is a resource request that cannot be met by the existing nodes.
Run kubectl apply -f nodeinfo.yaml to deploy the function.
Check the nodes in your cluster:
NAME                   STATUS   ROLES    AGE     VERSION
pool-o2bptn785-q25t7   Ready    <none>   3h40m   v1.25.4
pool-o2bptn785-q25tm   Ready    <none>   3h40m   v1.25.4
pool-o2bptn785-q25tq   Ready    <none>   3h39m   v1.25.4
functions-q24hi        Ready    <none>   3m55s   v1.25.4
You’ll see that we have the minimum set of nodes in the functions pool.
See that the function is in the proper pool:
kubectl get pod -n openfaas-fn -o wide

NAME                        READY   STATUS    RESTARTS   AGE     IP            NODE
nodeinfo-6f7dfc88fb-phk5d   1/1     Running   0          8m45s   10.244.0.77   functions-q24hi
Open several terminals with the following commands in each, or use Tmux to split up the panes for a single terminal:
# Watch the pods and where they are running
kubectl get pod -n openfaas-fn -o wide -w

# Watch events like when a Pod is pending
kubectl get event -n openfaas-fn -w --sort-by=.metadata.creationTimestamp

# See the node list grow dynamically
kubectl get nodes -w
You may also want to watch the OpenFaaS autoscaler:
# See the load being calculated, and Pods being adjusted
kubectl logs -n openfaas deploy/autoscaler -f
Want to learn how to use Tmux? Watch my guide
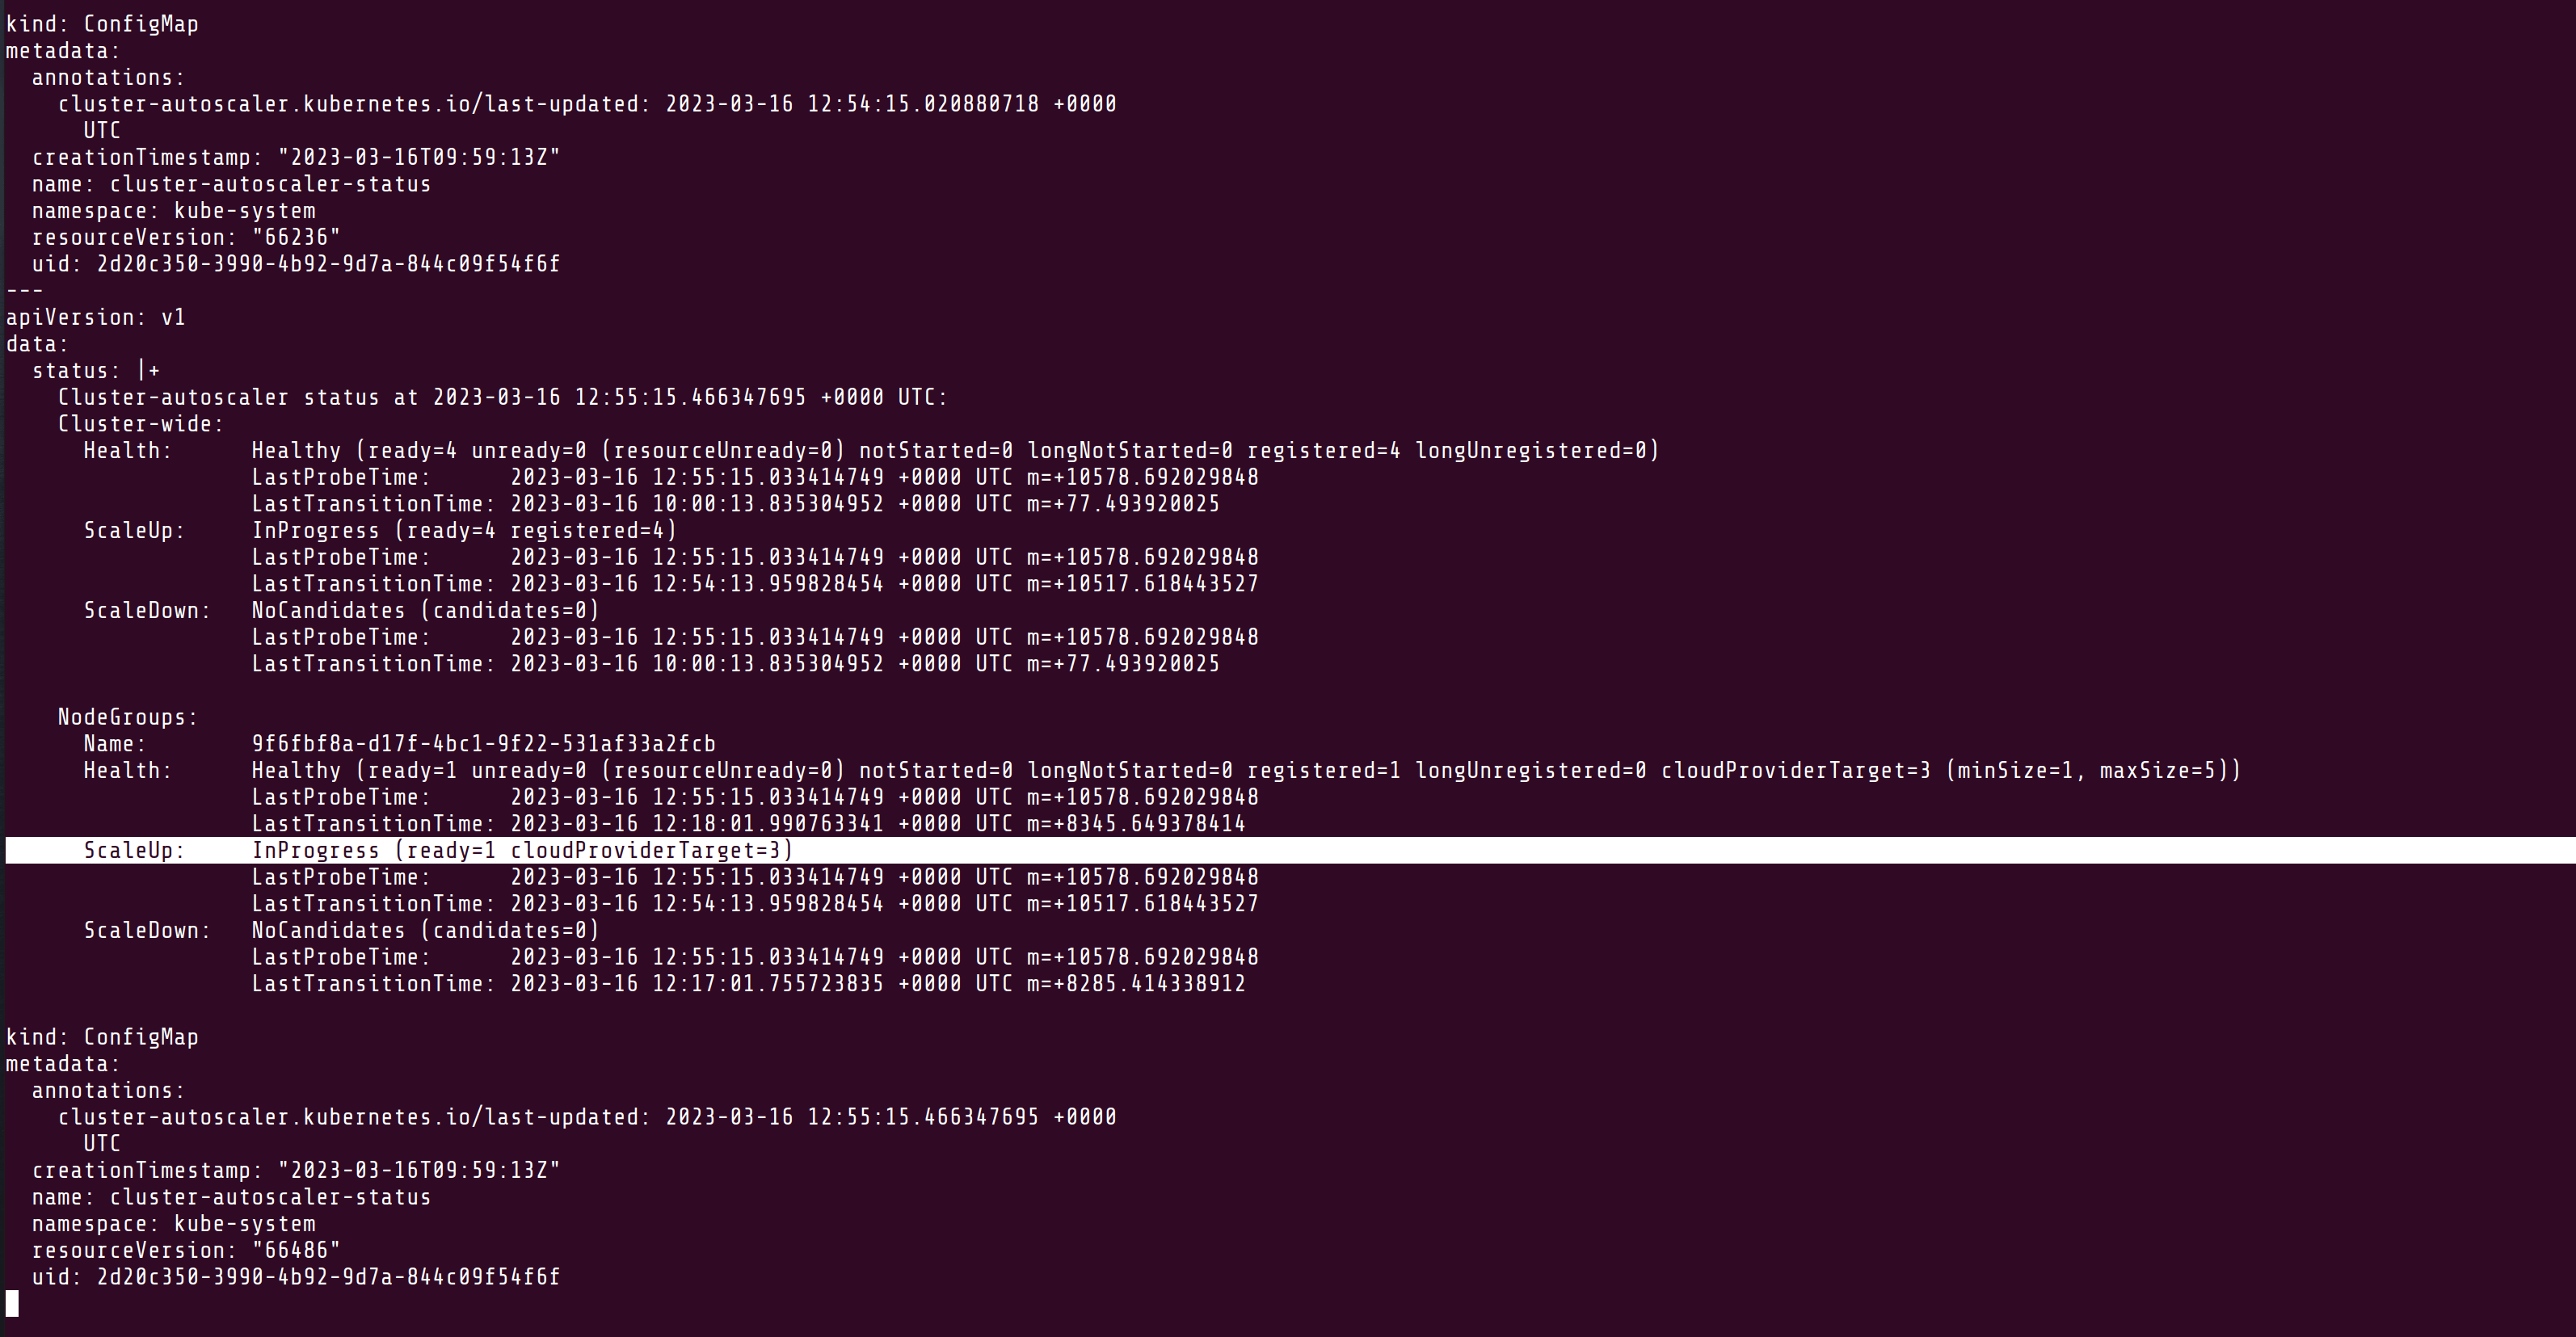
Finally, DigitalOcean’s cluster autoscaler will print its output into a ConfigMap that you can view with:
kubectl get configmap cluster-autoscaler-status -o yaml -n kube-system
Is that a lot of terminals? Yes. Kubernetes is a complex system, but it’s important to understand how everything works together, even if you only ever look at the OpenFaaS dashboard, CLI and Grafana dashboards in production.
Now, start a load-test with hey to the function, and you’ll see that the one node we had, will start to run out of resources, and another one will be added to the pool.
hey -z 5m -c 10 -q 400 http://139.59.199.69:8080/function/nodeinfo
We’re running a test over 5 minutes, with 10 concurrent connections, and a soft cap of 400 requests per second.
We know that our Pod is configured for RPS scaling with a target of 50 RPS per pod, so we should see the amount of Pods scale to 8.
By default, DigitalOcean will not install the Kubernetes metrics-server. I installed it with arkade using: arkade install metrics-server, which then enabled two additional and important commands:
kubectl top node
kubectl top pod -n openfaas-fn
You can’t add --watch/-w to these commands, but you can have them repeat in a terminal by prefixing them with the watch command.
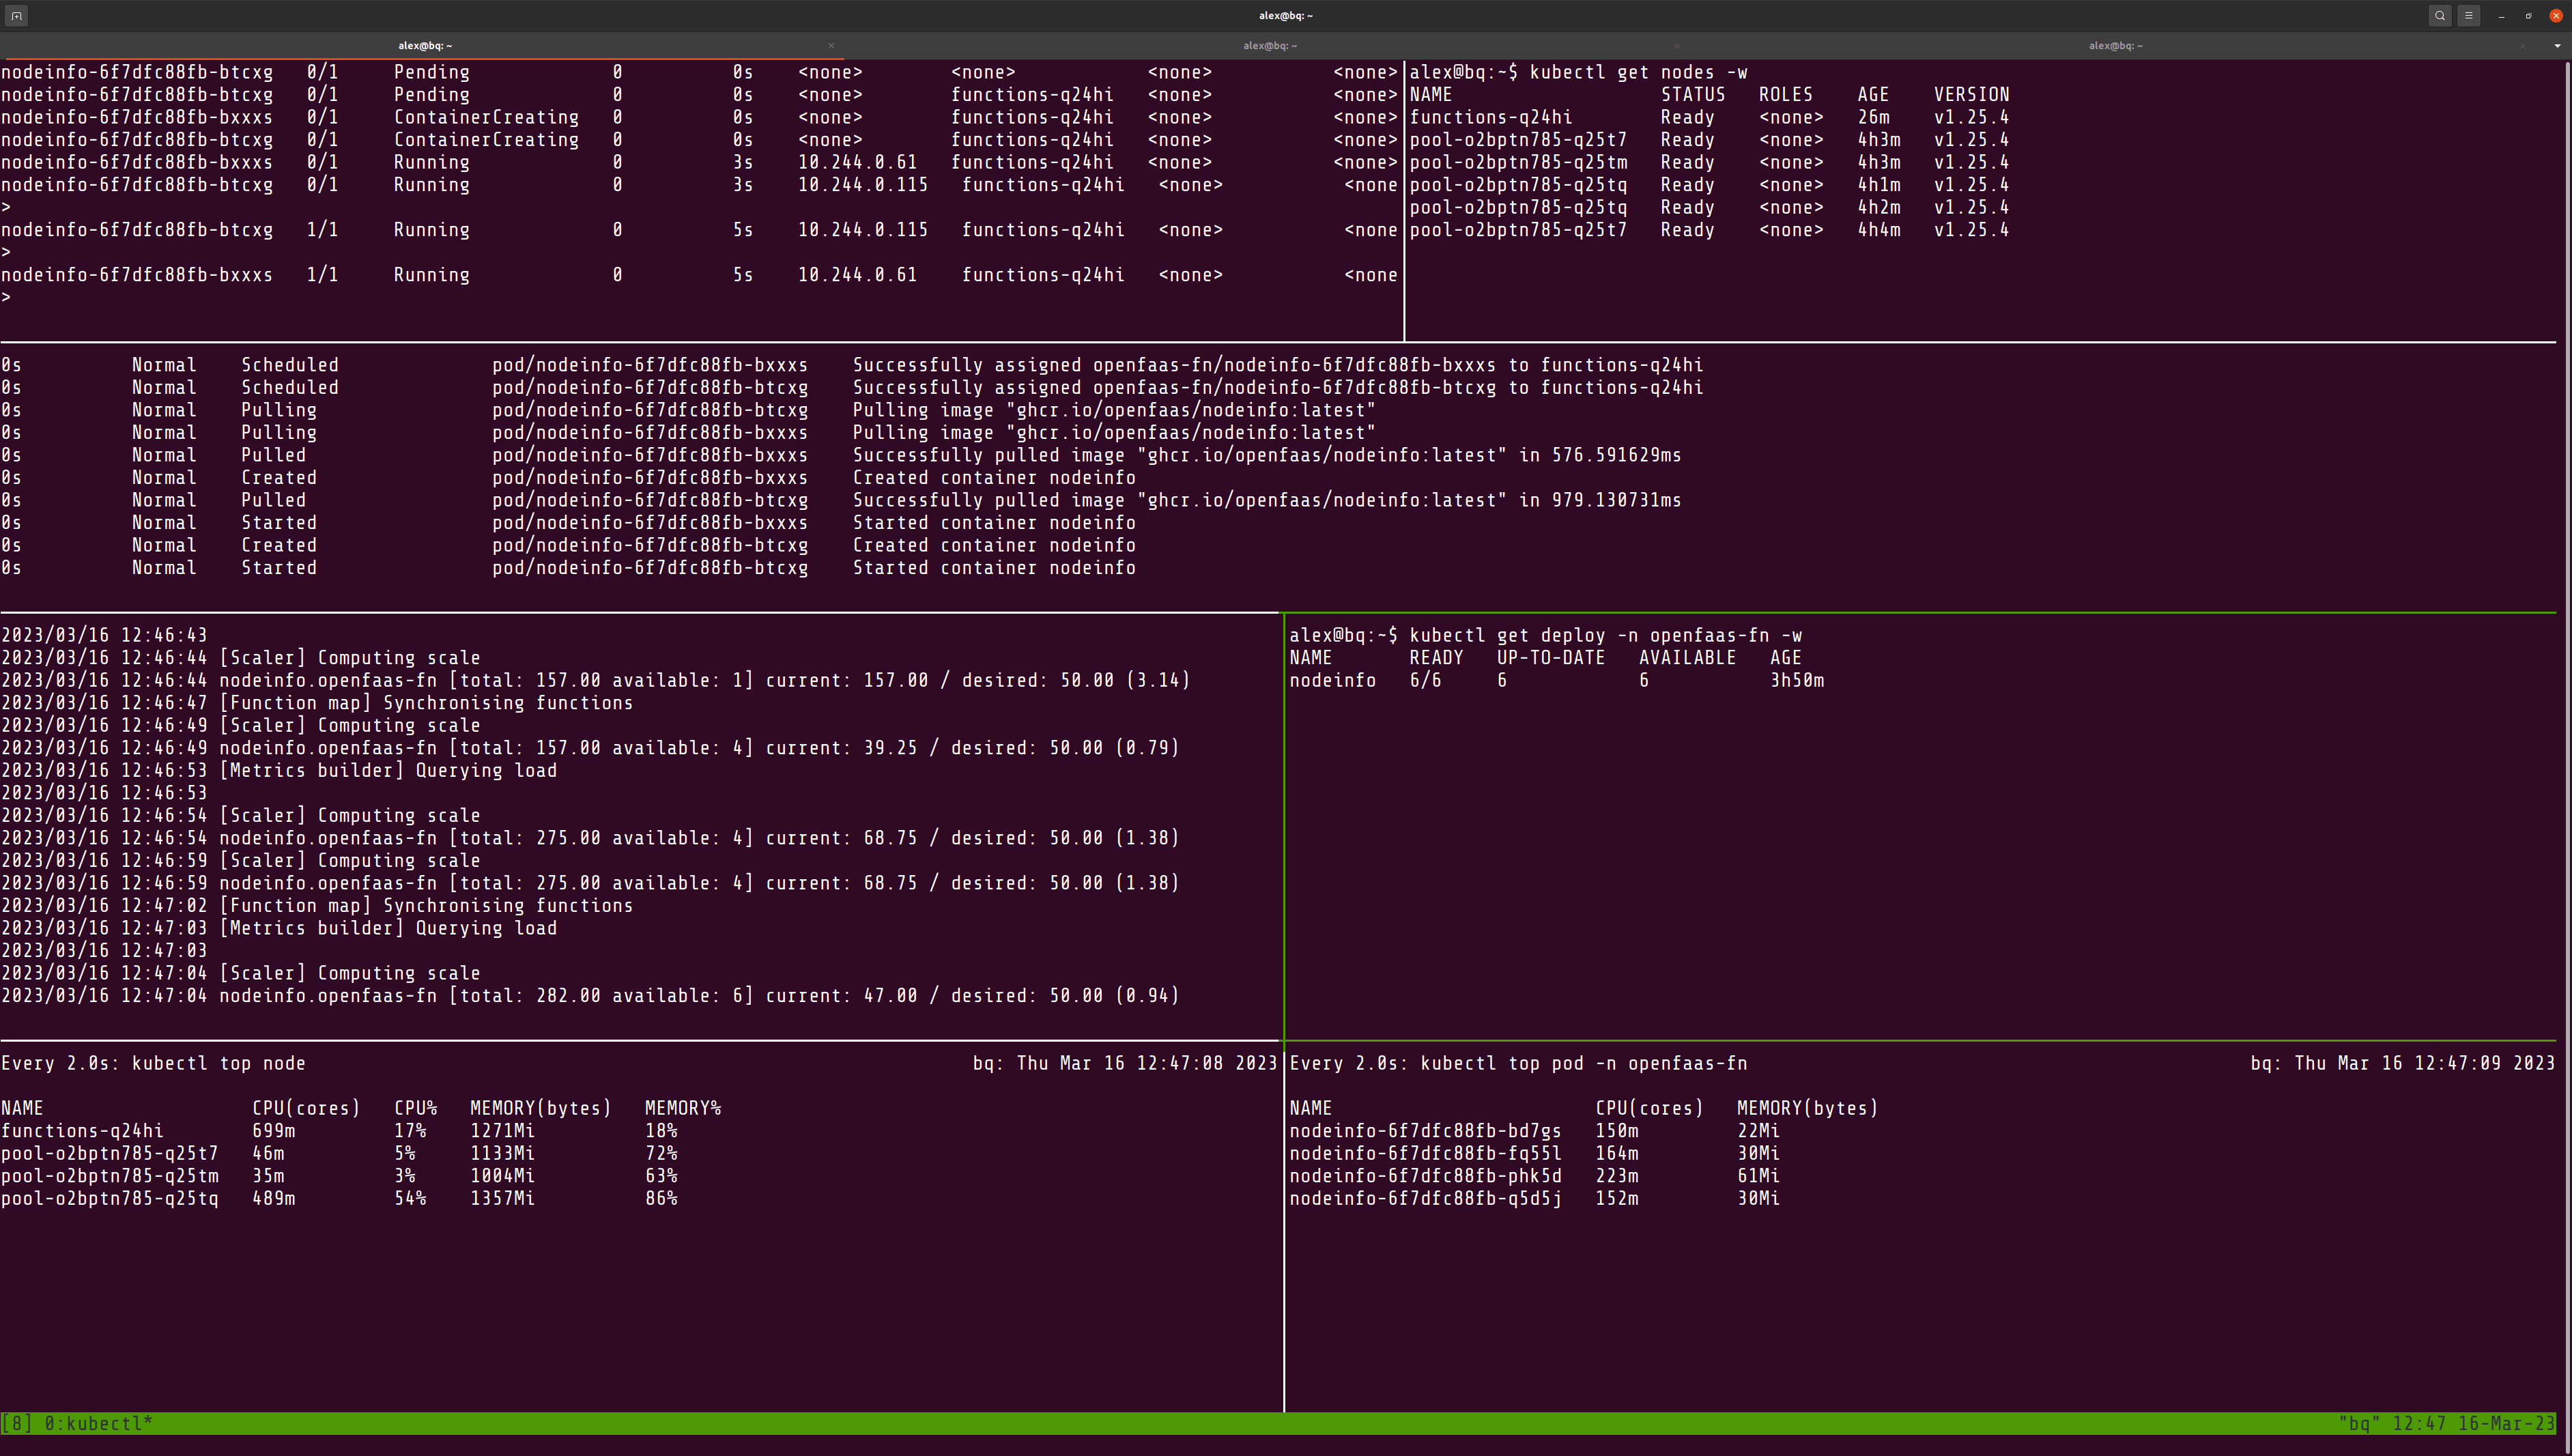
Horizontal scaling well within the capacity we have in the cluster will not cause new nodes to be added unnecessarily.
In my initial test, due to the low resource requirements of the nodeinfo function, I didn’t see node scaling take place - but I did see Pod based scaling take us up to 6 replicas.
    requests:
     cpu: 200m
-     memory: 500Mi
+     memory: 1500Mi
So, I increased both the resource requests and the incoming load with hey to cause the OpenFaaS autoscaler to request more Pods than the functions pool had capacity for.
We can see that with the new RAM allocation, and the higher load test values, the OpenFaaS Function scaler has requested 10 Pods, but only 4 can be scheduled.
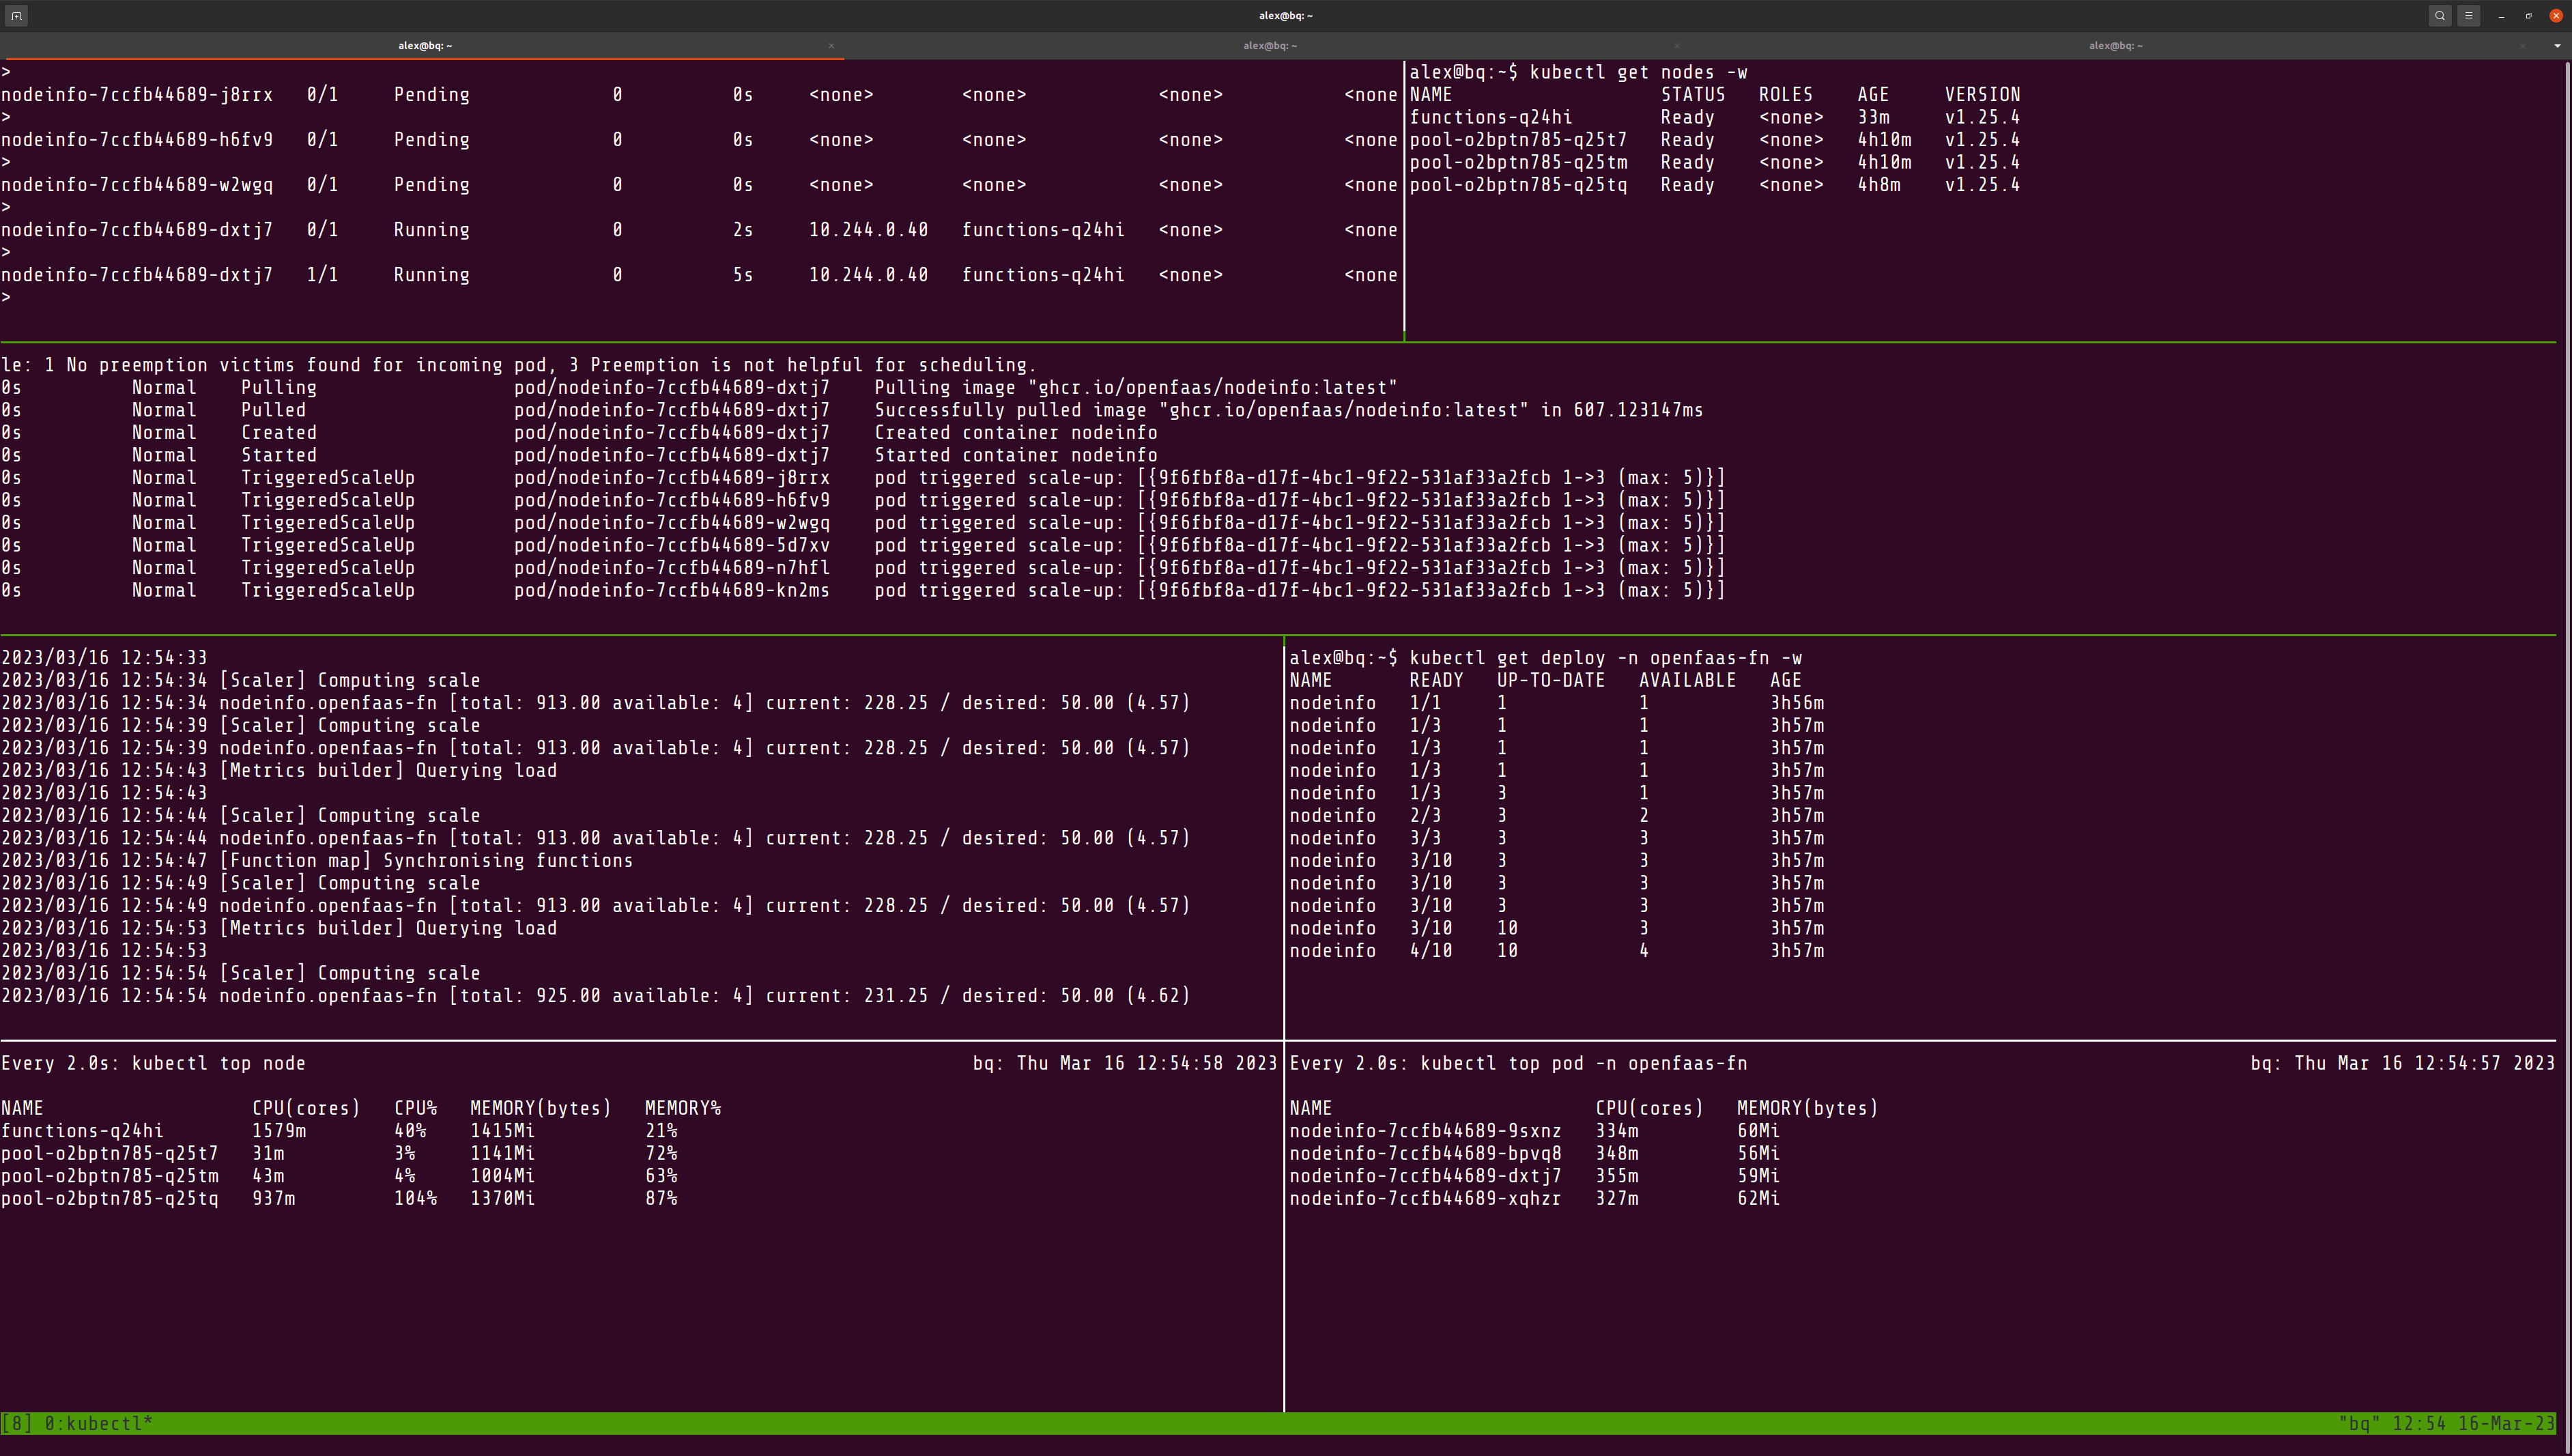
Cluster scaling is needed to get to the right number of Pods required
The default configuration for the cluster autoscaler is not as quick as the OpenFaaS function scaler, so it takes a few minutes to detect the need for more nodes. After detecting the need, provisioning and attaching the new nodes can also take a while.
The ConfigMap shows the status, needing 3x nodes instead of 1:
Finally, the extra nodes arrive, are provisioned and the load is being balanced between each of the three machines:
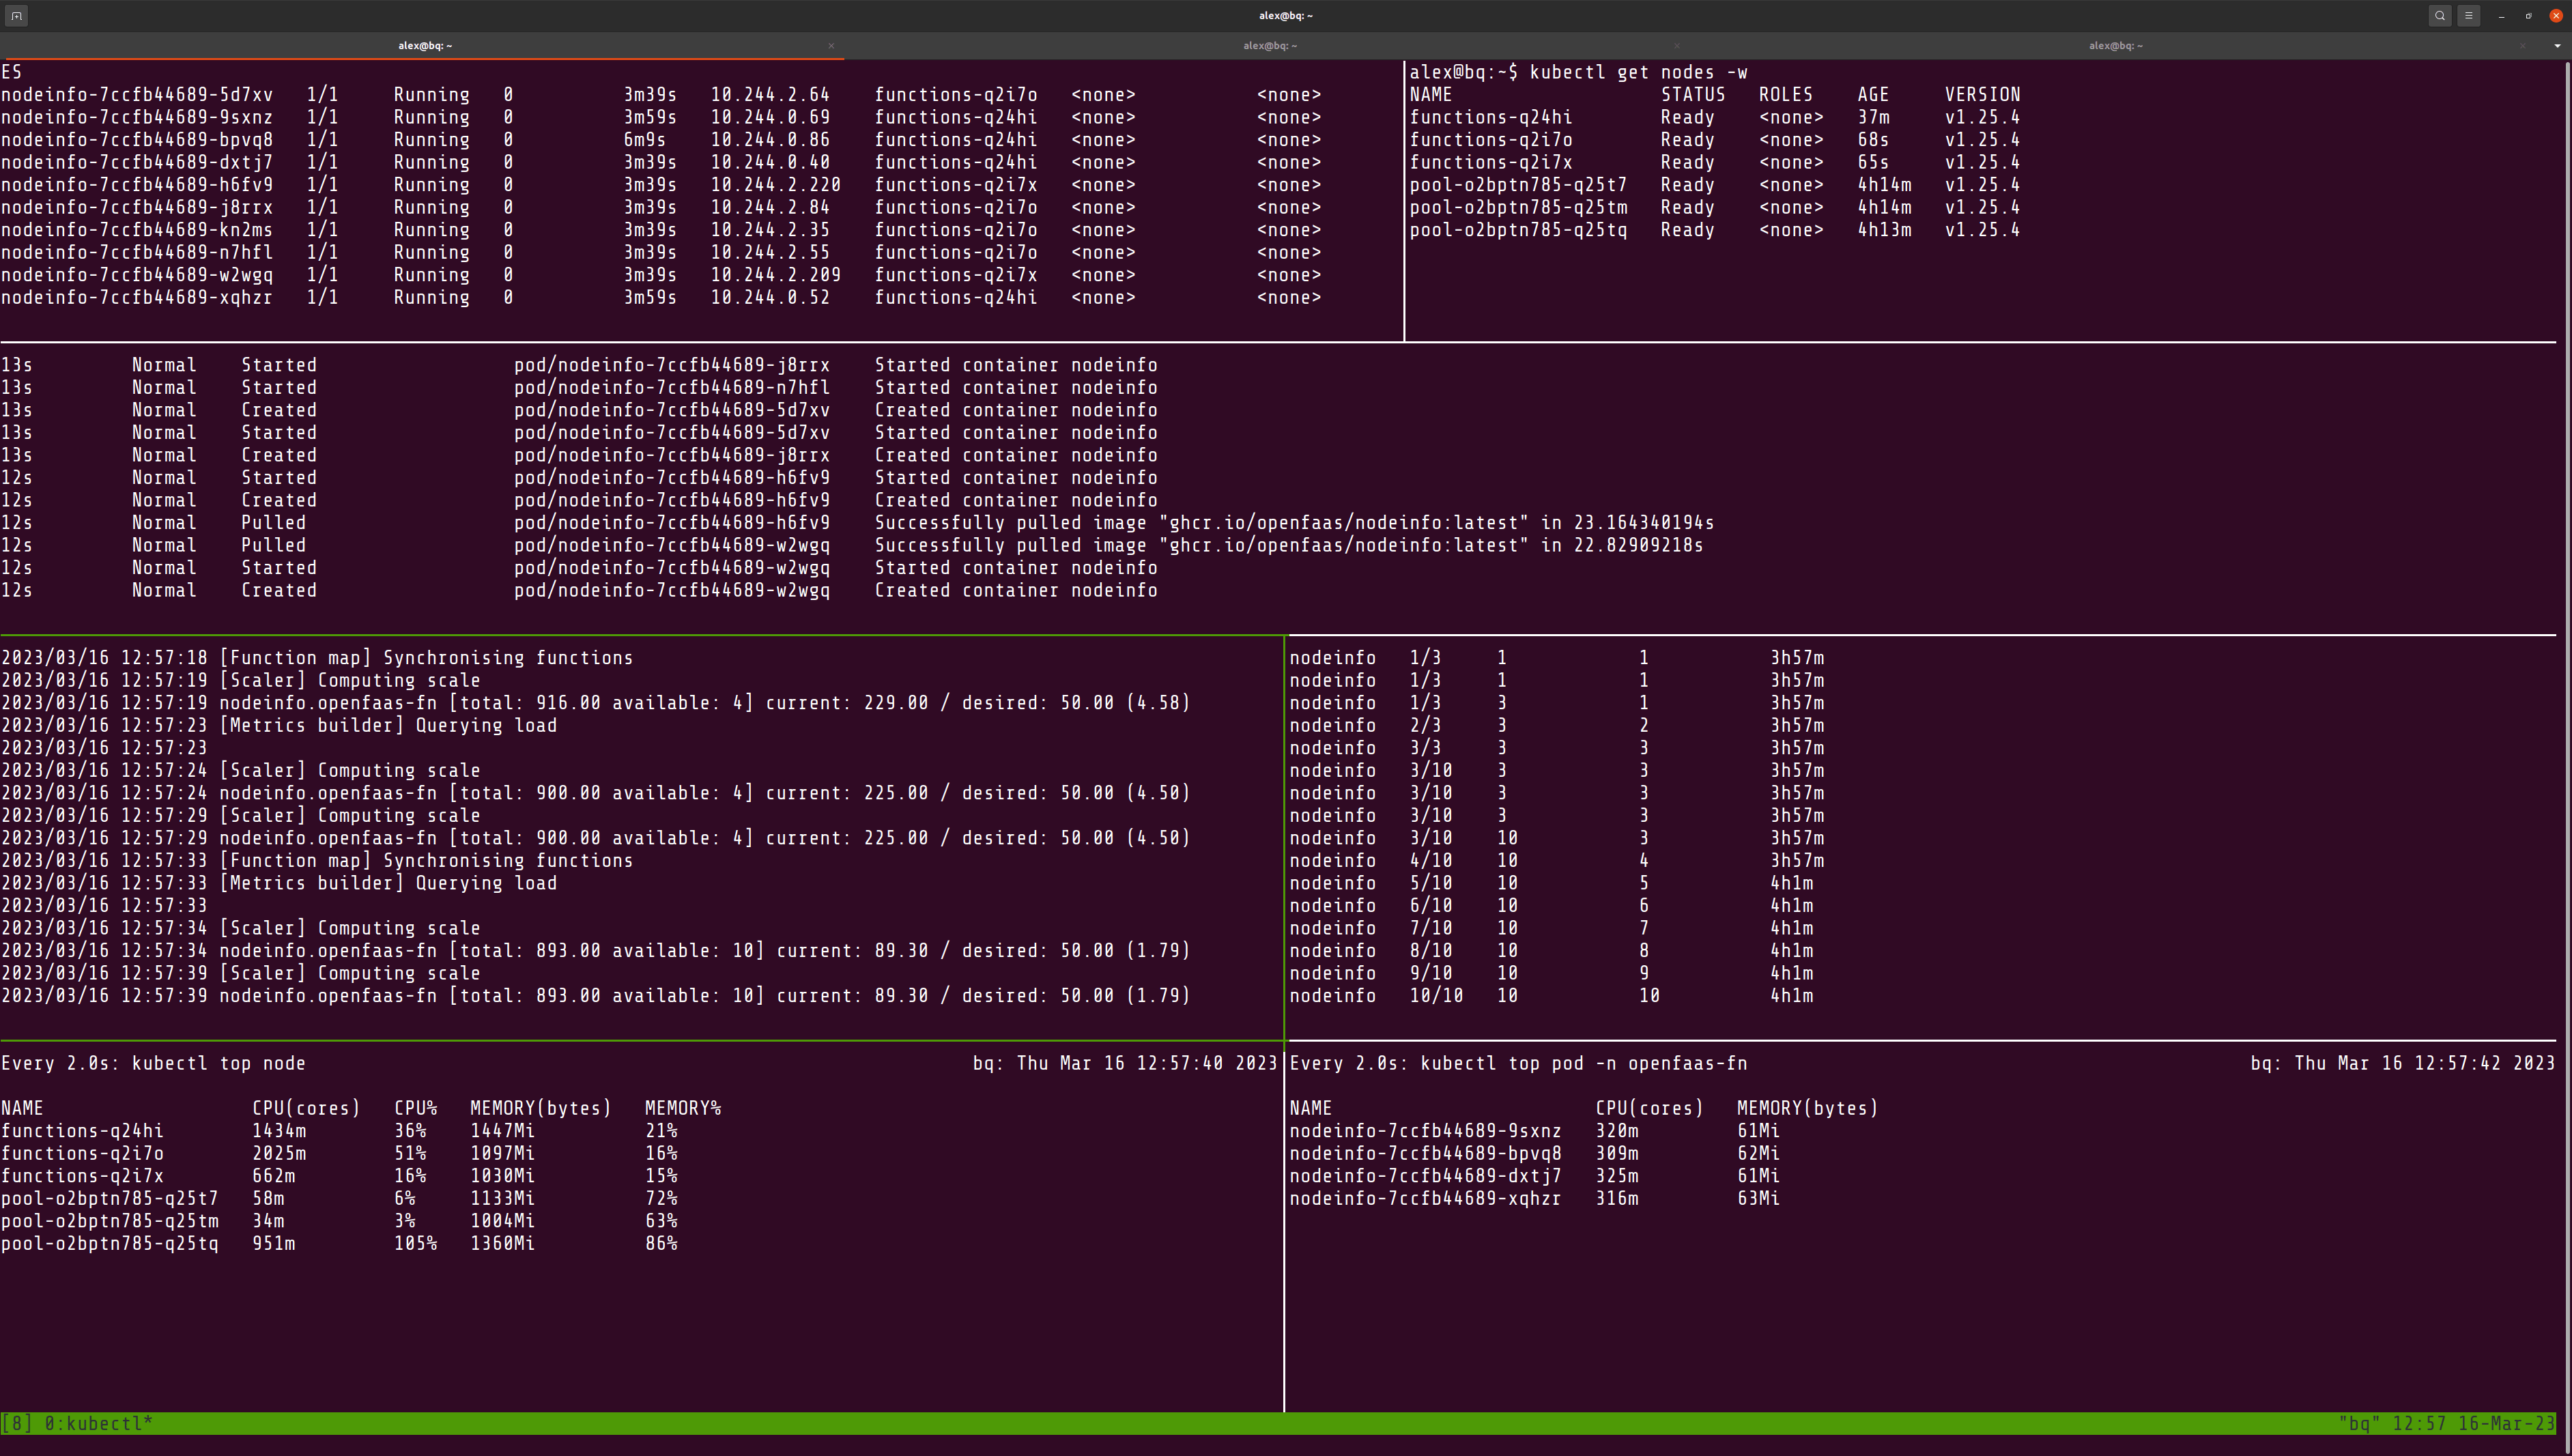
After a period of inactivity, the cluster autoscaler will remove the extra nodes, and the cluster will return to its original size.
If all these terminals are a bit much to keep in mind, we also provide a number of Grafana Dashboards for customers which correlate function replicas, input load, performance, duration and error rate.

OpenFaaS Pro Overview dashboard
They can also be used to monitor CPU and RAM consumption, to help you set the right resource requests for your functions.
Wrapping up
The load test we ran here represented a sudden and continued spike in traffic, similar to what I see when my blog hits the front page of Hacker News. But every system will have a different pattern of traffic, and you’ll need to fine-tune the OpenFaaS scaler along with your cloud provider’s node autoscaler to suit your needs.
We have a number of autoscaler test suites and sample functions which you can run as an OpenFaaS Pro customer including a variable load, ramping up over time, and concurrency limiting.
See also: OpenFaaS autoscaler tests
With DigitalOcean Kubernetes in particular, every node gets 1GB of Pods schedule to it before you get to run any of your work Pods. Bear this in mind, and make sure that you have enough resources to run the functions you need.
I got caught out during testing, where three nodes were added with 1GB of free RAM, but the auto-scaler didn’t remove them again because of all of DigitalOcean’s own Pods that it runs.
Cluster auto-scaling is much slower than Pod scaling, machines have to be found, provisioned, loaded up and joined into the cluster. So whilst a Pod may come online in under 2 seconds, a new node could take several minutes in the worst case.
If you’d like to try out the tutorial, you can get 200 USD of credit to use over 60 days, if you’re a new user. Use this referral link to claim it.
Headroom and heterogenous node sizes
What if the load exceeds capacity and your function can’t scale up?
Some cluster auto-scalers such as Spot by NetApp allow you to configure headroom, which means that you’re not running right up to the wire before you add more nodes. It can also add nodes predictively based upon past load, oversize nodes or add heterogenous sizes.
If you’re an AWS EKS customer, did you know that you can also enable a node pool which runs entirely within ephemeral AWS Fargate containers?
Queuing and deferred execution
Another alternative is to use a queueing system, like the one built-into OpenFaaS with NATS JetStream. It defers work until there is enough capacity and will retry functions until they are processed.
What should we use at work?
What if you’re a hobbyist and use OpenFaaS Community Edition (CE)? There is still a basic function auto-scaler included, however you do not have the same control over the scaling, or the capability to limit where functions or the core services for OpenFaaS are scheduled.
For anyone using OpenFaaS at work, we recommend OpenFaaS Pro.
See also:
- The Next Generation of Queuing: JetStream for OpenFaaS
- Rethinking Auto-scaling for OpenFaaS
- Docs: OpenFaaS Pro Autoscaler
- Kubernetes Cluster Autoscaler repository
Would you like a demo, or to talk to our team about functions with OpenFaaS?
Get in touch with us via the form on our Pricing page.

Alex Ellis
Founder of @openfaas.