Confluent’s hosted Kafka service is a quick and cost effective way to trigger your functions by events
In this walk-through, we’ll set up a development account on Confluent Cloud for free access to an Apache Kafka cluster suitable for testing and development. We’ll then set up the Kafka Connector which is bundled with OpenFaaS Standard to trigger functions on new messages.
Most of the time we see people publishing JSON, however binary and text data are also supported. So your function will receive a payload in the HTTP body, along with other metadata like the topic name, additional headers, partition and offset.
How it works

The conceptual overview shows subscriptions being managed by the Kafka Connector, rather than replicas of functions.
Instead of managing dozens or hundreds of individual subscriptions between the various replicas of each function, this is managed in the long-lived Kafka connector. This pattern is common across the various connectors including Postgres, AWS SNS/SQS, Cron, etc. In addition to helping manage the number of subscribers per partition, having the subscription managed in a connector means that all functions can be scaled to zero safely.
An OpenFaaS event connector can subscribe to one or many topics, and then invoke functions based upon the messages it receives. The connector is stateless, and can be scaled up or down to match the number of partitions in the topic. If it happens to crash, it’ll pick up again from the last offset that was committed to the partition.
Once a connector is deployed and subscribed to one or more topics, then all you need to do is to update a function with an extra annotation. So if you added the topic: payment.created annotation to the new-payment function, from there on it would be invoked with the payload of every message that was published to the payment.created topic.
Common options for authentication
There are several common ways to configure Apache Kafka, then a few more esoteric options used by some enterprise companies.
In order of complexity:
- No authentication, plaintext communication (without TLS)
- Plaintext communication (without TLS), but with SASL
- TLS with a client certificate
- TLS without a client certificate, but with SASL
In general, hosted providers will always enable TLS, then use either 3) a client certificate or 4) SASL for authentication.
Confluent Cloud uses TLS and SASL. SASL is a username and password. This is the option we’ll be using here, and means creating two secrets in Kubernetes, one for the username, and one for the password.
Aiven uses TLS plus a client certificate using their own self-signed CA, which means creating three secrets, one for the CA, one for the client certificate and one for the private key.
The argument that we tend to hear for 1 or 2, is that a team may be running their stack within a private network or VPC. This model only provides the illusion of security, and is not recommended. It can mean that an eavesdropper or malware that is running within the private environment could potentially gain access to the Kafka cluster.
Provision a Kafka cluster with Confluent Cloud
Head over to Confluent Cloud and sign up as a new customer.
Click on Environments and Default, if Default is not displayed, create it.
Click Clusters or “Add Cluster”
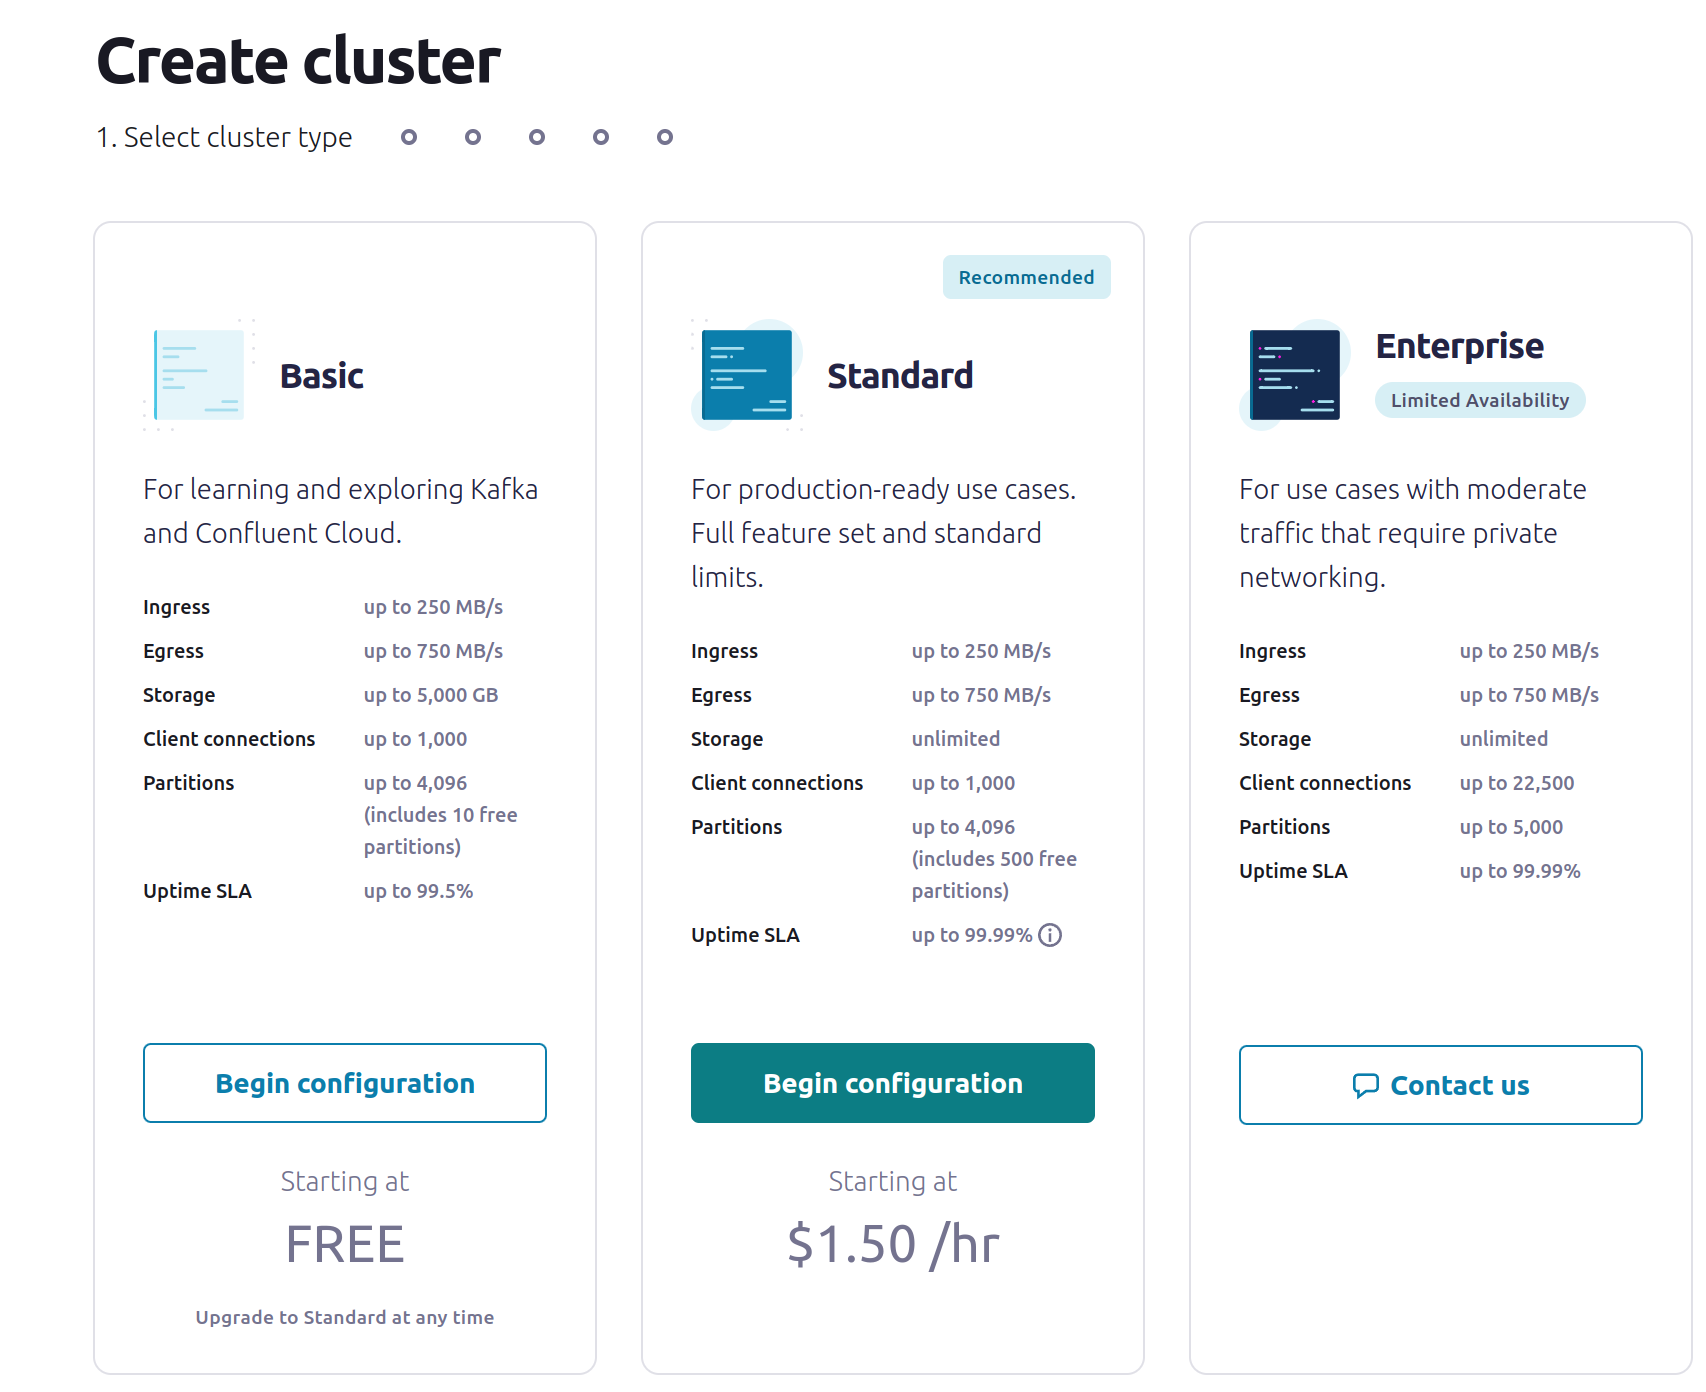
At time of writing, the Basic tier of cluster is free, and more than suitable for testing out the Kafka Connector to see how it works.
If you are concerned about being charged by Confluent for your testing, then pay close attention to any limits or quotas that you may exceed.
Pick a cloud from AWS to Google Cloud to Azure, if you already use one of these vendors, use that one so that you can keep your data in the same region.
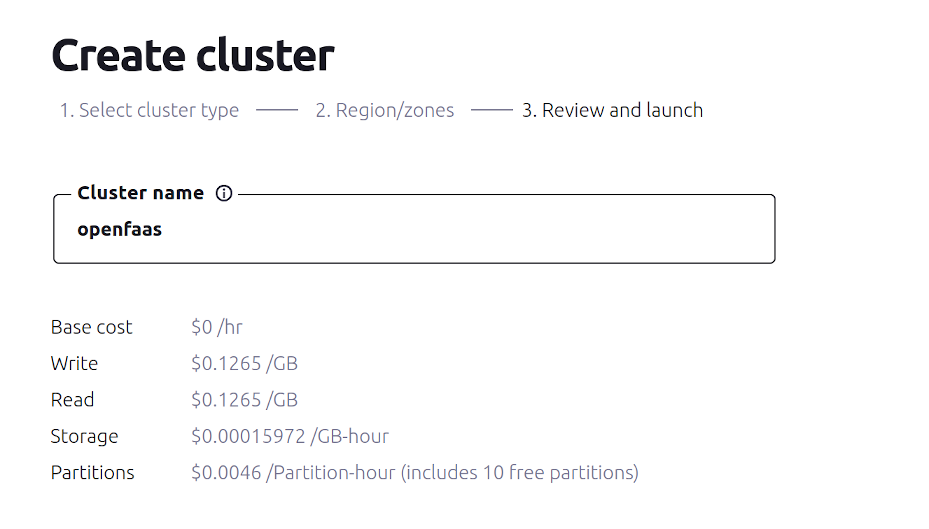
Obtain connection information
Click Cluster Overview, then API Keys and Create Key
For testing, Confluent recommend using the Global access key.
Save the Key as kafka-broker-username.txt
Save the Secret as kafka-broker-password.txt
Add a description such as “openfaas” or “kafka-connector”
Next, click Cluster Settings, and under Endpoints copy the Bootstrap server value.
This will look like pkc-l6wr6.europe-west2.gcp.confluent.cloud:9092.
Note this down for later user.
Create a topic for testing and name it faas-request:
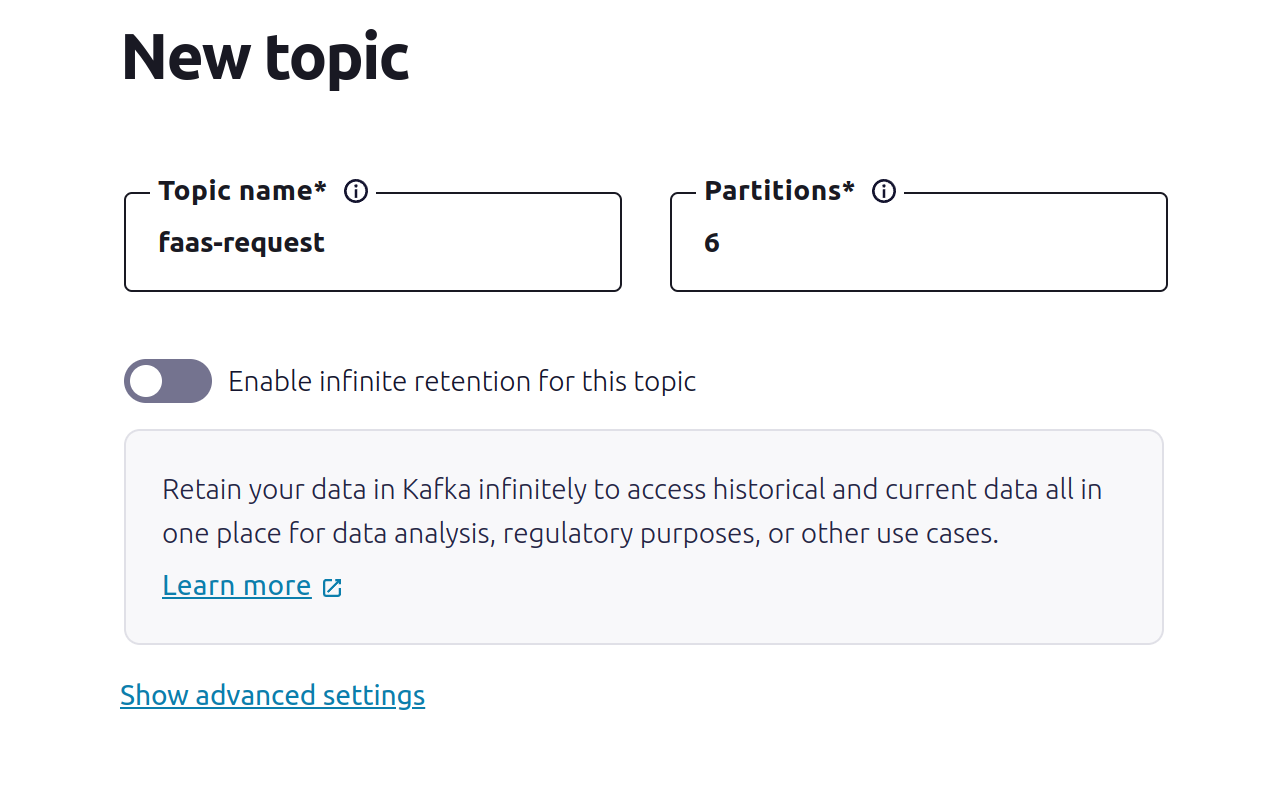
For testing, you could set the partition to a smaller value like 3.
Next we’ll configure the Helm chart, and use the topic name in the configuration.
Configure and install the Helm Chart
Add the OpenFaaS Helm chart repository to Helm, then update your repositories:
helm repo add openfaas https://openfaas.github.io/faas-netes/
helm repo update
The Helm Chart for the Kafka Connector can be installed in two ways:
- Once per topic - more scalable, with a bit more setup
- Once with many topics - less scalable, but easier to get started
All settings are configured through a values.yaml file, and the end of the README file has a reference explaining all the various options.
Now create a values.yaml file, and add each of the below sections:
For the topic or topics, provide either a single topic, or a comma-separated list of topics.
topics: faas-request
You should also set the content type that you expect messages to be encoded in:
contentType: text/plain
The most common option is application/json, but you can also use text/plain or application/octet-stream for binary data.
Your function’s handler will receive the message as the body of the HTTP request, and a number of additional headers defined in the docs.
Next add the address of the Kafka Cluster or Broker:
brokerHosts: pkc-l6wr6.europe-west2.gcp.confluent.cloud:9092
If you have more than one bootstrap server in the cluster, you can specify each in a comma-separated list.
Make sure you change this value, do not use the above value, which is from our own test cluster.
Since we know that both TLS and SASL are enabled on Confluent Cloud, we should now add:
tls: true
saslAuth: true
Finally, add a secret for the username and password that we saved earlier:
kubectl create secret generic \
  kafka-broker-username \
  -n openfaas \
  --from-file broker-username=~/kafka-broker-username.txt

kubectl create secret generic \
  kafka-broker-password \
  -n openfaas \
  --from-file broker-password=~/kafka-broker-password.txt
Depending on how many times you want to install the Kafka connector, you may wish to change the name of the installation in Helm (kafka-connector), or if you are using a single topic, you can leave it as-is.
helm upgrade kafka-connector openfaas/kafka-connector \
    --install \
    --namespace openfaas \
    -f values.yaml
Troubleshooting the installation
Check the logs of the connector:
kubectl logs -n openfaas deploy/kafka-connector
If it is not loading, then you may have missed a secret, check this by running kubectl describe -n openfaas deploy/kafka-connector followed by kubectl get events -n openfaas --sort-by=.metadata.creationTimestamp.
There are several other ways to troubleshoot the connector, by turning on verbose and debug logging.
Update values.yaml and then run the helm upgrade command again:
logs:
  # Log debug messages
  debug: true

# Print the data read from the Kafka topic before invoking functions
printRequestBody: true

# Print the data received from invoked functions
printResponseBody: true
It’s recommended to turn off those settings for production, when you’ve resolved any issue that you’re facing.
Trigger a function from the Kafka topic
The Kafka topic we created was called faas-request, we can have a function subscribe to this topic by adding a topic annotation.
The printer function from the OpenFaaS Store will show the message that it received in its logs along with any additional headers.
Create a stack.yaml file:
provider:
  name: openfaas

functions:
  printer:
    skip_build: true
    image: ghcr.io/openfaas/printer:latest
    annotations:
        topic: faas-request
Now run faas-cli deploy to deploy the function.
Alternatively, you can deploy without a YAML file: faas-cli store deploy printer --annotation topic=faas-request
Now over on the Confluent Dashboard, navigate to the Topics, then faas-request, Messages then Produce new message to this topic.
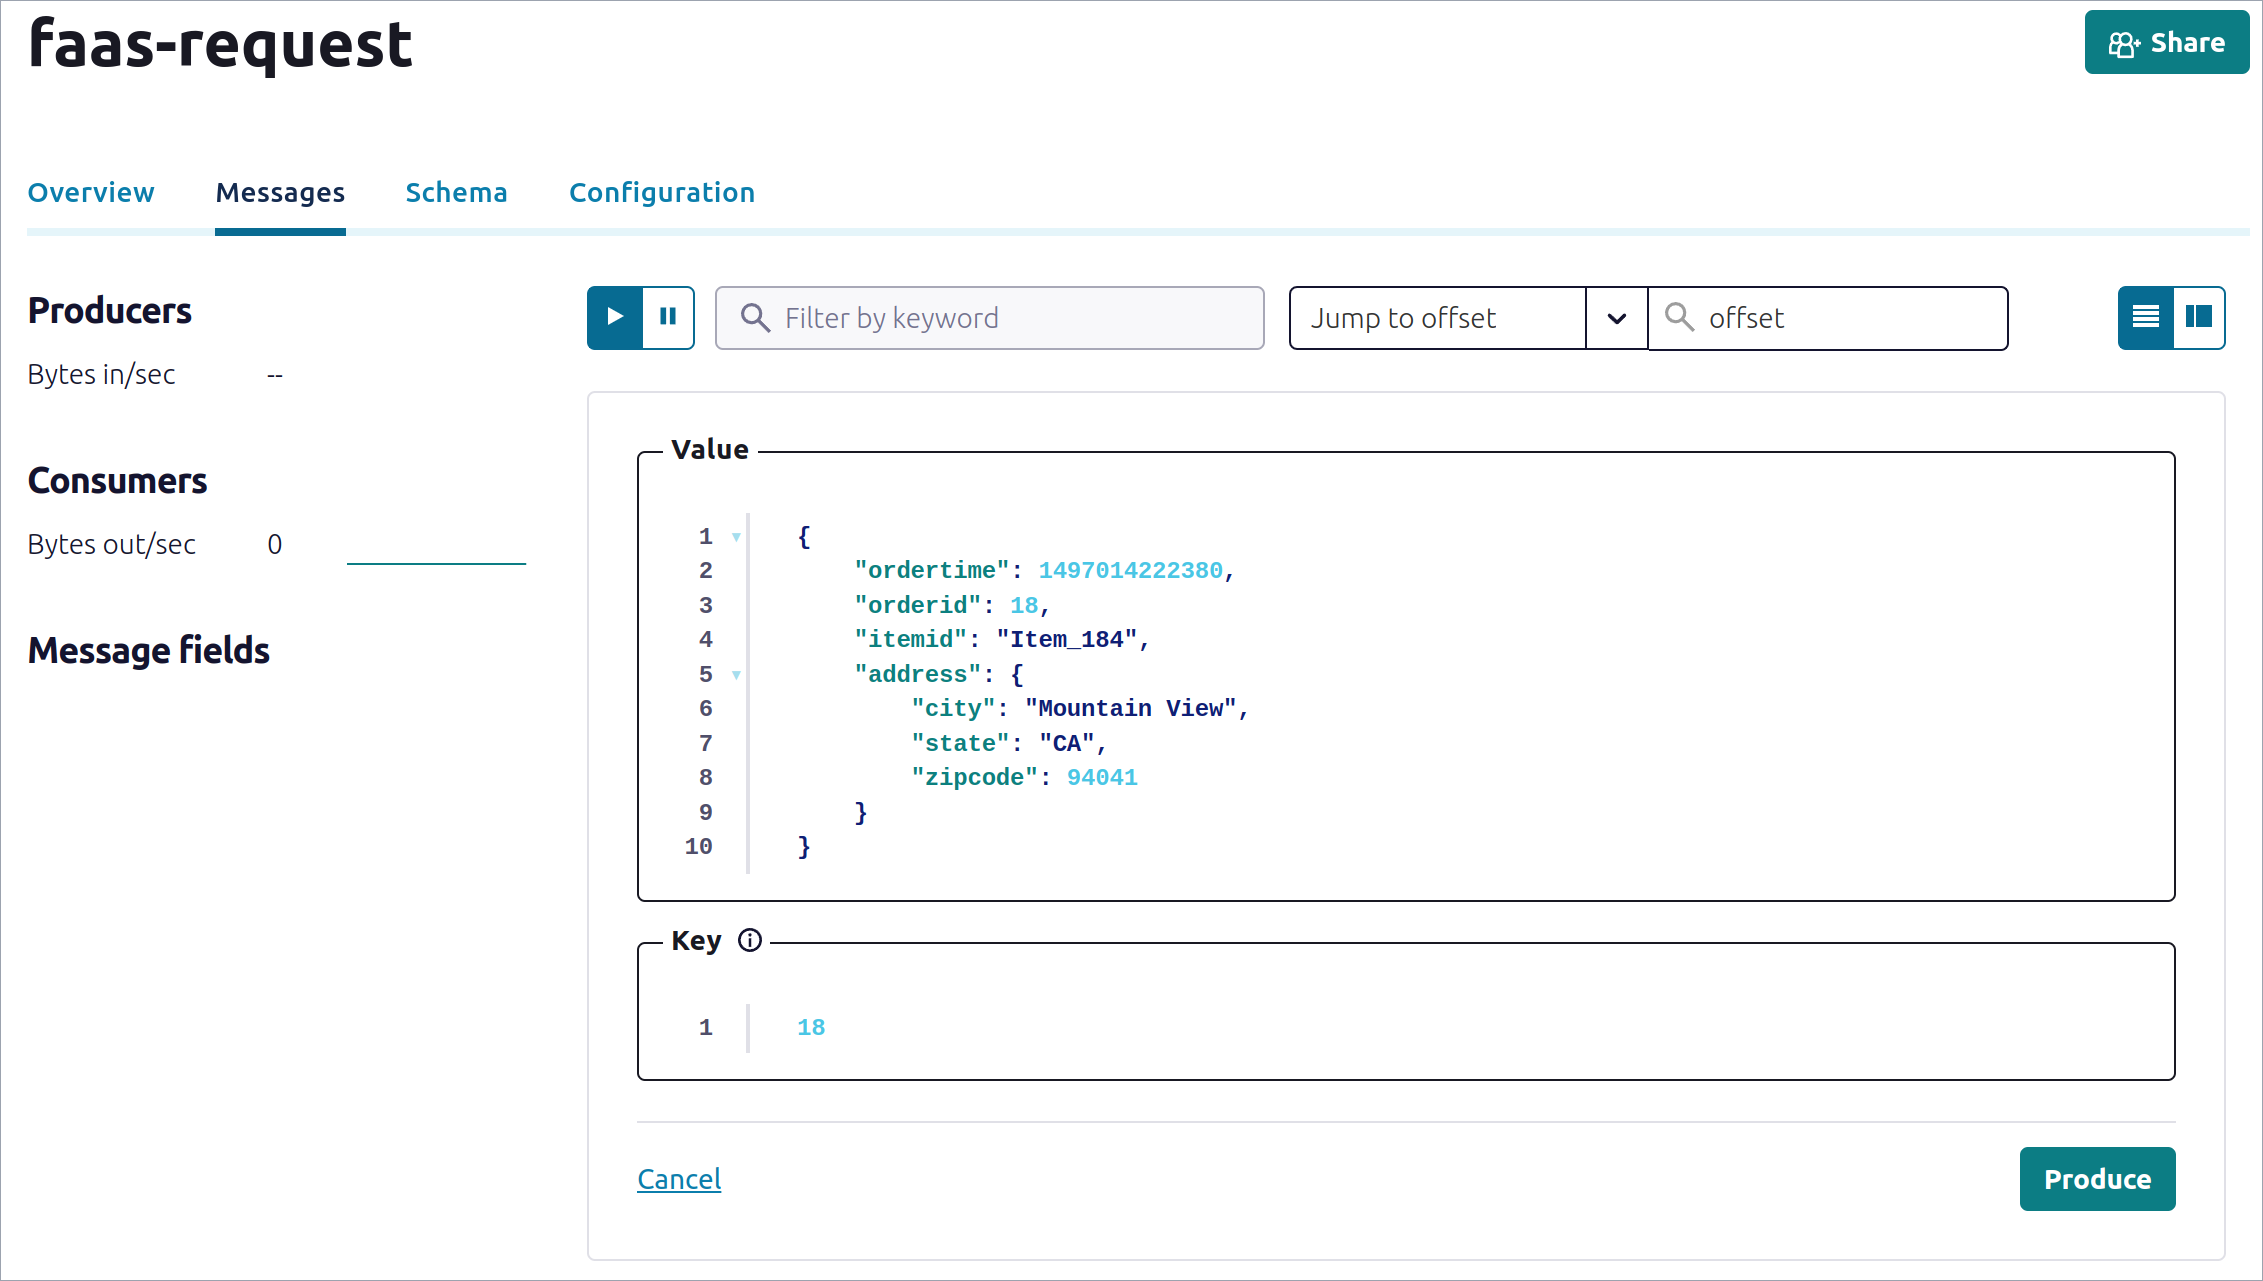
Produce a message on the topic
Navigate to the OpenFaaS Standard Dashboard, and click on the printer function, then Logs.
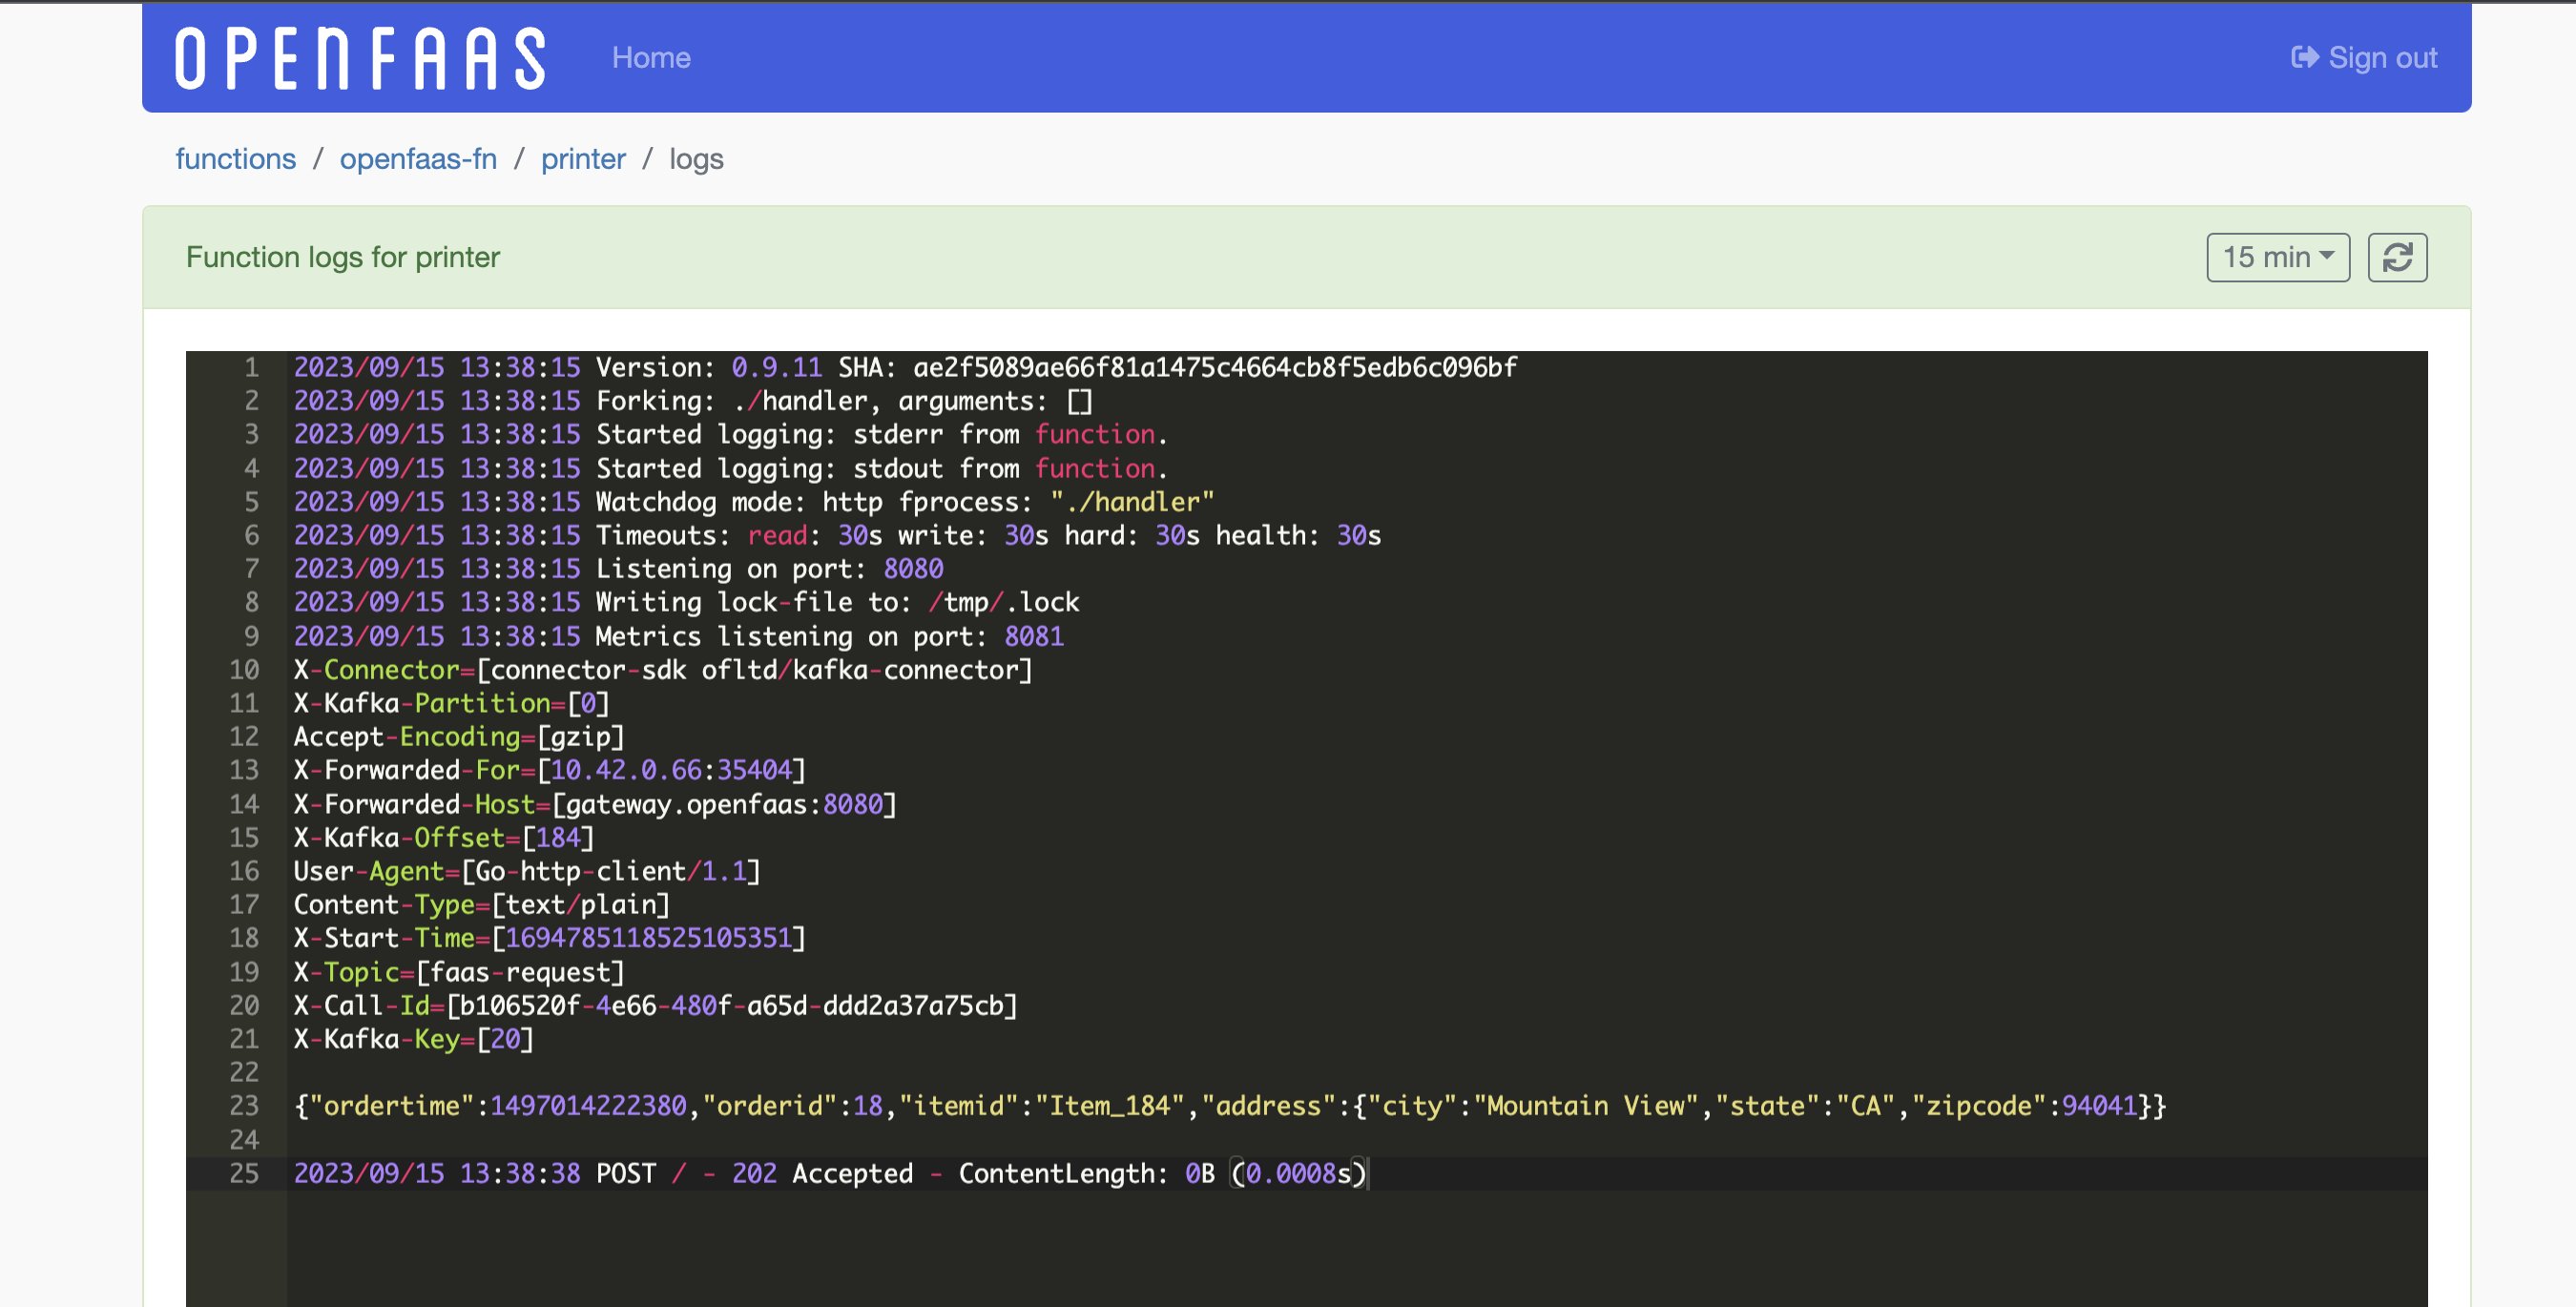
Viewing the logs of the invocation
In addition to the body, you’ll also note a number of headers, these are explained in more details in the Kafka Connector docs
Producing messages from functions
If you have existing systems that publish messages to Apache Kafka, you’ll be able to configure the connector to start sending those messages to functions.
However, if you do not currently have any message producers, then you can publish messages from a function by using a Kafka client library, such as confluent-kafka for Python or Sarama for Golang, etc.
Bear in mind that most Python libraries for Kafka will use librdkafka, which is a C++ module, and will likely build from source when building your function. For that reason, you should use an OpenFaaS template based upon Debian Linux, which includes a C++ toolchain.
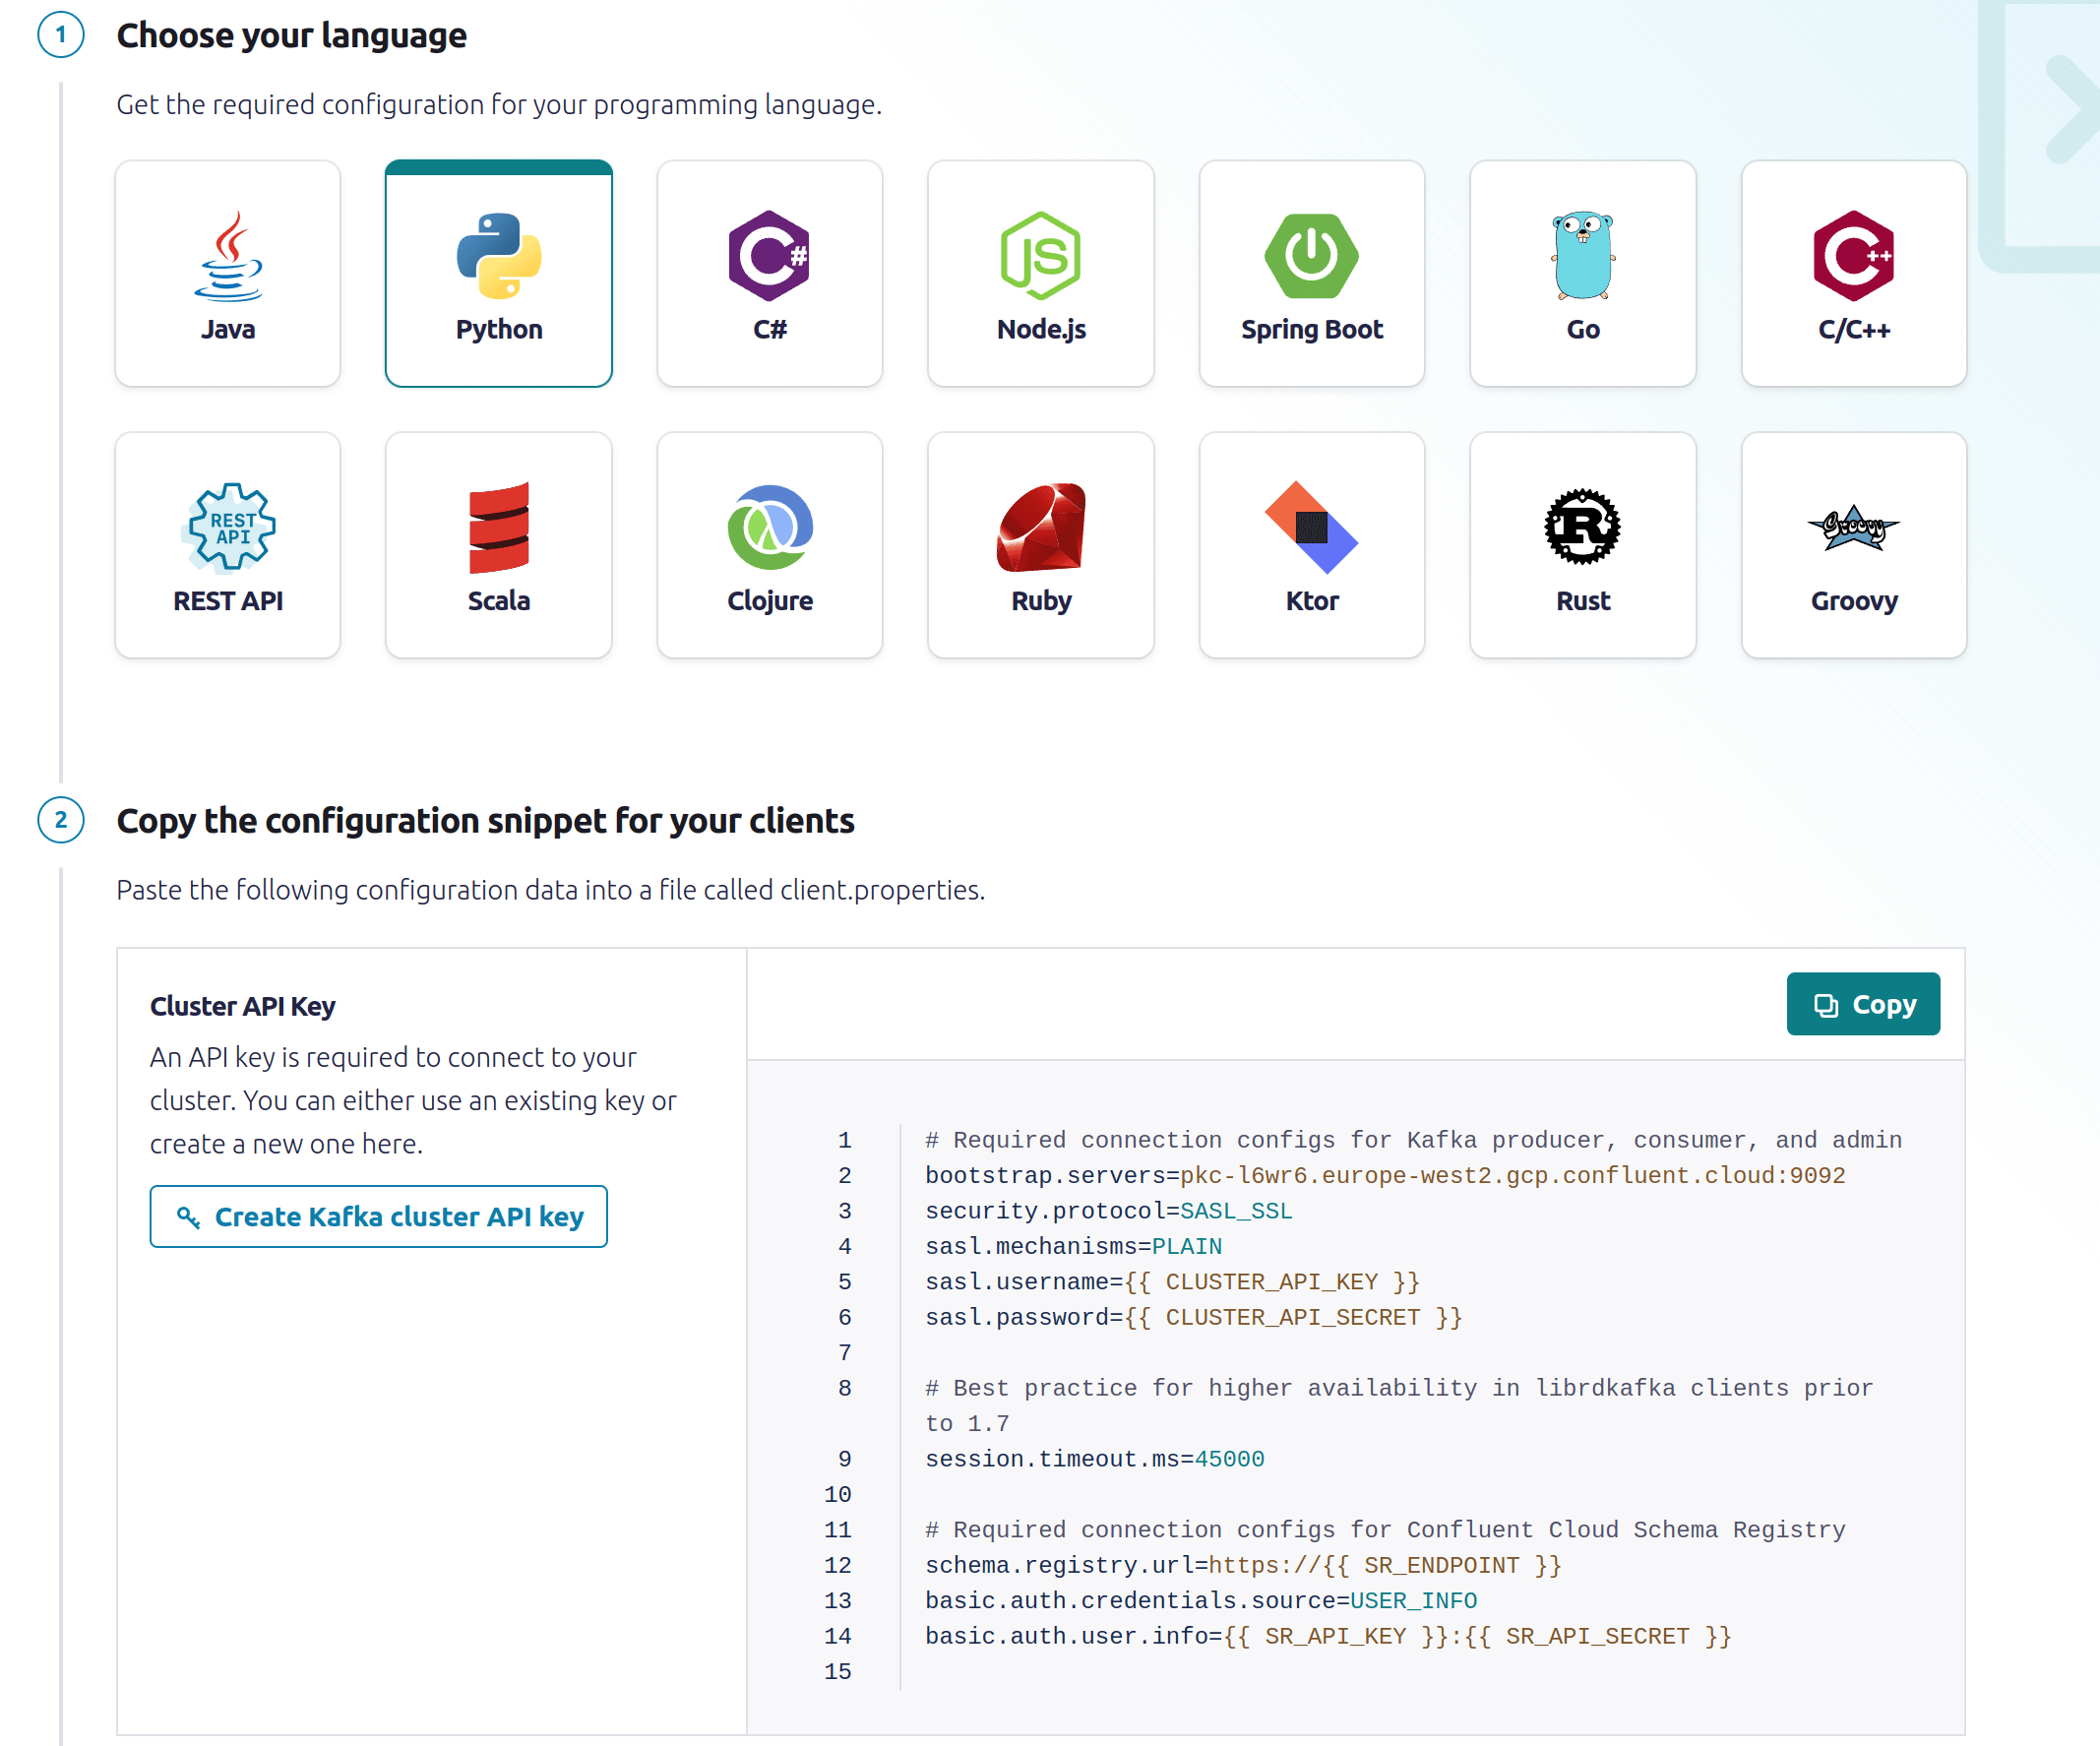
Code samples for producing messages in different languages
By clicking “Add Client” in the Confluent Dashboard, you can see the code samples for producing messages in different languages, and also discover different SDKs.
To produce messages on the faas-request topic, run the following:
# Replace the below value with your own registry and username
export OPENFAAS_PREFIX=ttl.sh/openfaas-tutorial

faas-cli template store pull python3-http-debian
faas-cli new --lang python3-http-debian producer

echo "confluent-kafka" > producer/requirements.txt
Create two secrets for the function:
faas-cli secret create kafka-broker-username \
    --from-file ~/kafka-broker-username.txt
faas-cli secret create kafka-broker-password \
    --from-file ~/kafka-broker-password.txt
Update producer.yml:
functions:
  producer:
    lang: python3-http-debian
    handler: ./producer
    image: ttl.sh/openfaas-tutorial/producer:latest

    ### Add/customise the below
    environment:
        kafka_broker: "pkc-l6wr6.europe-west2.gcp.confluent.cloud:9092"
    secrets:
    - kafka-broker-username
    - kafka-broker-password
Then write a handler:
from confluent_kafka import Producer
import socket, os

def handle(event, context):

    username = get_secret('kafka-broker-username')
    password = get_secret('kafka-broker-password')
    broker = os.getenv("kafka_broker")

    conf = {
        'bootstrap.servers': broker,
        'security.protocol': 'SASL_SSL',
        'sasl.mechanism': 'PLAIN',
        'sasl.username': username,
        'sasl.password': password,
        'client.id': socket.gethostname()
    }

    producer = Producer(conf)

    topic = 'faas-request'
    producer.produce(topic, value=event.body)

    producer.flush()

    return {
        "statusCode": 200,
        "body": "Message produced"
    }

def get_secret(name):
    ret = None
    with open("/var/openfaas/secrets/" + name, "r") as file:
        ret = file.read().strip()
    return ret
Run faas-cli up to deploy the function. Whatever body you use to make a HTTP POST will be published to the topic.
Example messages published via the function:
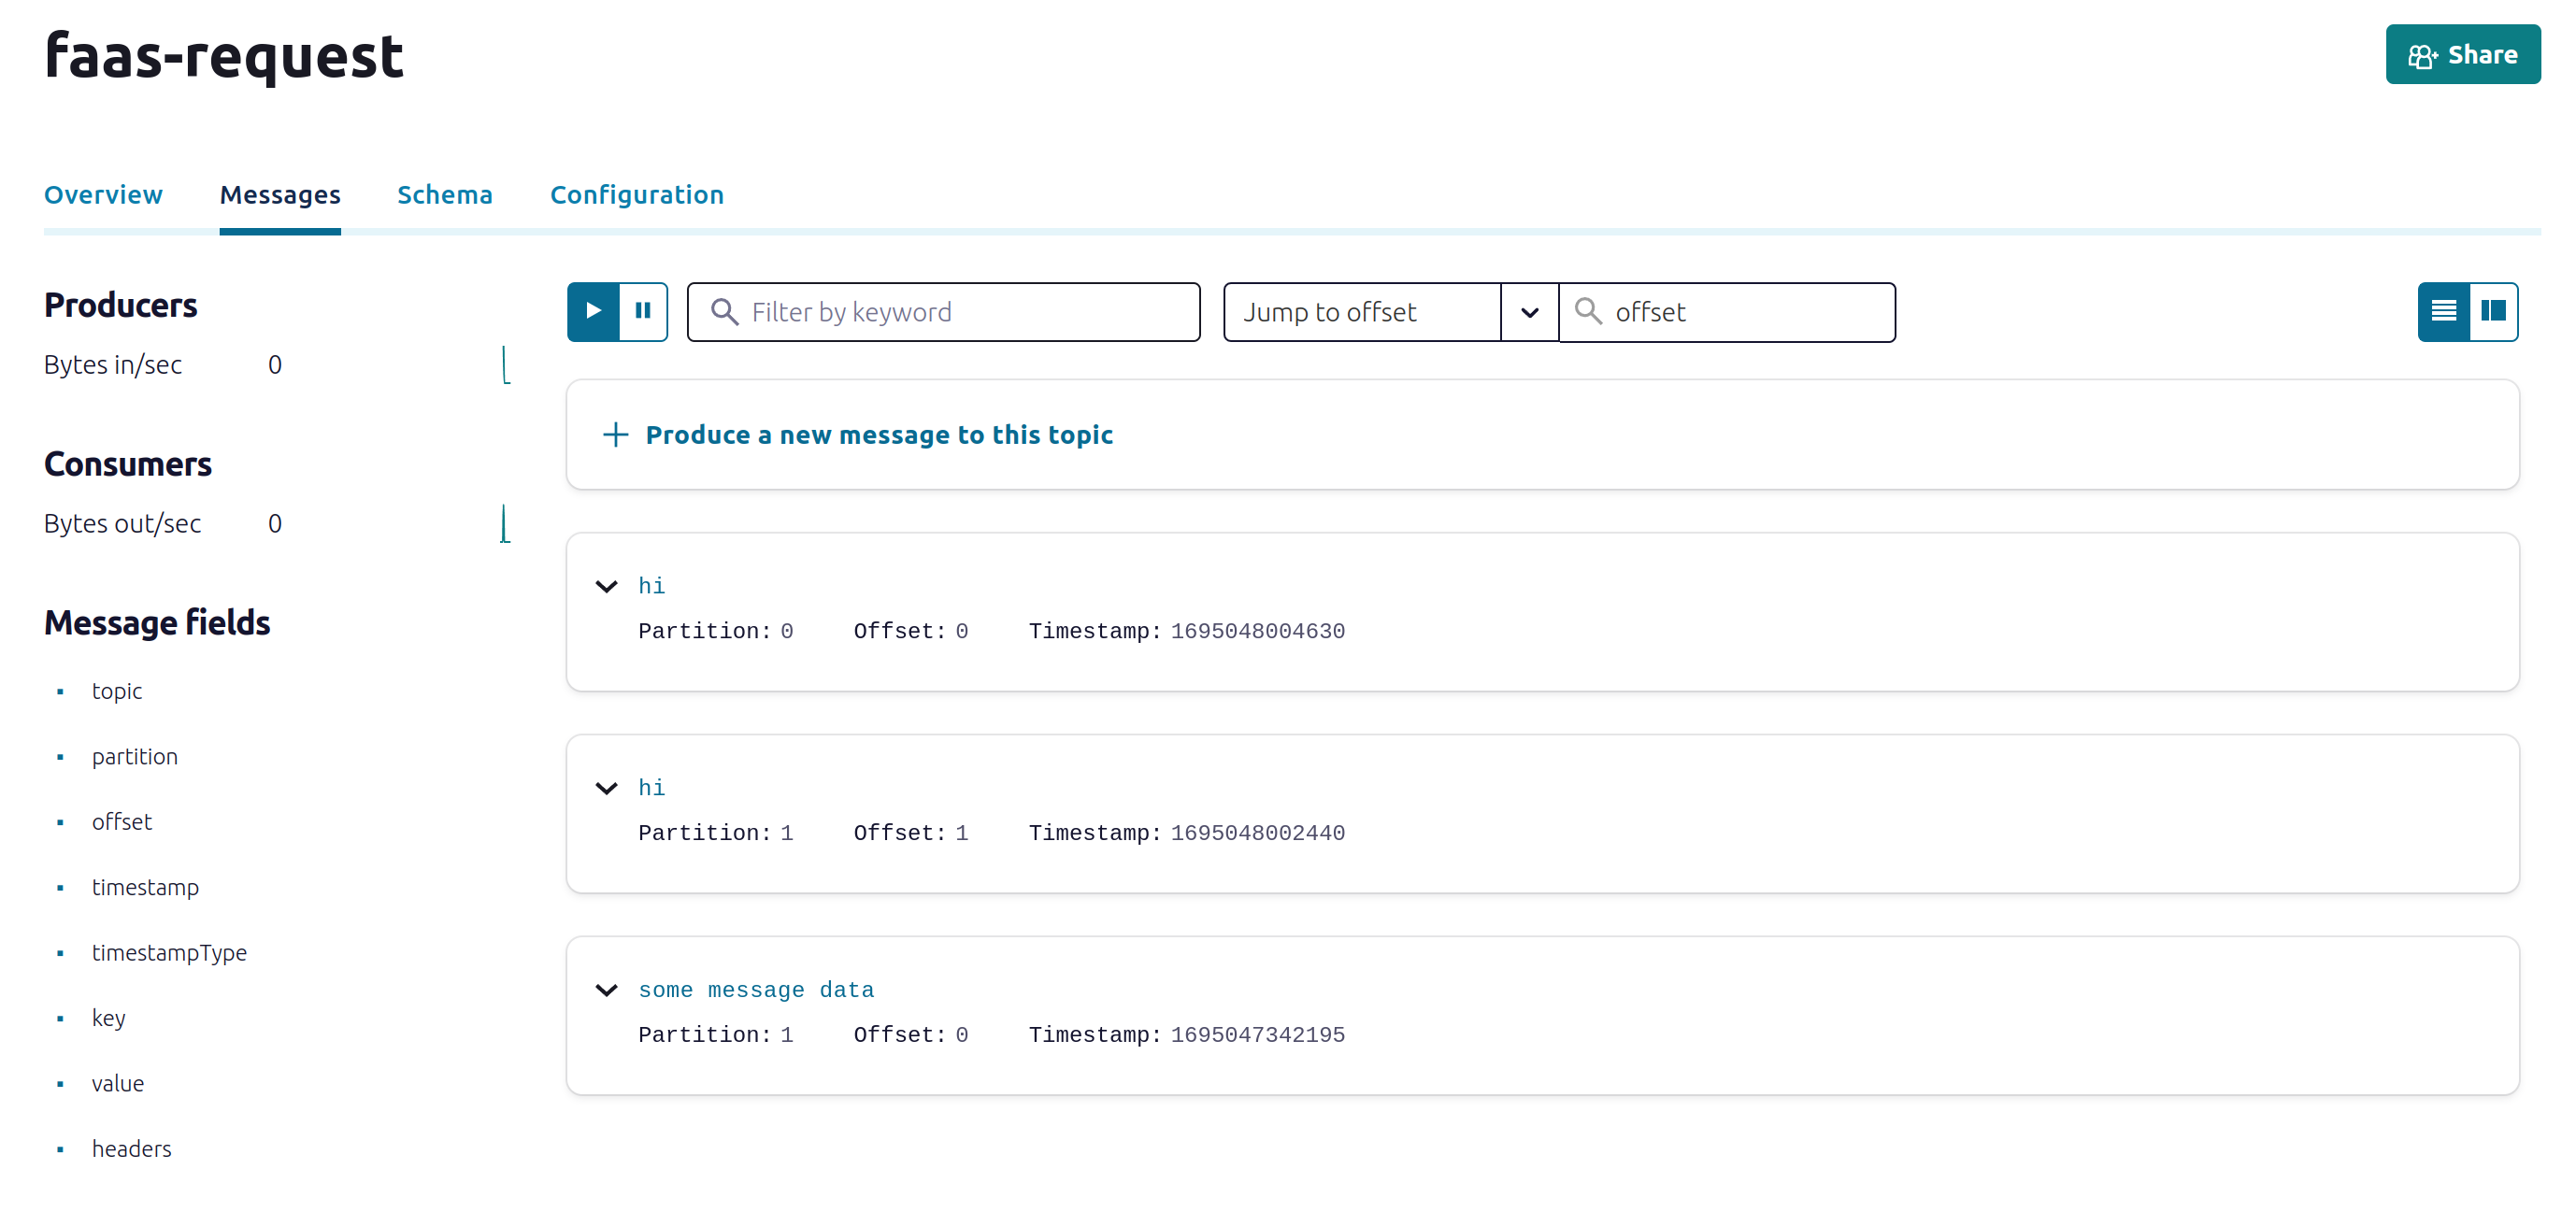
Example messages showing up on the topic in the Confluent Dashboard
Next steps
We’ve now configured a development Kafka cluster on Confluent Cloud, which should be free to keep running for low usage and testing. We then configured the Kafka connector with TLS and SASL, then deployed a function to receive messages from the topic, and viewed its logs in the OpenFaaS Dashboard.
Scaling and retries
“The rule in Kafka is a maximum of 1 consumer per partition (as each partition must only be allocated to 1 consumer), so you can only have as many consumers (in a single consumer group) as there are partitions for a topic, but you can also have less.” instacluster by NetApp
We recommend installing the connector once per topic for production use, changing the Helm installation so that you can have multiple instances of the connector running in the same cluster. Then scale the Kafka connector deployment to match the size of the partition.
So if the faas-request topic has 3 partitions, then you should have 3 replicas of the Kafka connector running. The replicas can be set in the values.yaml file or by running kubectl scale -n openfaas deploy/kafka-connector --replicas=3.
If the connector crashes for some reason, or the Pod is scheduled to a different node, then Kubernetes will automatically restart it, and it’ll pick up from the last message it processed.
For retries, set the asyncInvocation option to true, so that consumed messages get put into the NATS JetStream queue and retried according to the policy you’ve defined. There are more advanced options covered in the docs and Helm chart, but what we’ve covered today should cover 80% of the use-cases for triggering functions from Kafka.
If you have any further questions, please feel free to get in touch with us.
You may also like:
- Trigger functions from Kafka hosted by Aiven
- Trigger functions from Postgres
- Trigger functions from AWS SNS/SQS

Alex Ellis
Founder of @openfaas.