In this post, I’ll walk you through how to provision your own OpenFaaS Cloud connected to a self-hosted GitLab instance, so that you can run your Serverless functions and stateless microservices on any private or public cloud.
OpenFaaS Cloud provides a managed version of the OpenFaaS experience along with OAuth2, CI/CD, TLS via LetsEncrypt and a personalized dashboard for each user’s repo or project in your GitLab instance.
Announcing @openfaas cloud at @DevNetCreate #TeamServerless #Serverless pic.twitter.com/n6hhcRK0I5
— Jock Reed (@JockDaRock) April 10, 2018
What’s GitLab?
GitLab is an open source Source Control Management for Git. Its core business model revolves around an Open Core “enterprise edition”.
I often hear from teams that they like GitLab because it’s portable and can be installed on any cloud. That aligns really well with my mission with OpenFaaS: Serverless Functions Made Simple. I started the OpenFaaS project back in December 2016 because I wanted a way to run Serverless Functions on any cloud, hardware or edge device, even something like a Raspberry Pi.
See also: Jan 2017: Functions as a Service (FaaS)
The first time I integrated OpenFaaS into GitLab was through the use of a .gitlab-ci.yml file, but in fall 2018 I led efforts to build a deeper integration for functions so that users wouldn’t have to worry about maintaining individual build pipelines for their functions and stateless microservices. That’s where OpenFaaS Cloud started and it’s what we’ll be using today along with the ofc-bootstrap installation tool.
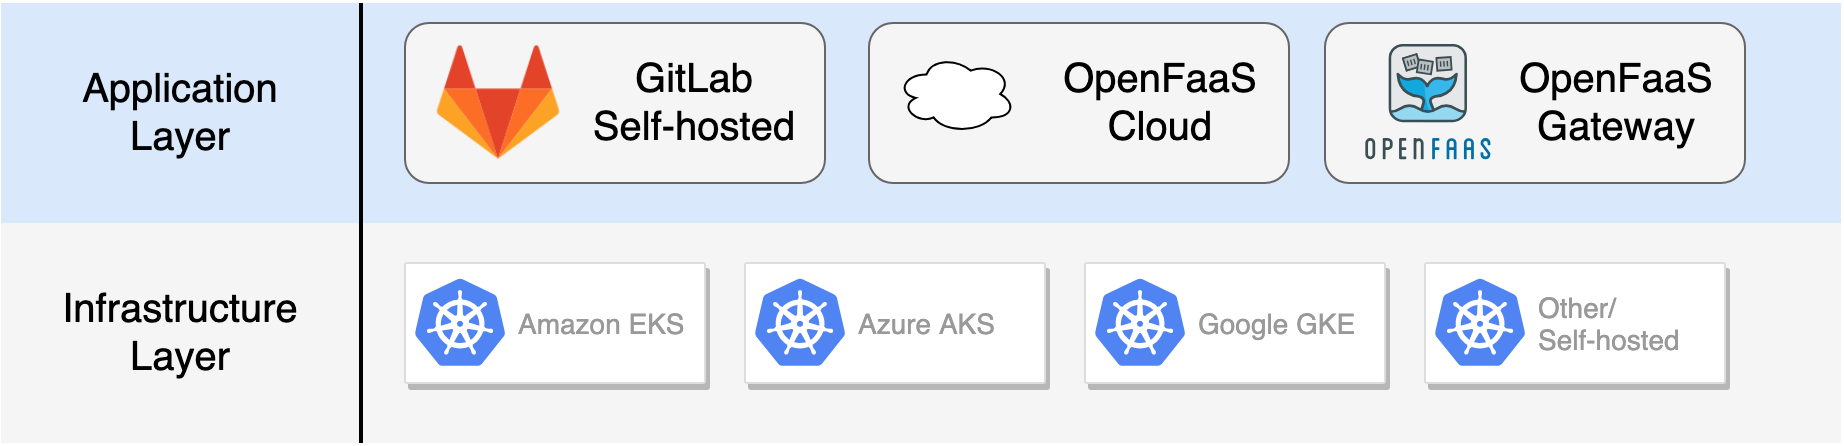
OpenFaaS combined with GitLab provides a completely portable CI/CD experience for all your stateless microservices and functions on Kubernetes including:
- Scale to zero
- Microservice support
- Functions in any language
- Detailed Prometheus metrics
- Auto-scaling (aka Horizonal Pod Scaling)
- Portability through the Docker / OCI-image format.
See also: Sample .gitlab-ci.yml file
Note: OpenFaaS, OpenFaaS Cloud and ofc-bootstrap are all Open Source under the MIT license.
Tutorial
We will configure an existing GitLab installation and then use the ofc-bootstrap tool to install OpenFaaS Cloud in around 100 seconds.
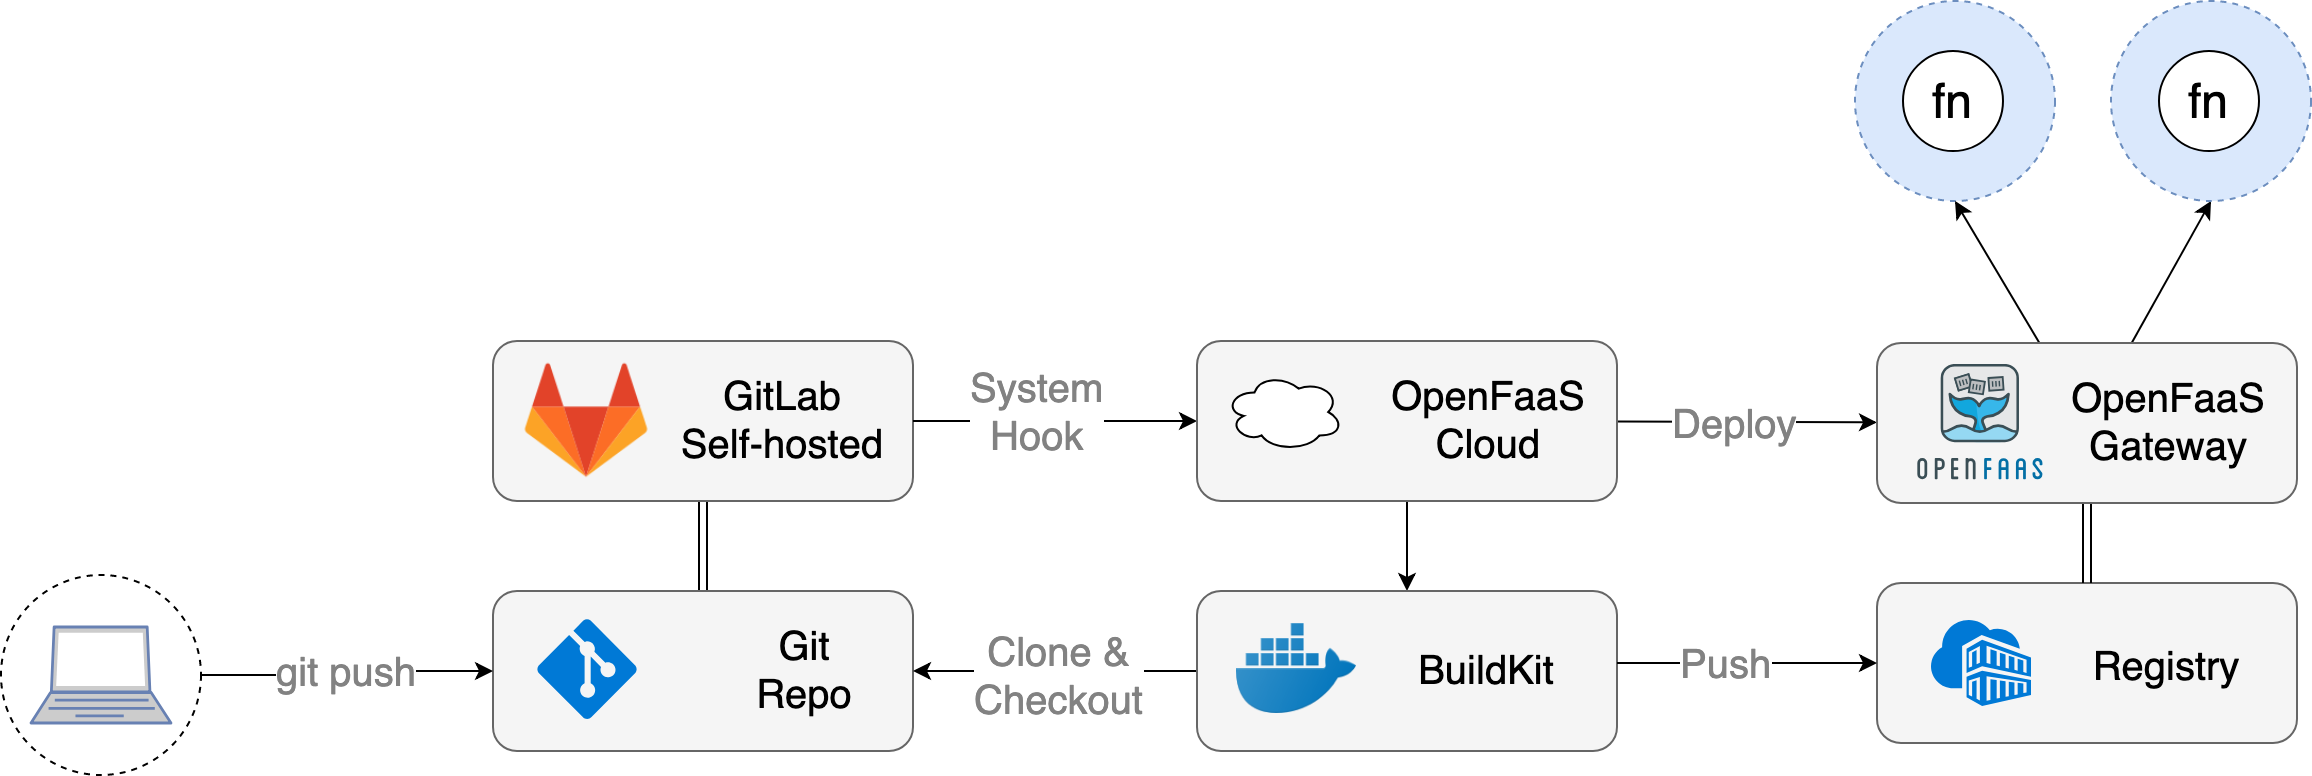
Pictured: conceptual overview of OpenFaaS Cloud with GitLab.
GitLab subscribes to git push events on each repository and then triggers a System Hook (webhook) over HTTPS to OpenFaaS Cloud’s webhook receiver. From there OpenFaaS Cloud checks for a tag on the GitLab repo of openfaas-cloud, if present it will clone and checkout the repository for the given commit and then use BuildKit to publish a Docker image.
Feedback is available on the OpenFaaS Cloud dashboard as container logs and also within GitLab under the CI view. A successful build is then deployed to the OpenFaaS instance. Each user and project has their own dashboard which is protected by OAuth2 using the users from your GitLab system to log in.
Pre-requisites
- A domain-name
You should have a domain name registered - this can be new or existing. You will need to configure its nameservers to point at either DigitalOcean, Google Cloud or AWS. I recommend using DigitalOcean because it is free at time of writing.
This constraint is due to the use of wild-card TLS certificates and cert-manager and the DNS01 challange.
- A Kubernetes v1.10 or newer cluster
Your cluster can be private and self-hosted, but in post we will install TLS via LetsEncrypt so I recommend you use a managed service such as DigitalOcean, Amazon EKS or Google’s GKE.
Note: I reviewed DigitalOcean’s Kubernetes service and rate it highly for beginners. Get free credits here to test everything out for free.
- A self-hosted GitLab CE or EE instance
You may already have a GitLab installation, if you don’t you can install it easily or use a the official helm chart.
Alternatively GitLab is available in the DigitalOcean Marketplace as a one-click VM.
faas-cli
On MacOS:
brew install faas-cli
On Linux:
# sudo is optional, but moves the binary into your PATH
curl -sLS cli.openfaas.com | sudo sh
kubectl
If you haven’t already then install kubectl from https://kubernetes.io/docs/tasks/tools/install-kubectl/
helm
Install the helm CLI only from https://github.com/helm/helm
Get ofc-bootstrap
The ofc-bootstrap tool is used to install OpenFaaS Cloud in a single click. You will need to configure it with all the necessary secrets and configuration beforehand using a YAML file.
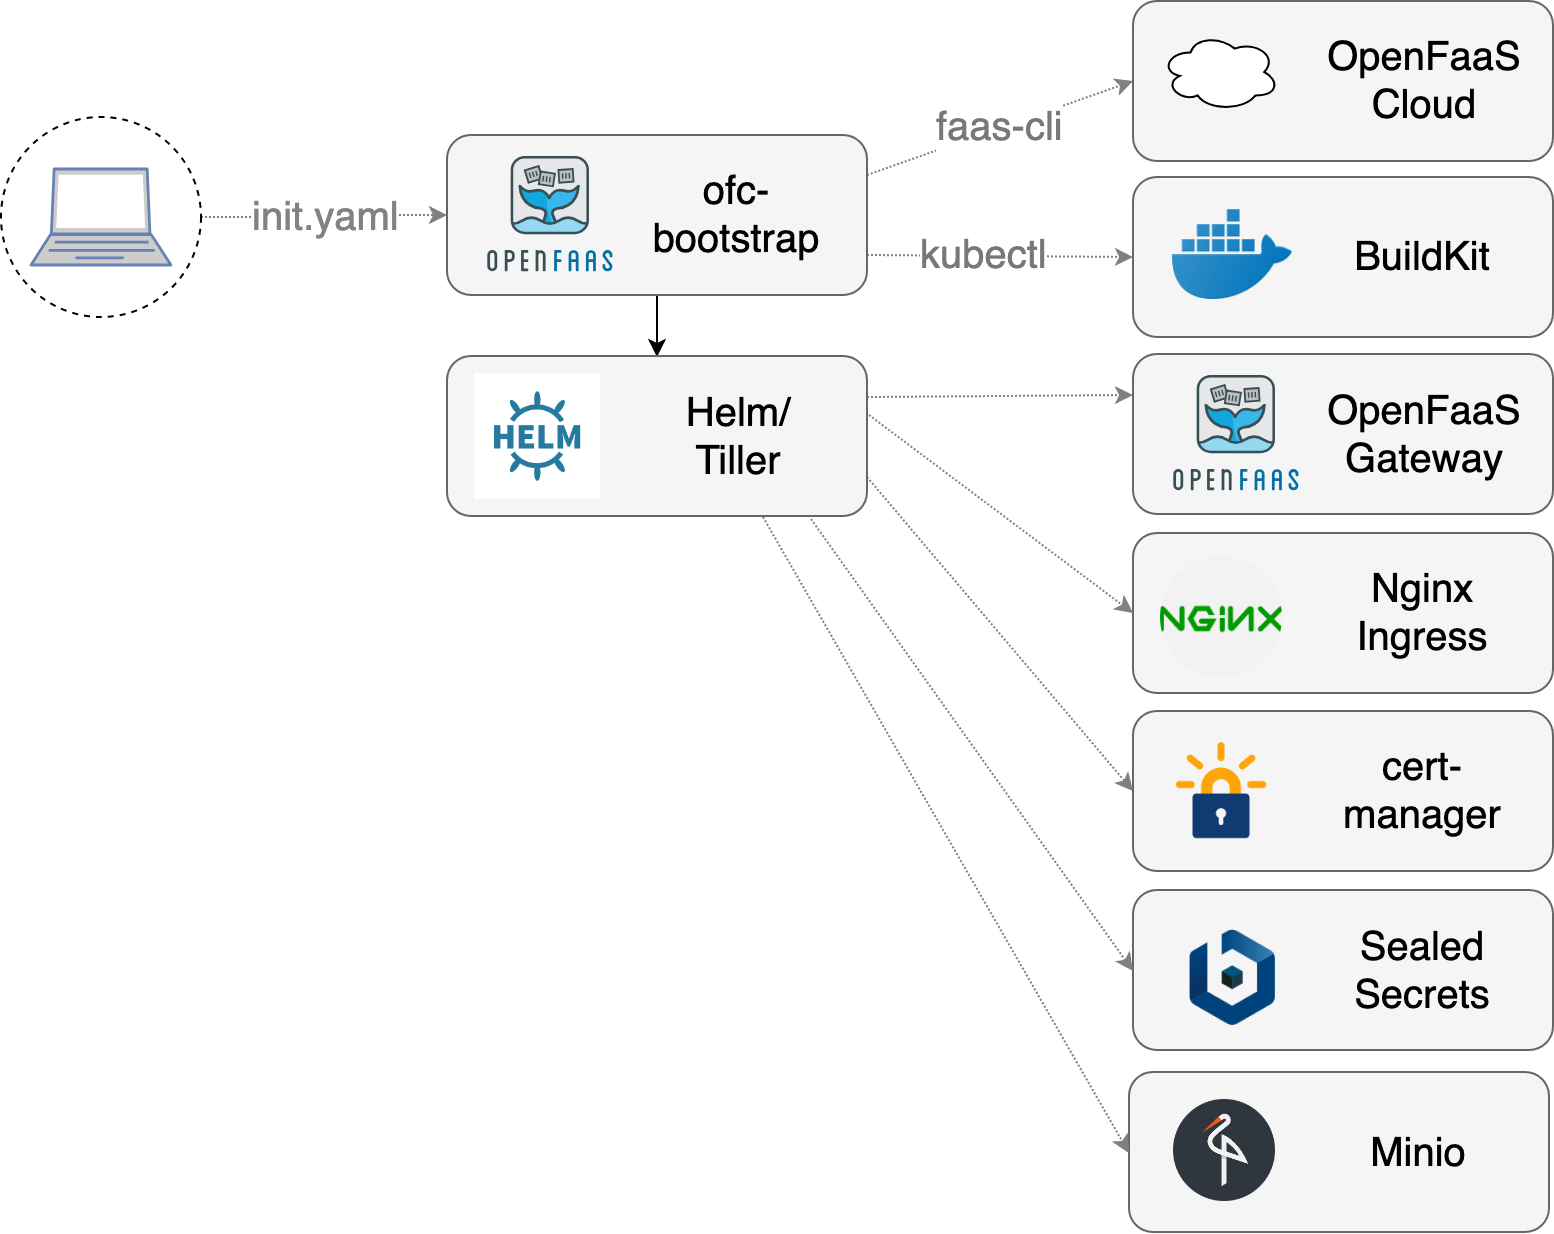
ofc-bootstrappackages a number of primitives such as an IngressController, a way to obtain certificates from LetsEncrypt, the OpenFaaS Cloud components, OpenFaaS itself and Minio for build log storage. Each component is interchangeable.
mkdir -p ~/dev/ofc/
cd ~/dev/ofc/
git clone https://github.com/openfaas/ofc-bootstrap
cd ~/dev/ofc/ofc-bootstrap
Now fetch the latest release from: GitHub and save it in /usr/local/bin/. If you’re on MacOS download “ofc-bootstrap-darwin” and save it as “ofc-bootstrap”.
Run chmod +x /usr/local/bin/ofc-bootstrap
Now create a new init.yaml file with this command:
cp example.init.yaml init.yaml
Look for the ### User-input section of the file. This is where we’ll now be populating our configuration and secrets for later use with the tool.
Plan your DNS records
OpenFaaS Cloud requires 3x A records to be set up, we will point each at the LoadBalancer created later in the tutorial. These URLs will be:
- auth.system.domain.com
- system.domain.com
- *.domain.com
The final entry *.domain.com is for each GitLab user or project i.e. alexellis.domain.com
In init.yaml set your root_domain i.e. domain.com.
Configure GitLab
-
Edit
init.yamland setgitlab_instance:to the public address of your GitLab instance. -
Edit
init.yamland setscm: githubtoscm: gitlab.
Create an access token
You will need to create an access token with sudo permissions and API access.
- Go to your Personal profile
- Click Access Tokens
- Create a token
- Name: OpenFaaS Cloud
- Scopes:
api, read_repository, sudo, read_user
You will be given an API token at this time and must enter it into init.yaml.
Look for: "gitlab-api-token" and set the value to the value from the UI
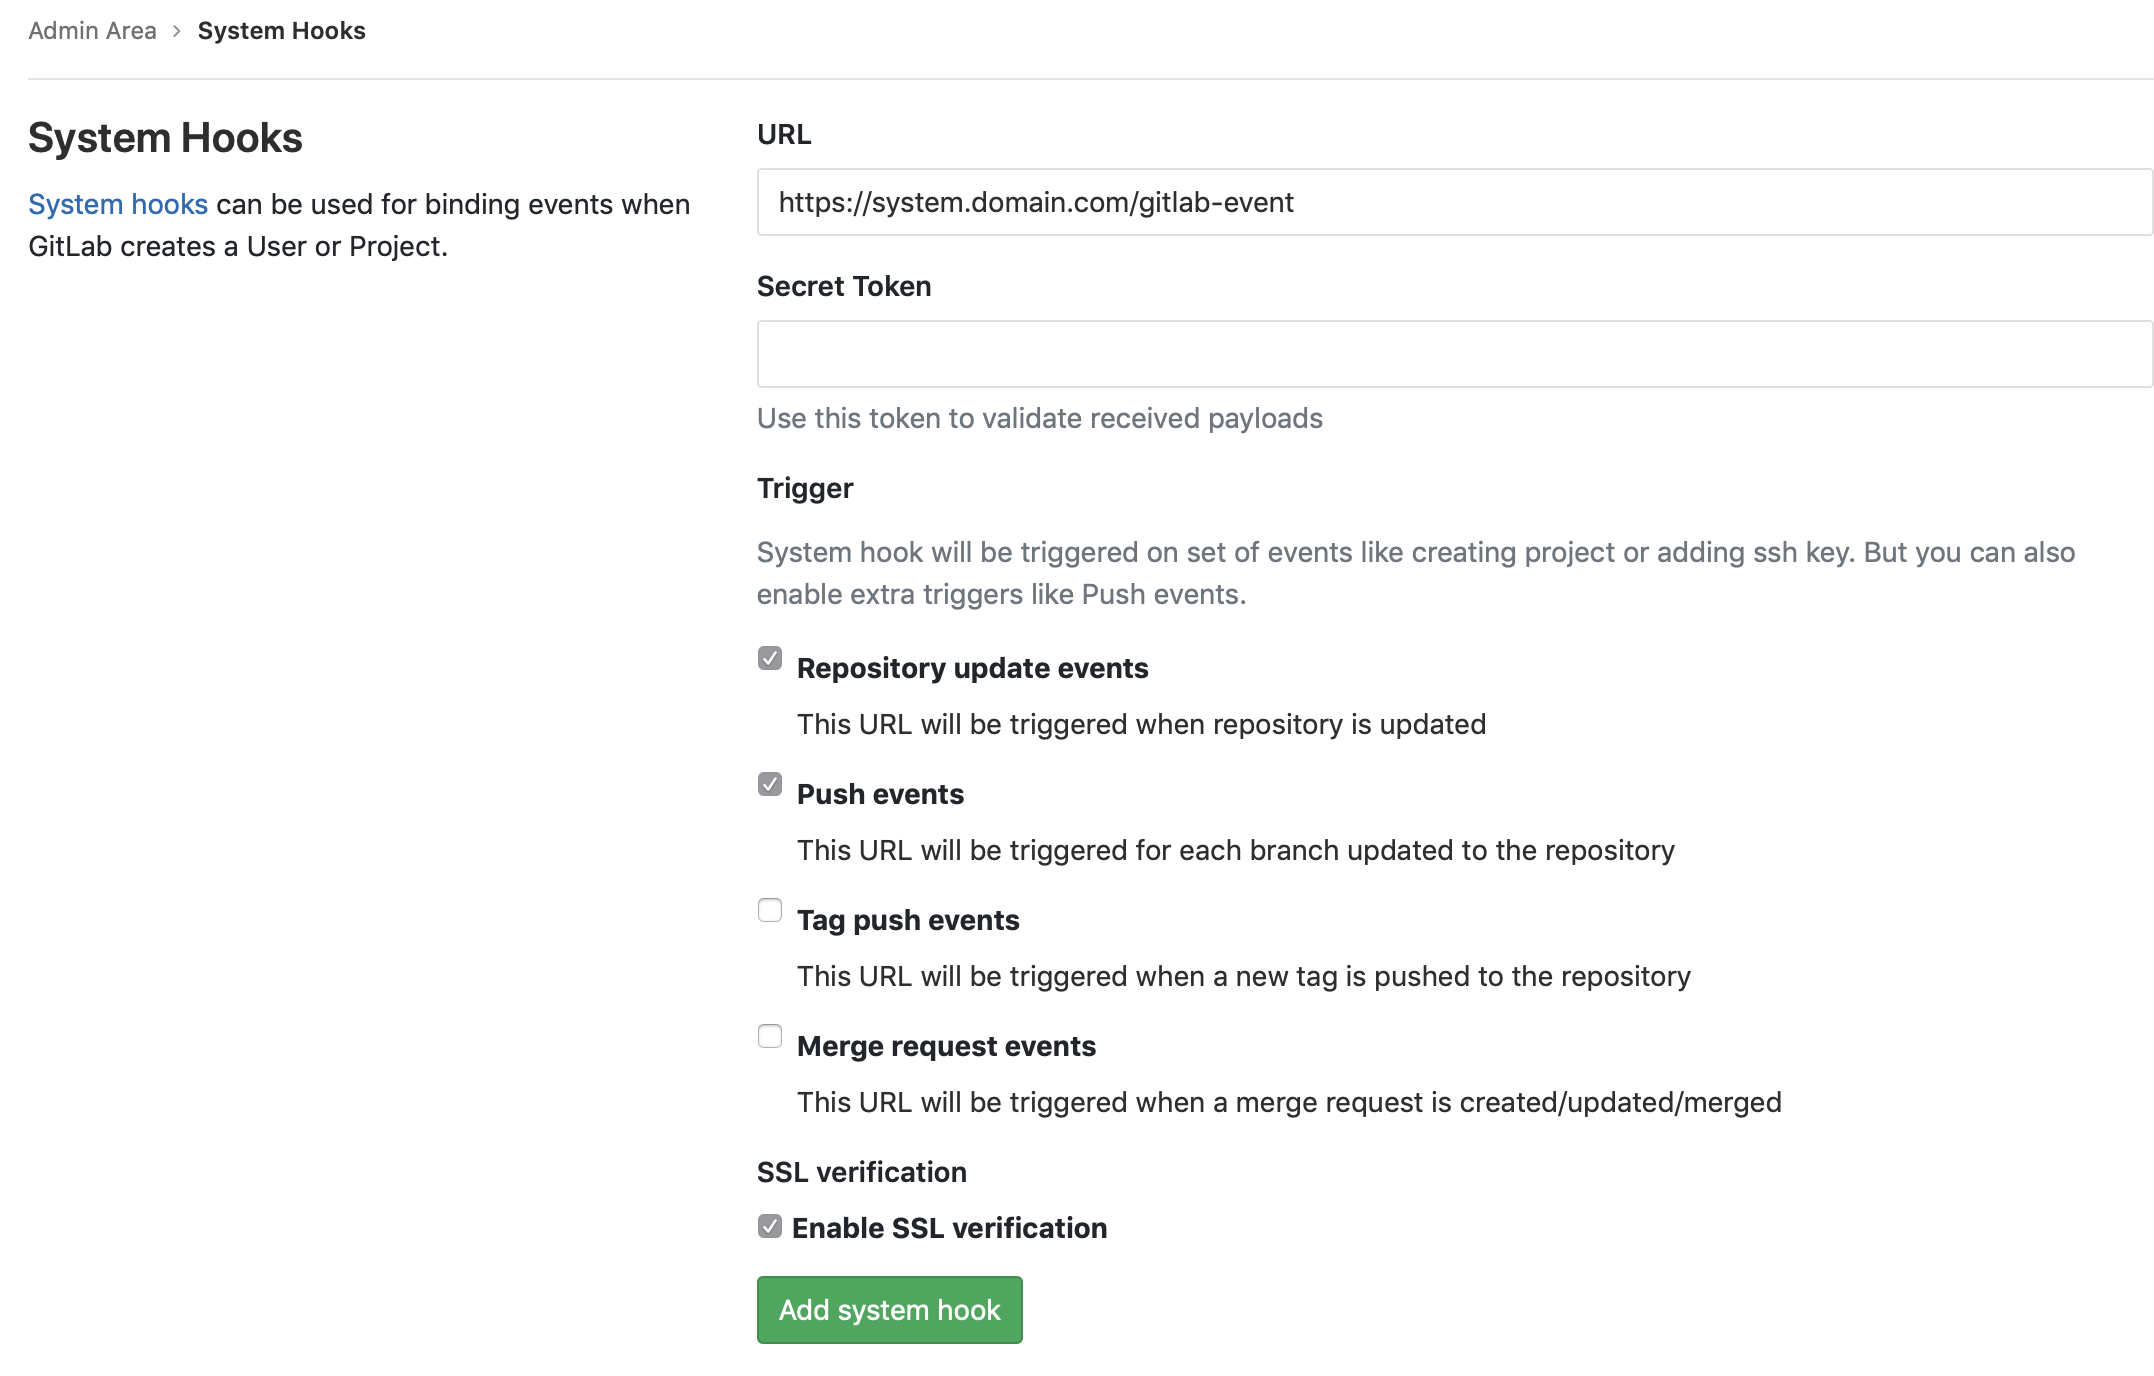
Create the system hook
This hook will publish events when there is a git push into a repo.
- Go to your Admin area.
- Click System Hooks
- Enter the URL
https://system.domain.com/gitlab-eventreplacingdomain.comwith your domain - Do not enter a value for Secret Token at this time
Create an OAuth application
The OAuth application will be used for logging in to your dashboard.
- Click Admin Area then Applications
- Click New application
- Under Name enter “OpenFaaS Cloud for GitLab”
-
In Redirect URI enter “https://auth.system.domain.com/oauth2/authorized”
- Add the scopes as pictured below

After creating your application you will get a client_id and client_secret.
Set your (Application Id) client_id in init.yaml under: oauth and client_id
Set your (Secret) client_secret in init.yaml under: "of-client-secret".
Set oauth_provider_base_url to https://gitlab.domain.com, where this is the domain of your GitLab instance. Don’t add a final slash to the URL.
Set enable_oauth to true
Configure your TLS secret
-
Turn on TLS by setting
tls: true -
Under
tls_configchangeissuer_typetoprodandemailto your email.
A secret is required by cert-manager to obtain a wildcard TLS certificate using a DNS01 challenge.
If using DigitalOcean, save an access token to:
~/Downloads/do-access-token
Note: you can create a new access token by logging into your DigitalOcean account and clicking API then Generate New Token.
ofc-boostrap will pass the token onto cert-manager as a Kubernetes secret.
If you are using GCP or AWS to manage DNS then see the README.md file.
Authenticate to your registry
Since automatic CI/CD is built-into OFC, it needs somewhere to store container images.
The easiest registry to use is the Docker Hub, the caveat is that the images will be public, but this can be changed at a later date. If you don’t have an account you can sign-up at: https://hub.docker.com
You can also install your own self-hosted registry for private Docker images. Note: you can self-host a registry on a single-node, or in a different cluster all together if you wish.
Note: using AWS ECR is beyond the scope of this tutorial. See here for info: OFC: configuring AWS ECR.
Now log in, using ofc-bootstrap.
Im using Dockerhub, my user is: ofctest and my password is: my-password, therefore I ran:
ofc-bootstrap registry-login --username ofctest \
--password my-password
note: if you are using a self-hosted registry, you can pass the --server flag to pass your registry url to the command.
Check the credentials/config.json file, the credentials should be encoded in base64.
Edit init.yaml and set registry: to docker.io/ofctest/ replacing ofctest with your username on the Docker Hub. You can also create an organization through the Docker Hub so that your images are kept in one place.
Configure your CUSTOMERS ACL
The CUSTOMERS ACL list contains a list of projects and users for which CI/CD can be triggered.
- Create a public GitLab repo called whatever you like, for instance:
ofc-acl - Add a CUSTOMERS plain-text file and enter each name on a new line
- Find the Raw URL from the UI (Open Raw)
- Edit the line that says
customers_urland enter the URL i.e.https://gitlab.domain.com/user/ofc-acl/raw/master/CUSTOMERS
You can edit the content of this file at any time.
Run the tool
Make sure your kubectl is pointing to the correct cluster.
ofc-bootstrap -yaml=init.yaml
If anything goes wrong you can reset using the ./scripts/reset.sh bash script found in the GitHub repo which we cloned earlier.
Post-installation tasks
- Find the IP address of your Kubernetes LoadBalancer for the IngressConroller (Nginx)
kubectl get svc/nginxingress-nginx-ingress-controller -o wide
Now create your DNS A records as follows all pointing at the same IP:
- auth.system.domain.com
- system.domain.com
- *.domain.com
I recommend using a short TTL such as 60 seconds. To verify that DNS has propagated use ping -c 1 subdomain.domain.com.
Now find the generated webhook secret:
echo $(kubectl get secret -n openfaas-fn gitlab-webhook-secret -o jsonpath="{.data.gitlab-webhook-secret}" | base64 --decode; echo)
Update your “Payload secret” on the System Hooks page. This secret is used to verify the sender of webhooks.
You can check your TLS certficates with:
Check the system domain:
curl -v https://system.domain.com/healthz
Check the auth domain:
curl -v https://auth.system.domain.com/healthz
Check the wildcard domain:
curl -v https://username.domain.com/healthz
You’re now good to go.
Create your first functions or microservices
OpenFaaS Cloud will now manage your serverless functions and microservices.
- Create a new repo called
openfaas-cloud-test
Now add a tag to the repo so that OpenFaaS Cloud knows that it can manage this repository.
- Click Settings and General
- Now Click “General project” and Expand
- Enter a tag of “openfaas-cloud” and hit Save Changes.
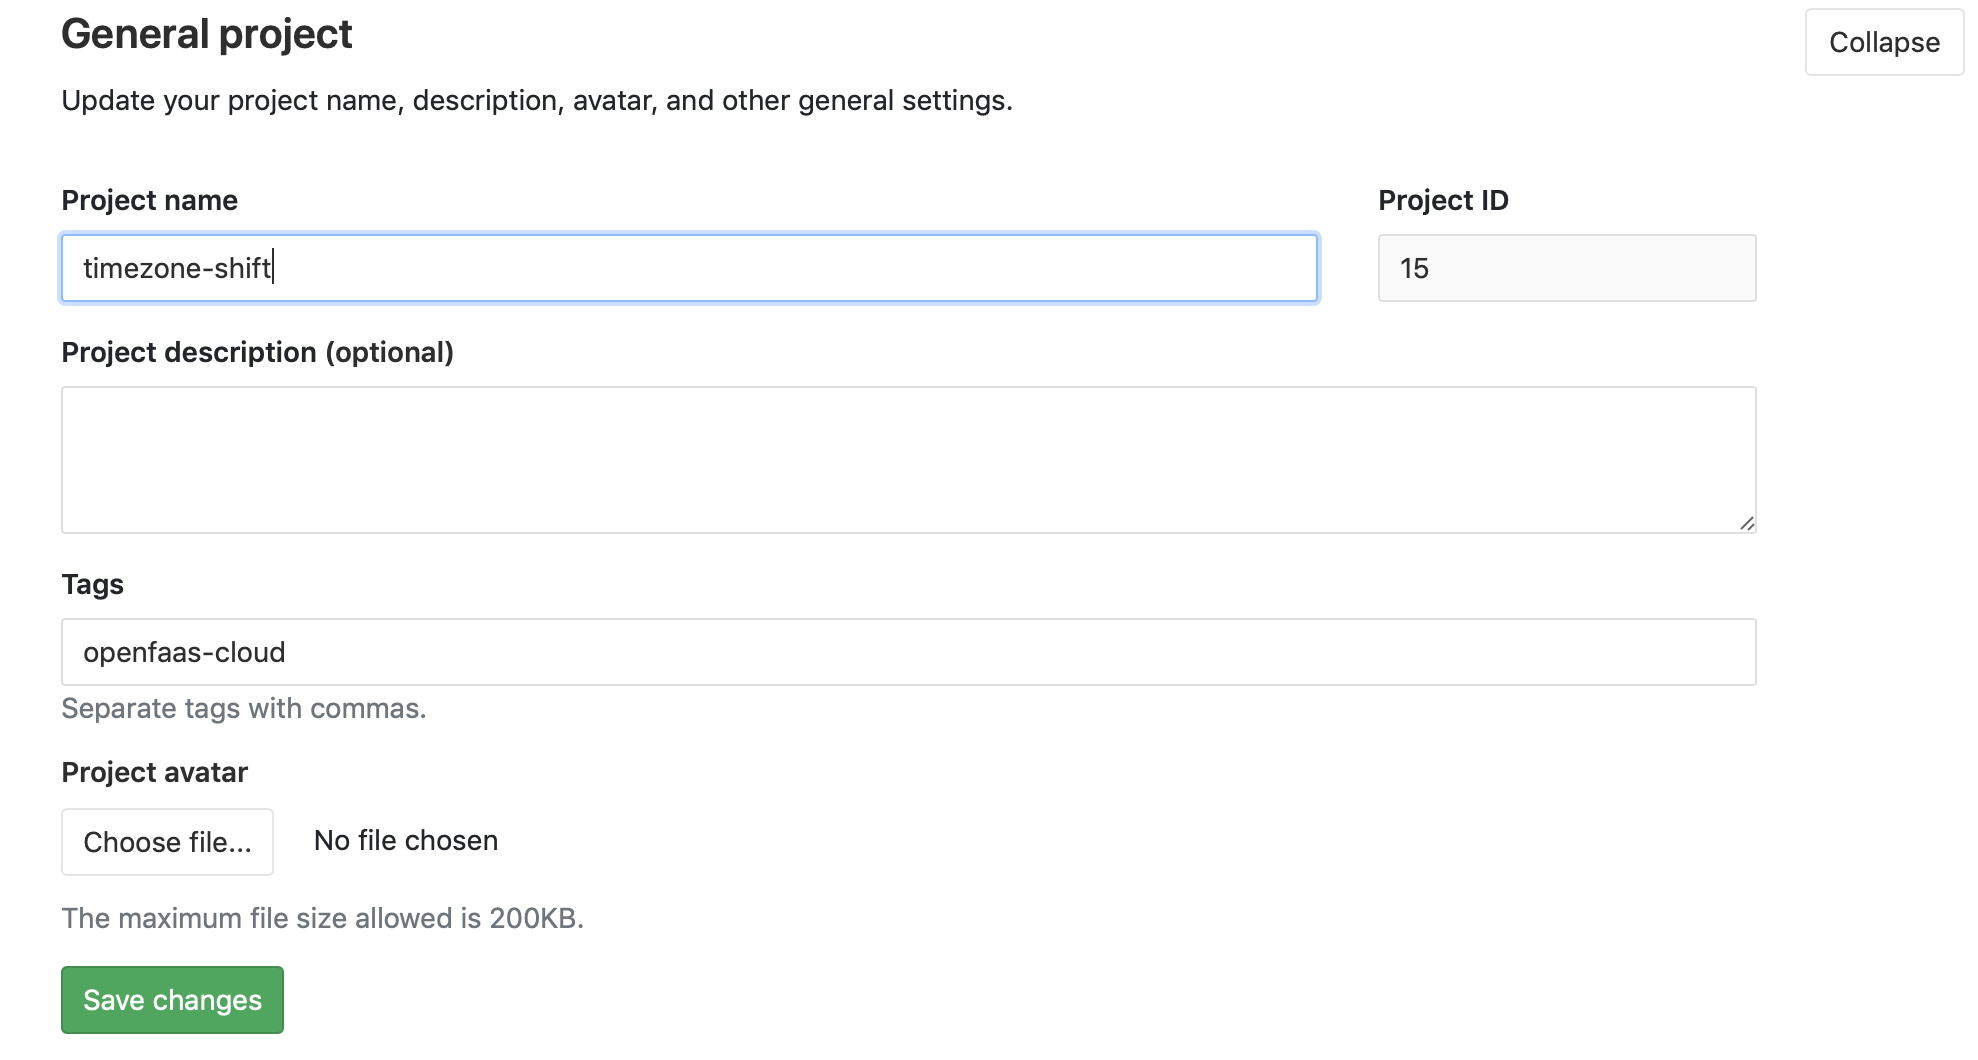
Note: this is not a
git tagbut a GitLab-specific feature
-
Clone the repo and enter the directory
-
Create a new function:
faas-cli template store pull node10-express
faas-cli new --lang node10-express timezone-shift --prefix=dockerhub_username
Now let’s create a quick function to shift timezones for meetings.
We’ll install an npm module so you’ll need to have Node.js installed on your local machine, or run this command in a container and grab the resulting package.json file.
cd timezone-shift
npm install --save moment
Enter into handler.js:
"use strict"
const moment = require('moment');
module.exports = (event, context) => {
    let meeting = moment.utc(event.body.meeting)
    let adjusted = meeting.clone().utc().add(-8, 'hours');
    context
        .status(200)
        .succeed({ meeting: meeting.format(), adjusted: adjusted.format() });
}
We need to rename our function’s YAML file to stack.yaml, so that it can be picked up by the OpenFaaS Cloud CI/CD pipeline.
Push the code:
git add .
git commit
git push origin master
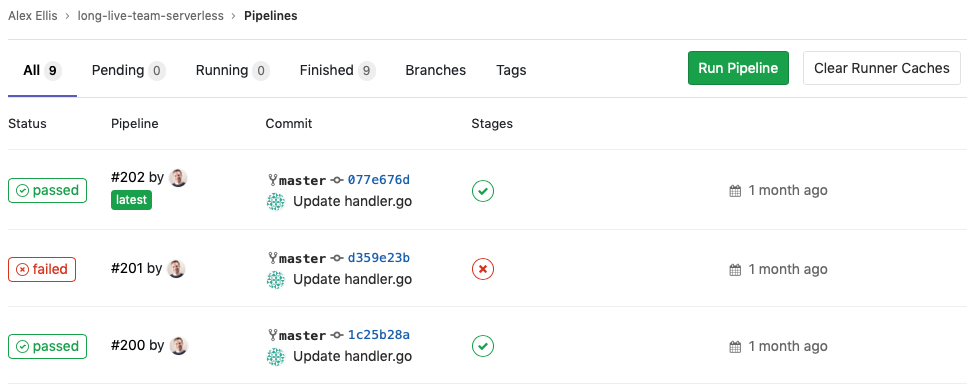
You will now receive feedback directly in the GitLab UI.
Here are some past builds:
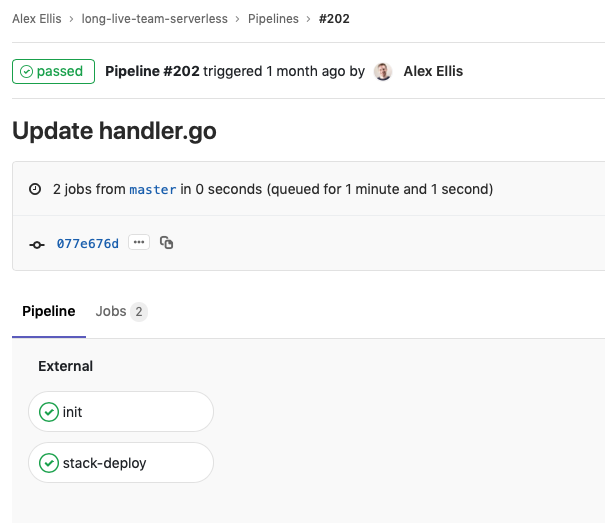
And here are the pipeline steps with one for the overall stack and one more for each function:
The function will appear on your dashboard:
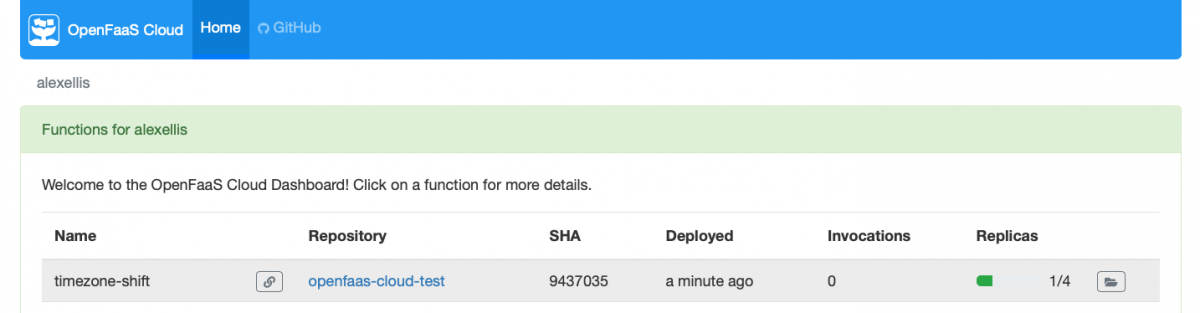
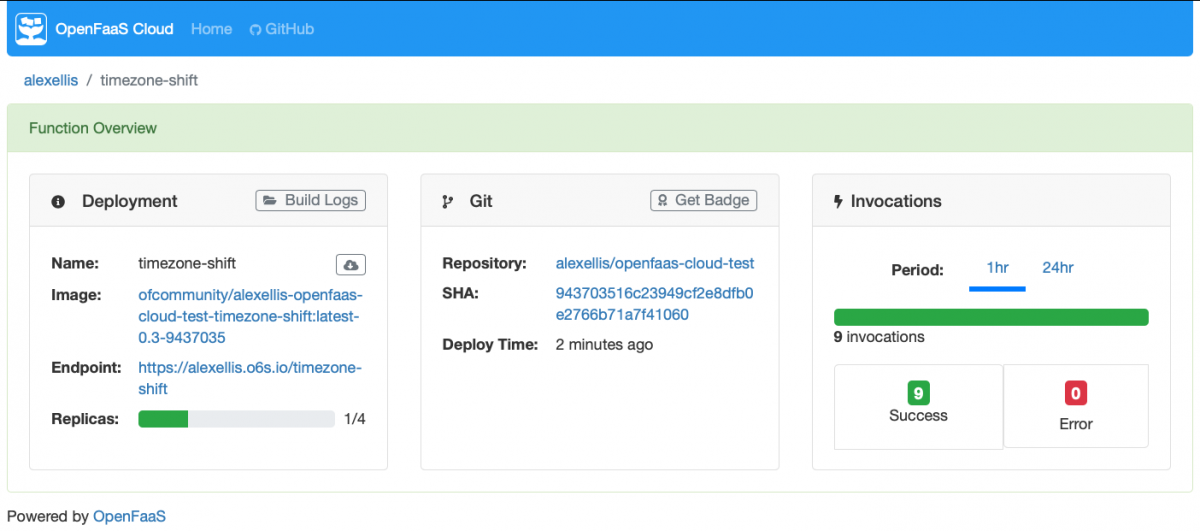
And you’ll get detailed feedback on your details page, by clicking on the row on the dashboard:
Invoke the function and find out what time your meeting at 5pm in London will be in over in San Francisco:
https://username.domain.com/timezone-shift -H "Content-type: application/json" -d ' {"meeting": "2019-02-18T17:00:00"}'; echo

{"meeting":"2019-02-18T17:00:00Z","adjusted":"2019-02-18T09:00:00Z"}
Day 2
You can find out more about day 2 operations over on the documentation site
Use secrets in your repos
You can also use secrets for your functions by encrypting them or “sealing” them using Bitnami’s SealedSecrets. Read more.
Invite your team
You are the first user for your installation, now you can invite your team, colleagues and friends, or keep the environment for yourself. You can enroll new users by adding their usernames or top-level projects to your CUSTOMERS file at any time.
Add and remove repos
To start building from a new repo just add the openfaas-cloud tag.
At any time if you want to stop building a specific repository or to delete its functions from OpenFaaS Cloud remove the tag openfaas-cloud and a System hook from GitLab will fire into OpenFaaS Cloud to remove the function.
Wrapping up
We installed OpenFaaS Cloud and enabled CI/CD, TLS and OAuth2 on any repo without any complicated configuration or pipelines or maintenance overhead. In this post we used a self-hosted GitLab instance as our SCM, but public and private GitHub repos and organisations are also supported by ofc-bootstrap!
You can follow me @alexellisuk and @openfaas on Twitter
If you have comments, questions or suggestions then please join the OpenFaaS Slack to chat with the community.
You may also like:
- Build a single page app with OpenFaaS Cloud
- Sailing through the Serverless Ocean with Spotinst & OpenFaaS Cloud
- OpenFaaS workshop

Alex Ellis
Founder of @openfaas.