Learn how to take source code from users and generate custom URLs using existing building blocks.
All the component parts are readily available to take user-supplied source-code, produce an OpenFaaS function, and deploy it with its own custom HTTPS URL. The target user for this kind of workflow is a SaaS company, or an internal platform team who want to offer a “code to URL” experience for their users.
Learn more about multi-tenant use of OpenFaaS here: Build a Multi-Tenant Functions Platform with OpenFaaS
If you follow all of the steps in this guide, then you’ll be able to take code like this from a user:
"use strict"

module.exports = async (event, context) => {
  const result = {
    status: "Received input: " + JSON.stringify(event.body)
  };

  return context
    .status(200)
    .succeed(result);
}
And turn it into a HTTPs URL like this one: https://helloworld.webhooks.example.com
At a conceptual level, here’s what’s involved:
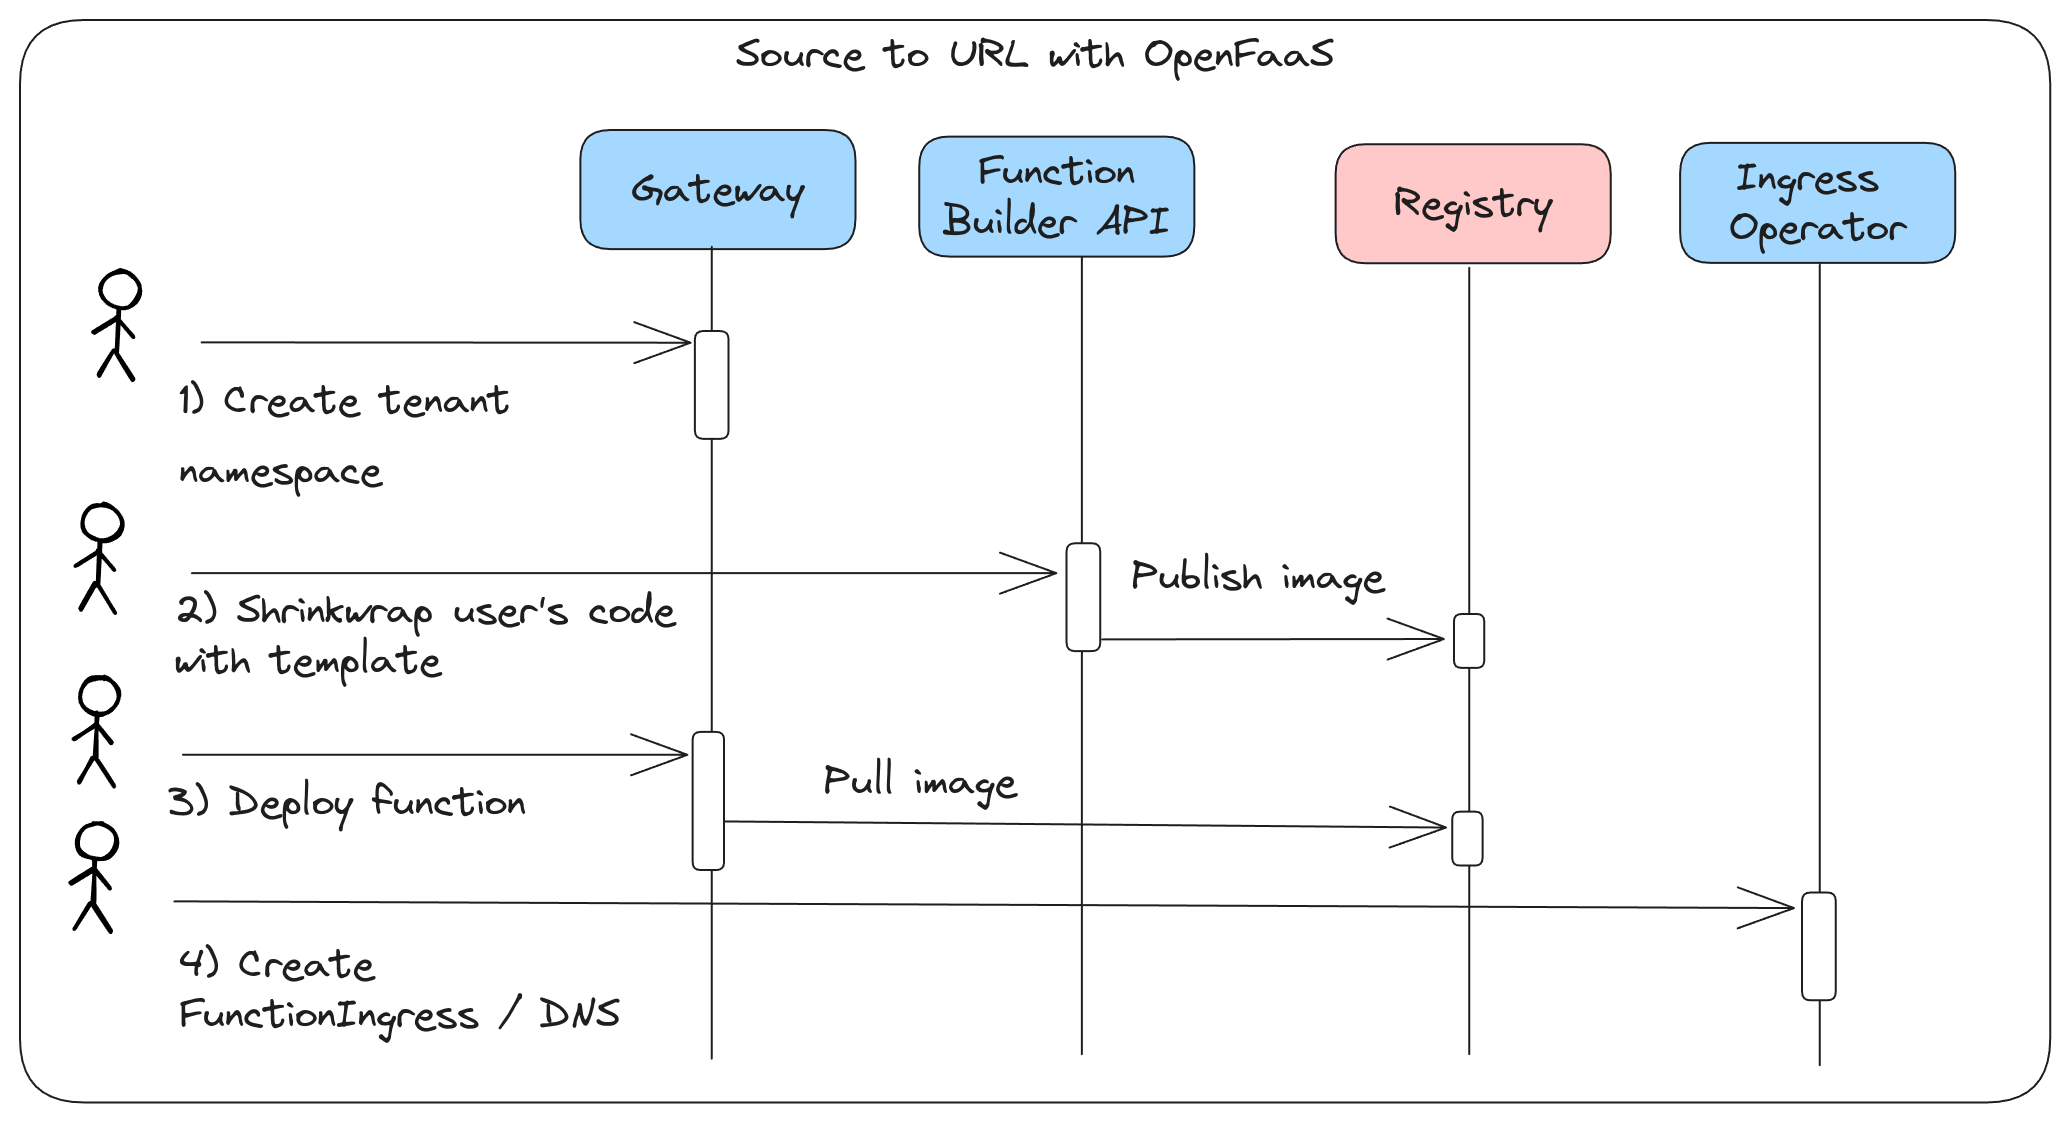
Conceptual diagram showing overview of flow
- Create a tenant namespace using the OpenFaaS REST API
- Build and publish a container image to a remote registry using the Function Builder REST API
- Deploy the function into the tenant’s namespace using the OpenFaaS REST API
- Create a custom domain or subdomain and TLS certificate for the function using FunctionIngress
Most of the steps in this tutorial will be shown using manual HTTP calls. This is so you can understand the role of each component, however when it comes to building your own integration, you could make these calls from your own code, or even write an OpenFaaS function to do it.
Before we begin
You’ll need a retail or trial license for OpenFaaS for Enterprises. Reach out if you’d like to try this tutorial and let us know what you’re building.
You’ll also need:
- The OpenFaaS for Enterprises installed and configured with
clusterRole: true - The OpenFaaS CLI (
faas-cli). - A Kubernetes cluster hosted on the public cloud, or with the inlets-operator if running locally, with 3-5 nodes with around 2vCPU and 8GB of RAM each.
- An Ingress Controller exposed with a public IP (we use ingress-nginx).
- cert-manager installed to obtain TLS certificates from Let’s Encrypt.
- Access to a domain for testing where you have access to create DNS A and CNAME records.
- The Function Builder pre-installed and configured for any registries that you’d like to use.
Part 1 - the tenant namespace
You can create a separate Kubernetes namespace for a tenant via the HTTP REST API.
The name must conform to DNS naming rules, and must also be unique. You could use a GUID, and record a mapping in your application or use a human-readable name. Names must not begin with a number.
faas-cli namespace create tenant-1
I won’t repeat the HTTP API call here, however you can view it in the OpenFaaS REST API docs.
If your users only have one namespace, you may name it after them, i.e. tenant-1, but if they can have multiple, you’ll want to add some annotations so that you can identify them later.
faas-cli namespace create webhooks \
  --annotation "tenant=tenant-1" \
  --annotation "email=alex@example.com"
Here we call the namespace “webhooks”, then add annotations to map some of our own custom data.
You’ll now see the extra namespace via faas-cli namespace list.
Part 2 - Publishing a container image from source code
There are two ways you could go about taking in source code:
- Only use a single template, and allow the user to supply the body for the handler
- Allow the user to send you a package like a Zip file or a location in object storage which also includes additional metadata like packages and the template to use
Typically, we see our customers going for option 1, with interpreted languages such as: Node.js, PHP, Python, etc.
There are three ways to try out the Function Builder API:
- Use
curland bash commands to build a package and invoke the endpoint - Use
faas-cli publish --remote-builderwhich uses faas-cli to do all of the steps in 1. - Use a code sample that we’ve already published on GitHub including Go, Node, Python, and PHP.
- Write your own code in your application
A conceptual diagram showing how to make a call to the Function Builder API:
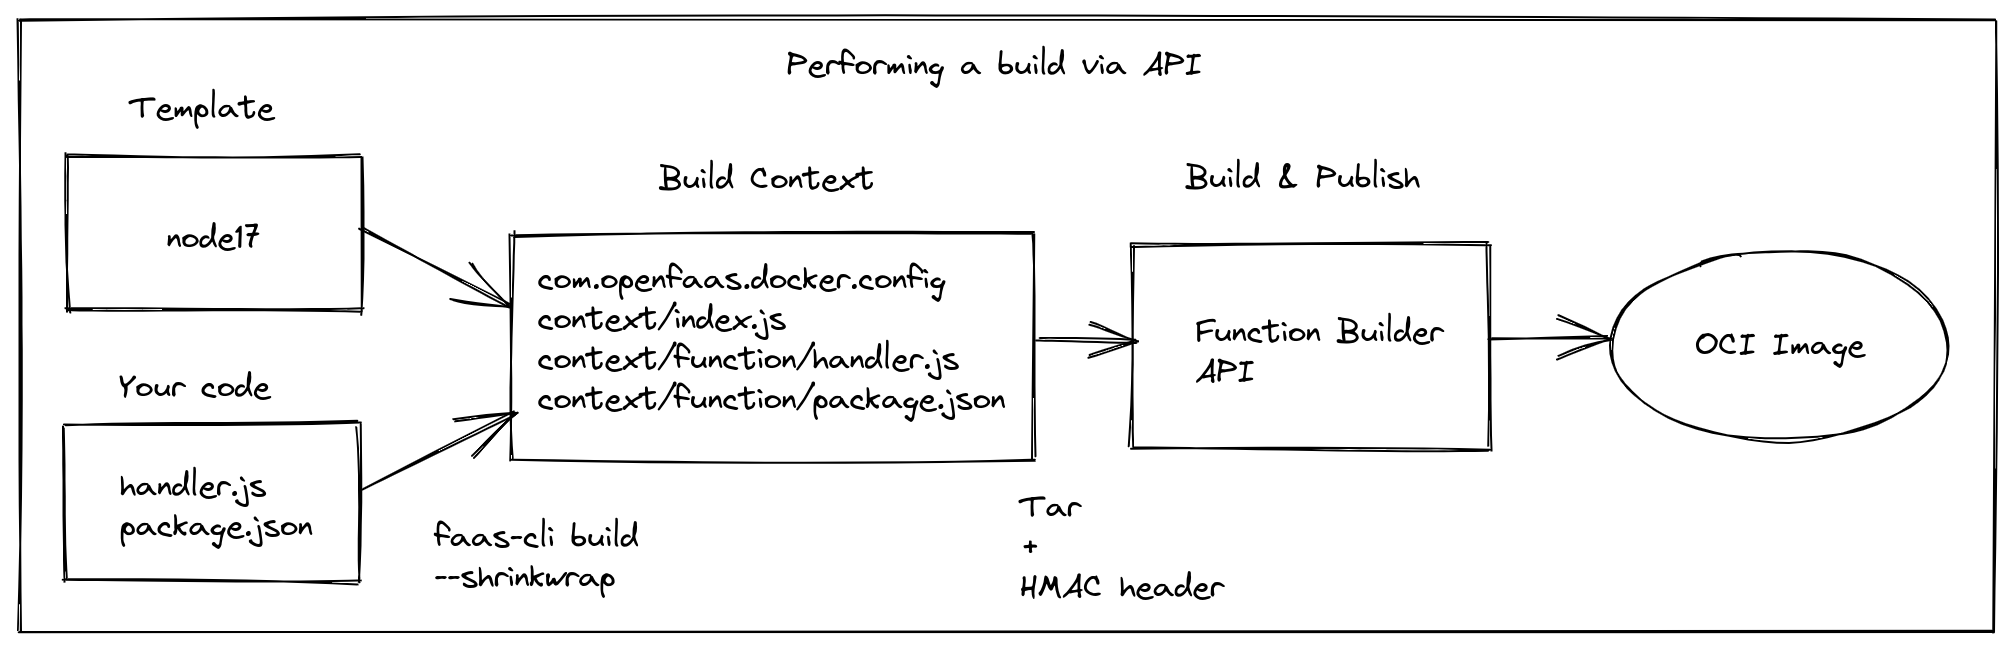
Conceptual diagram showing user code being shrink-wrapped using a template, and submitted to the Function Builder.
Assuming you’ve deployed the Function Builder API, port-forward it to your local machine:
kubectl port-forward -n openfaas \
    deploy/pro-builder 8081:8080
We’ll try the method outlined in curl, because it shows each step that’s required.
Obtain the payload secret required to sign the request:
export PAYLOAD=$(kubectl get secret -n openfaas payload-secret -o jsonpath='{.data.payload-secret}' | base64 --decode)
echo $PAYLOAD > $HOME/.openfaas/payload.txt
Prepare a temporary directory
rm -rf /tmp/functions
mkdir -p /tmp/functions
cd /tmp/functions
Create a new function
faas-cli new --lang node20 hello-world
The --shrinkwrap flag performs templating without actually invoking docker or buildx to build or publish an image. The Function Builder API will do that for us instead.
faas-cli build --shrinkwrap -f hello-world.yml
If you look in the ``./build/hello-world` folder you’ll see a build context that can be built with Docker.
Now rename “hello-world” to “context” since that’s the folder name expected by the builder
cd build
rm -rf context
mv hello-world context
Then, create a config file with the registry and the image name that you want to use for publishing the function.
Build-args can also be specified here for proxies, or enabling/disabling Go modules for instance.
export DOCKER_USER=alexellis2
echo -n '{"image": "ttl.sh/'$DOCKER_USER'/test-image-hello:0.1.0"}' > com.openfaas.docker.config
The test image will be published to the ttl.sh public and ephemeral registry which does not require authentication.
You can follow detailed instructions to set up authentication for the Docker Hub, AWS ECR, GCP GCR, or a self-hosted registry like CNCF Harbor.
Now we can invoke the Function Builder API to build and publish the function:
Create a tar of the build context:
tar cvf req.tar --exclude=req.tar .
Sign the payload:
PAYLOAD=$(kubectl get secret -n openfaas payload-secret -o jsonpath='{.data.payload-secret}' | base64 --decode)

HMAC=$(cat req.tar | openssl dgst -sha256 -hmac $PAYLOAD | sed -e 's/^.* //')
Invoke the build with the following:
curl -H "X-Build-Signature: sha256=$HMAC" -s http://127.0.0.1:8081/build -X POST --data-binary @req.tar | jq

[
....
    "v: 2021-10-20T16:48:34Z exporting to image 8.01s"
  ],
  "image": "ttl.sh/alexellis2/test-image-hello:0.1.0",
  "status": "success"
}
If it was successful, you’ll get a "status": "success" returned along with the image name you passed in. If it failed, you can return the logs element to the user which will show any failed build or unit testing steps.
Part 3 - Deploy the function via REST API
Now we can make a HTTP call to deploy the function.
Like before, there are several ways you can do this:
- Make a curl request
- Use
faas-cli deploy - Use the Go SDK for OpenFaaS
- Write code to create your own HTTP request in your own application
Let’s use 2. with faas-cli deploy.
faas-cli deploy \
    --image ttl.sh/alexellis2/test-image-hello:0.1.0 \
    --name hello-world \
    --namespace webhooks
We should also consider what additional settings we may want for the function at this time.
- Annotations can be used to add your own metadata to correlate the function to your own application - examples may be tenant name, function plan, or user ID.
- Kubernetes Requests should always be set for RAM and CPU to help the scheduler make the right decisions. Limits are optional, but encouraged for RAM.
- Labels are used to configure autoscaling, perhaps you’d like all your users’ functions to scale to zero?
Here’s a fuller example, but by no means completely exhaustive:
faas-cli deploy \
    --image ttl.sh/alexellis2/test-image-hello:0.1.0 \
    --name hello-world \
    --namespace webhooks \
    --annotation "com.example.tenant=tenant-1" \
    --annotation "com.example.plan=free" \
    --label com.openfaas.scale.zero=true \
    --label com.openfaas.scale.zero-duration=3m \
    --label com.openfaas.scale.min=1 \
    --label com.openfaas.scale.max=10 \
    --label com.openfaas.scale.type=rps \
    --label com.openfaas.scale.target=500 \
    --memory-request=64Mi \
    --memory-limit=128Mi \
    --cpu-request=50Mi
The name, image, namespace settings configure the function’s deployment, then we have additional metadata supplied via annotations, and labels for autoscaling.
We enabled scale to zero, with a idle period of 3 minutes, a minimum of 1 replica of the function, and a maximum of 10. We then set the autoscaler to scale based upon a target of 500 Requests Per Second (RPS) and set a request and limit for RAM, then a requested value for CPU.
If you’d like to see the equivalent HTTP REST call, you can prefix the command with FAAS_DEBUG=1.
PUT http://127.0.0.1:8080/system/functions
Content-Type: [application/json]
User-Agent: [faas-cli/dev]
Authorization: [Basic **********]
{
  "service": "hello-world",
  "image": "ttl.sh/alexellis2/test-image-hello:0.1.0",
  "namespace": "webhooks",
  "labels": {
    "com.openfaas.scale.max": "10",
    "com.openfaas.scale.min": "1",
    "com.openfaas.scale.target": "500",
    "com.openfaas.scale.type": "rps",
    "com.openfaas.scale.zero": "true",
    "com.openfaas.scale.zero-duration": "3m"
  },
  "annotations": {
    "com.example.plan": "free",
    "com.example.tenant": "tenant-1"
  },
  "limits": {
    "memory": "128Mi"
  },
  "requests": {
    "memory": "64Mi",
    "cpu": "50Mi"
  }
}
Part 4 - Create a custom domain and TLS certificate
The forth part of this tutorial is to create a custom domain and TLS certificate for the function so that the user can access it via a custom URL.
The Ingress Operator is an abstraction over Kubernetes Ingress that makes it quick and easy to create custom Ingress records configured to expose a function over a custom HTTP path or domain, or both. Access to functions is defined using a “FunctionIngress” Custom Resource Definition (CRD).
You’ll find examples of FunctionIngress in the documentation.
It’s not a compulsory component, and you could work with Ingress directly, or even Istio if you wished.
You’ll need to have the Ingress Operator enabled in the values.yaml file for OpenFaaS.
Then, create a DNS record for the user’s function.
On AWS EKS, LoadBalancers have DNS names, so you’d create a CNAME, but everywhere else they tend to have IP addresses, so you create an A record. These can be created via CLI tools, or via an API/SDK from your DNS provider such as AWS Route54, Google Cloud DNS, DigitalOcean, Cloudflare, etc.
If the external IP was 176.58.106.241, then you’d create a DNS A record such as:
176.58.106.241 hello-world.webhooks.example.com
I’ve used the format of function.namespace.domain, but you can use any format that you like. Perhaps one sub-domain per tenant, or one sub-domain per namespace. In any case, having a unique sub-domain is important if user functions need to store cookies.
You’ll need to create a Let’s Encrypt issuer. Again, we recommend doing this either per tenant via a ClusterIssuer, or via an Issuer in each namespace. Details can be found in the README.
Now, create a FunctionIngress record, either using the Kubernetes clientset for the ingress-operator or the Custom Resource Definition (CRD) and kubectl.
The below assumes the ingress-controller is ingress-nginx, using a ClusterIssuer called “tenant1”:
apiVersion: openfaas.com/v1
kind: FunctionIngress
metadata:
  name: helloworld-tls
  namespace: openfaas
spec:
  domain: "helloworld.webhooks.example.com"
  function: "helloworld"
  functionNamespace: "webhooks"
  ingressType: "nginx"
  tls:
    enabled: true
    issuerRef:
      name: "letsencrypt-tenant1"
      kind: "ClusterIssuer"
All FunctionIngress records are created in the “openfaas” namespace, then you reference the function’s namespace via the “functionNamespace” field.
Whenever traffic hits https://helloworld.webhooks.example.com, it will be re-routed to https://gateway.openfaas:8080/function/helloworld.webhooks.
Every Function will need its own FunctionIngress record, however Issuers and ClusterIssuers for cert-manager can be shared across multiple functions.
Now, if you expect to see many functions created each with their own domains, you may want to use a DNS01 challenge, and register a sub-domain per namespace, or per tenant instead of using individual A records and HTTP01 challenges.
With HTTP01 challenges and individual DNS records, you’d have 20 DNS records and 20 disparate TLS certificates. On the plus side, this is the simplest configuration, and on the downside you may run into Let’s Encrypt rate limits.
function1.tenant1.example.com, function2.tenant1.example.com, function3.tenant1.example.com, etc
With a DNS01 challenge and a sub-domain, you’d have a single wildcard DNS record with a singled TLS certificate, used for as many functions as you wanted.
*.tenant1.example.com
You can learn the differences here: ACME Challenge Types
Wrapping up
The goal of this tutorial was to show you how you could accept source code from your users, build it, deploy it, and then create a custom URL for them.
We tend to see individual teams having very strong opinions on how to tie together these various steps, which is why I’ve given you the building blocks to do with them as you wish.
If I were to automate all of the steps in this guide, then I’d write an OpenFaaS function using Go which could take advantage of the Go SDK for the OpenFaaS REST API, the Go example for the Function Builder, and the Go Kubernetes clientset for the Ingress Operator. You’d need to trigger the whole workflow from your user’s dashboard or the rest of your application, and we have some examples of people who are doing tha tin the blog post Build a Multi-Tenant Functions Platform with OpenFaaS.
You can monitor the OpenFaaS REST API and the Function Builder API, along with the functions using separate dashboards available in the Customer Community.
If you wish to give your users API access to OpenFaaS via the CLI and UI Dashboard, then you’ll need to configure an Identity Provider (IdP) and SSO/IAM for OpenFaaS.
If you have comments, questions, and suggestions or would just like to talk to us about this guide, you can reach us here.
You may also like:
- Build a Multi-Tenant Functions Platform with OpenFaaS
- Scaling to 15000 functions and beyond
- Walkthrough of Identity and Access Management (IAM) for OpenFaaS
- How to build functions from source code with the Function Builder API

Alex Ellis
Founder of @openfaas.