Learn how to build your own OpenFaaS Cloud on AWS using Amazon Elastic Kubernetes Service (EKS) to bring Serverless with GitOps to your team.
You may be familiar with OpenFaaS, but what is OpenFaaS Cloud? OpenFaaS Cloud (OFC) is a complete serverless platform for Kubernetes including CI/CD, authentication, TLS, and multi-user support.
You can think of it like an opinionated distribution or product built upon OpenFaaS.
The project’s aim is to enable leads and service providers to create a managed experience for development teams.
OpenFaaS Cloud users don’t need to learn about Kubernetes or Docker, they just need to write code in their language of choice and push it up into a public or private GitHub repository.
Here’s what’s included:
- Hosting for a wide range of functions, microservices, APIs, static websites, blogs, legacy binaries, and more.
- Built-in authentication, TLS and CI/CD
- Dashboard with detailed status, logs, and metrics
- Management by Pull Request / Merge Request
- Deep integration with GitHub.com and GitLab self-hosted through checks and commit statuses
- Support for encrypted secrets in Git repos through SealedSecrets
Teams can build services and functions using the OpenFaaS templating system, or with a Dockerfile.
Single pane of glass
Here’s a preview of the OpenFaaS Cloud dashboard which provides a single pane of glass.
Overview page
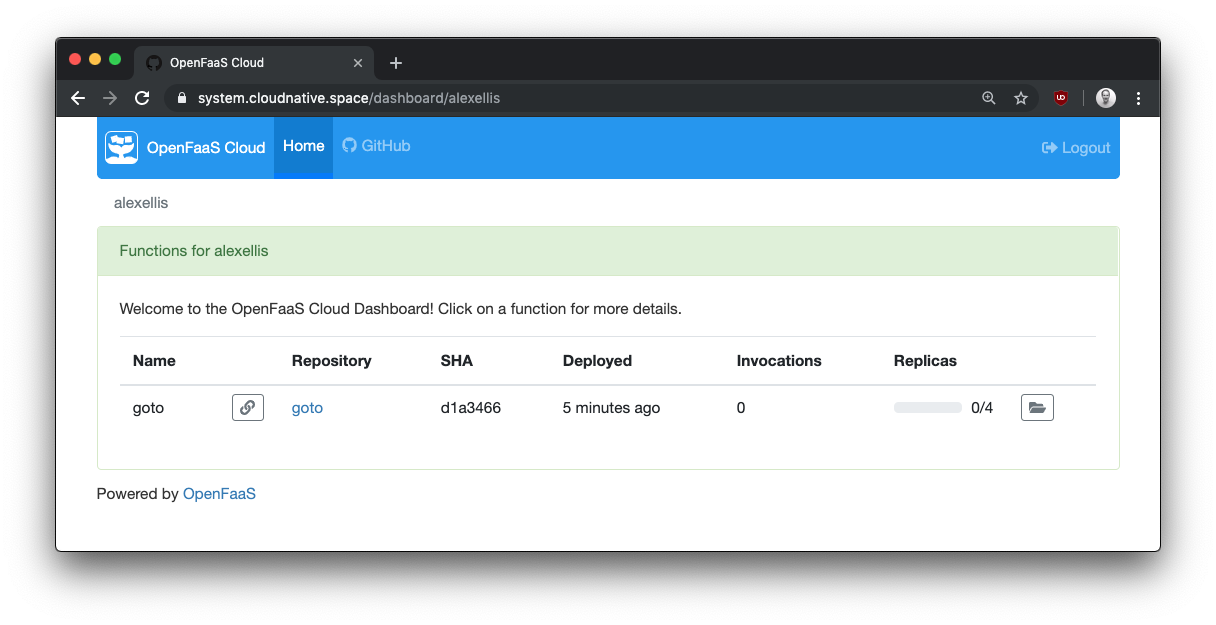
Manage all your deployments for your GitHub org or user in one place and get quick access to the build logs and endpoint link.
Details page
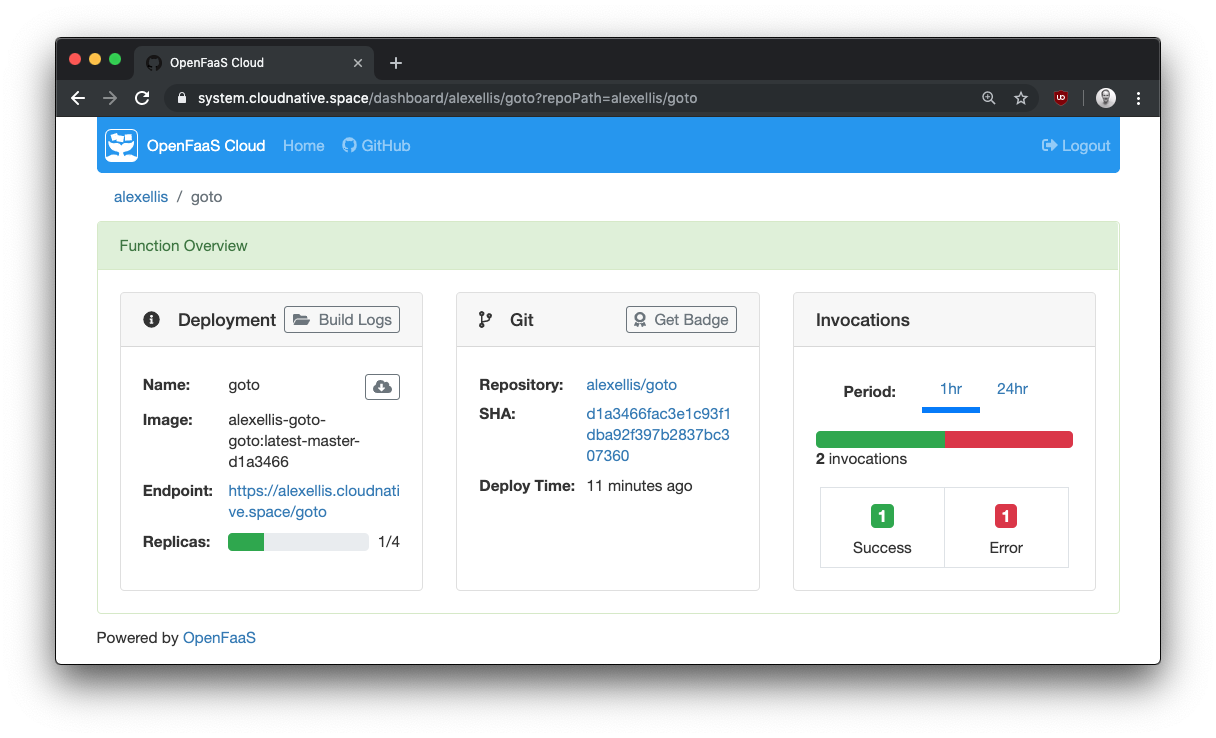
Get detailed information and metrics, including how many replicas are being scaled out across the cluster. Grab a badge for your GitHub repo and see what commit you’re currently running.
Runtime logs page
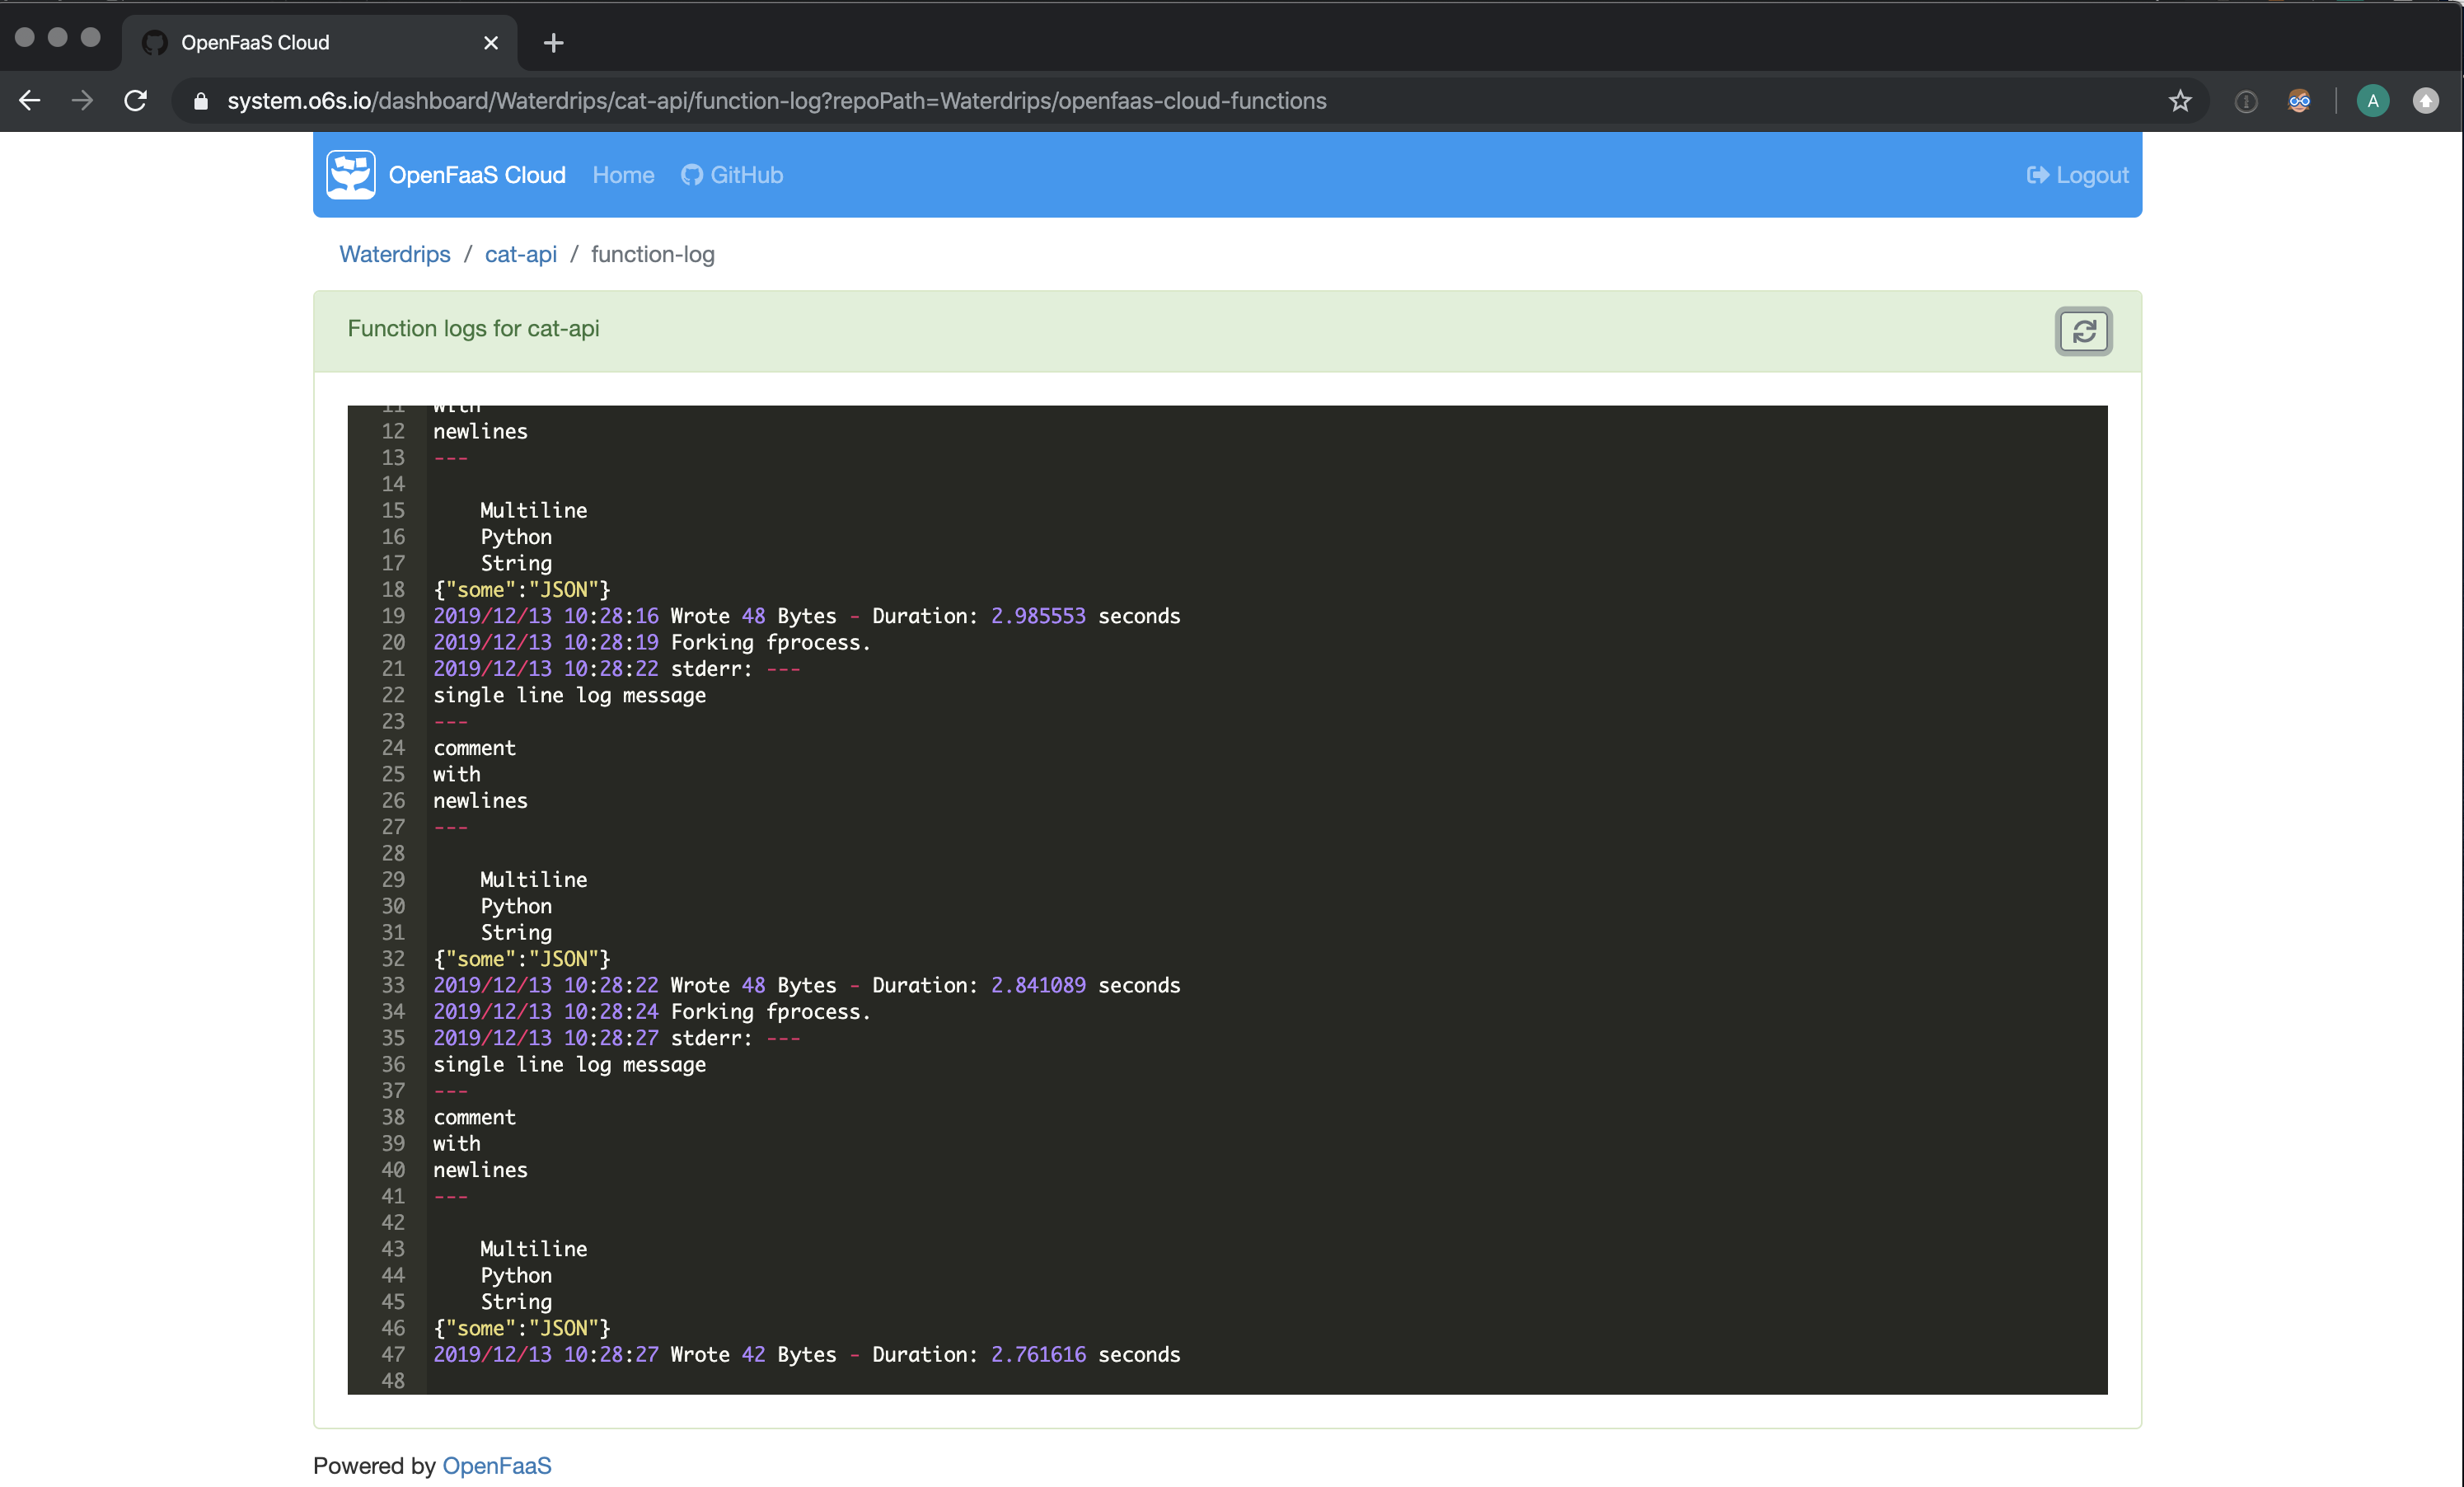
You can access the runtime logs of your functions within the UI for faster debugging and better developer feedback.
Build logs page

If anything goes wrong during your build or your unit tests need some work, you can access logs directly in the UI.
Rather than contending with the many choices of API object in Kubernetes, teams simply work with git.
- Want to add a new microservice?
git push - Want to delete a function you deployed?
git push - Want to rollback to a known version of an API?
git revertthengit push
Under the hood, OpenFaaS Cloud (OFC) will orchestrate OpenFaaS and Kubernetes to create highly-available Pods. Your Pods scale up and down according to traffic and can even scale down to zero at idle. You can also run your own OFC instance on your laptop, or deploy the functions you are building with OpenFaaS directly.
Want to see a real-world example of what you can build?
-
Check out my blog post on how to create a Serverless Single Page App (SPA) with OFC, Postgres, Go and Vue.js.
-
Get a free account on a managed version of OpenFaaS Cloud: Community Cluster and find out what folks are building
-
Check out goodfirstissue bot which runs on The Community Cluster
Thanks @alexellisuk for the shoutout during #KubeConEU #KubeCon . Thanks @mccabejohn for sharing the picture. pic.twitter.com/G0lDzUK6sE
— Good First Issue (@goodfirstissue) May 20, 2019
Start the tutorial
I developed a tool along with the community called ofc-bootstrap which installs all the requisite components like blocks of lego into a Kubernetes cluster. When you’re finished you get a URL and can start linking both public and private repositories to enjoy automatic CI/CD. Within a few moments your endpoint will be accessible and published on the Internet.
Today we’ll set up a Kubernetes cluster on AWS using eksctl and then after configuring a GitHub App for GitHub.com, we’ll populate ofc-bootstrap’s init.yaml file and run the tool. Configuring AWS and GitHub will take the majority of the time today, and if you’re configuring these systems for the first time, it may take you a little longer.
Once you’ve prepared your AWS environment and GitHub configuration, the tool takes around 100 seconds to complete, and at the end your platform will be ready for use. EKS can also be provisioned using the eks Terraform module, but this is outside of the scope of the post.
Overview of OpenFaaS Cloud components
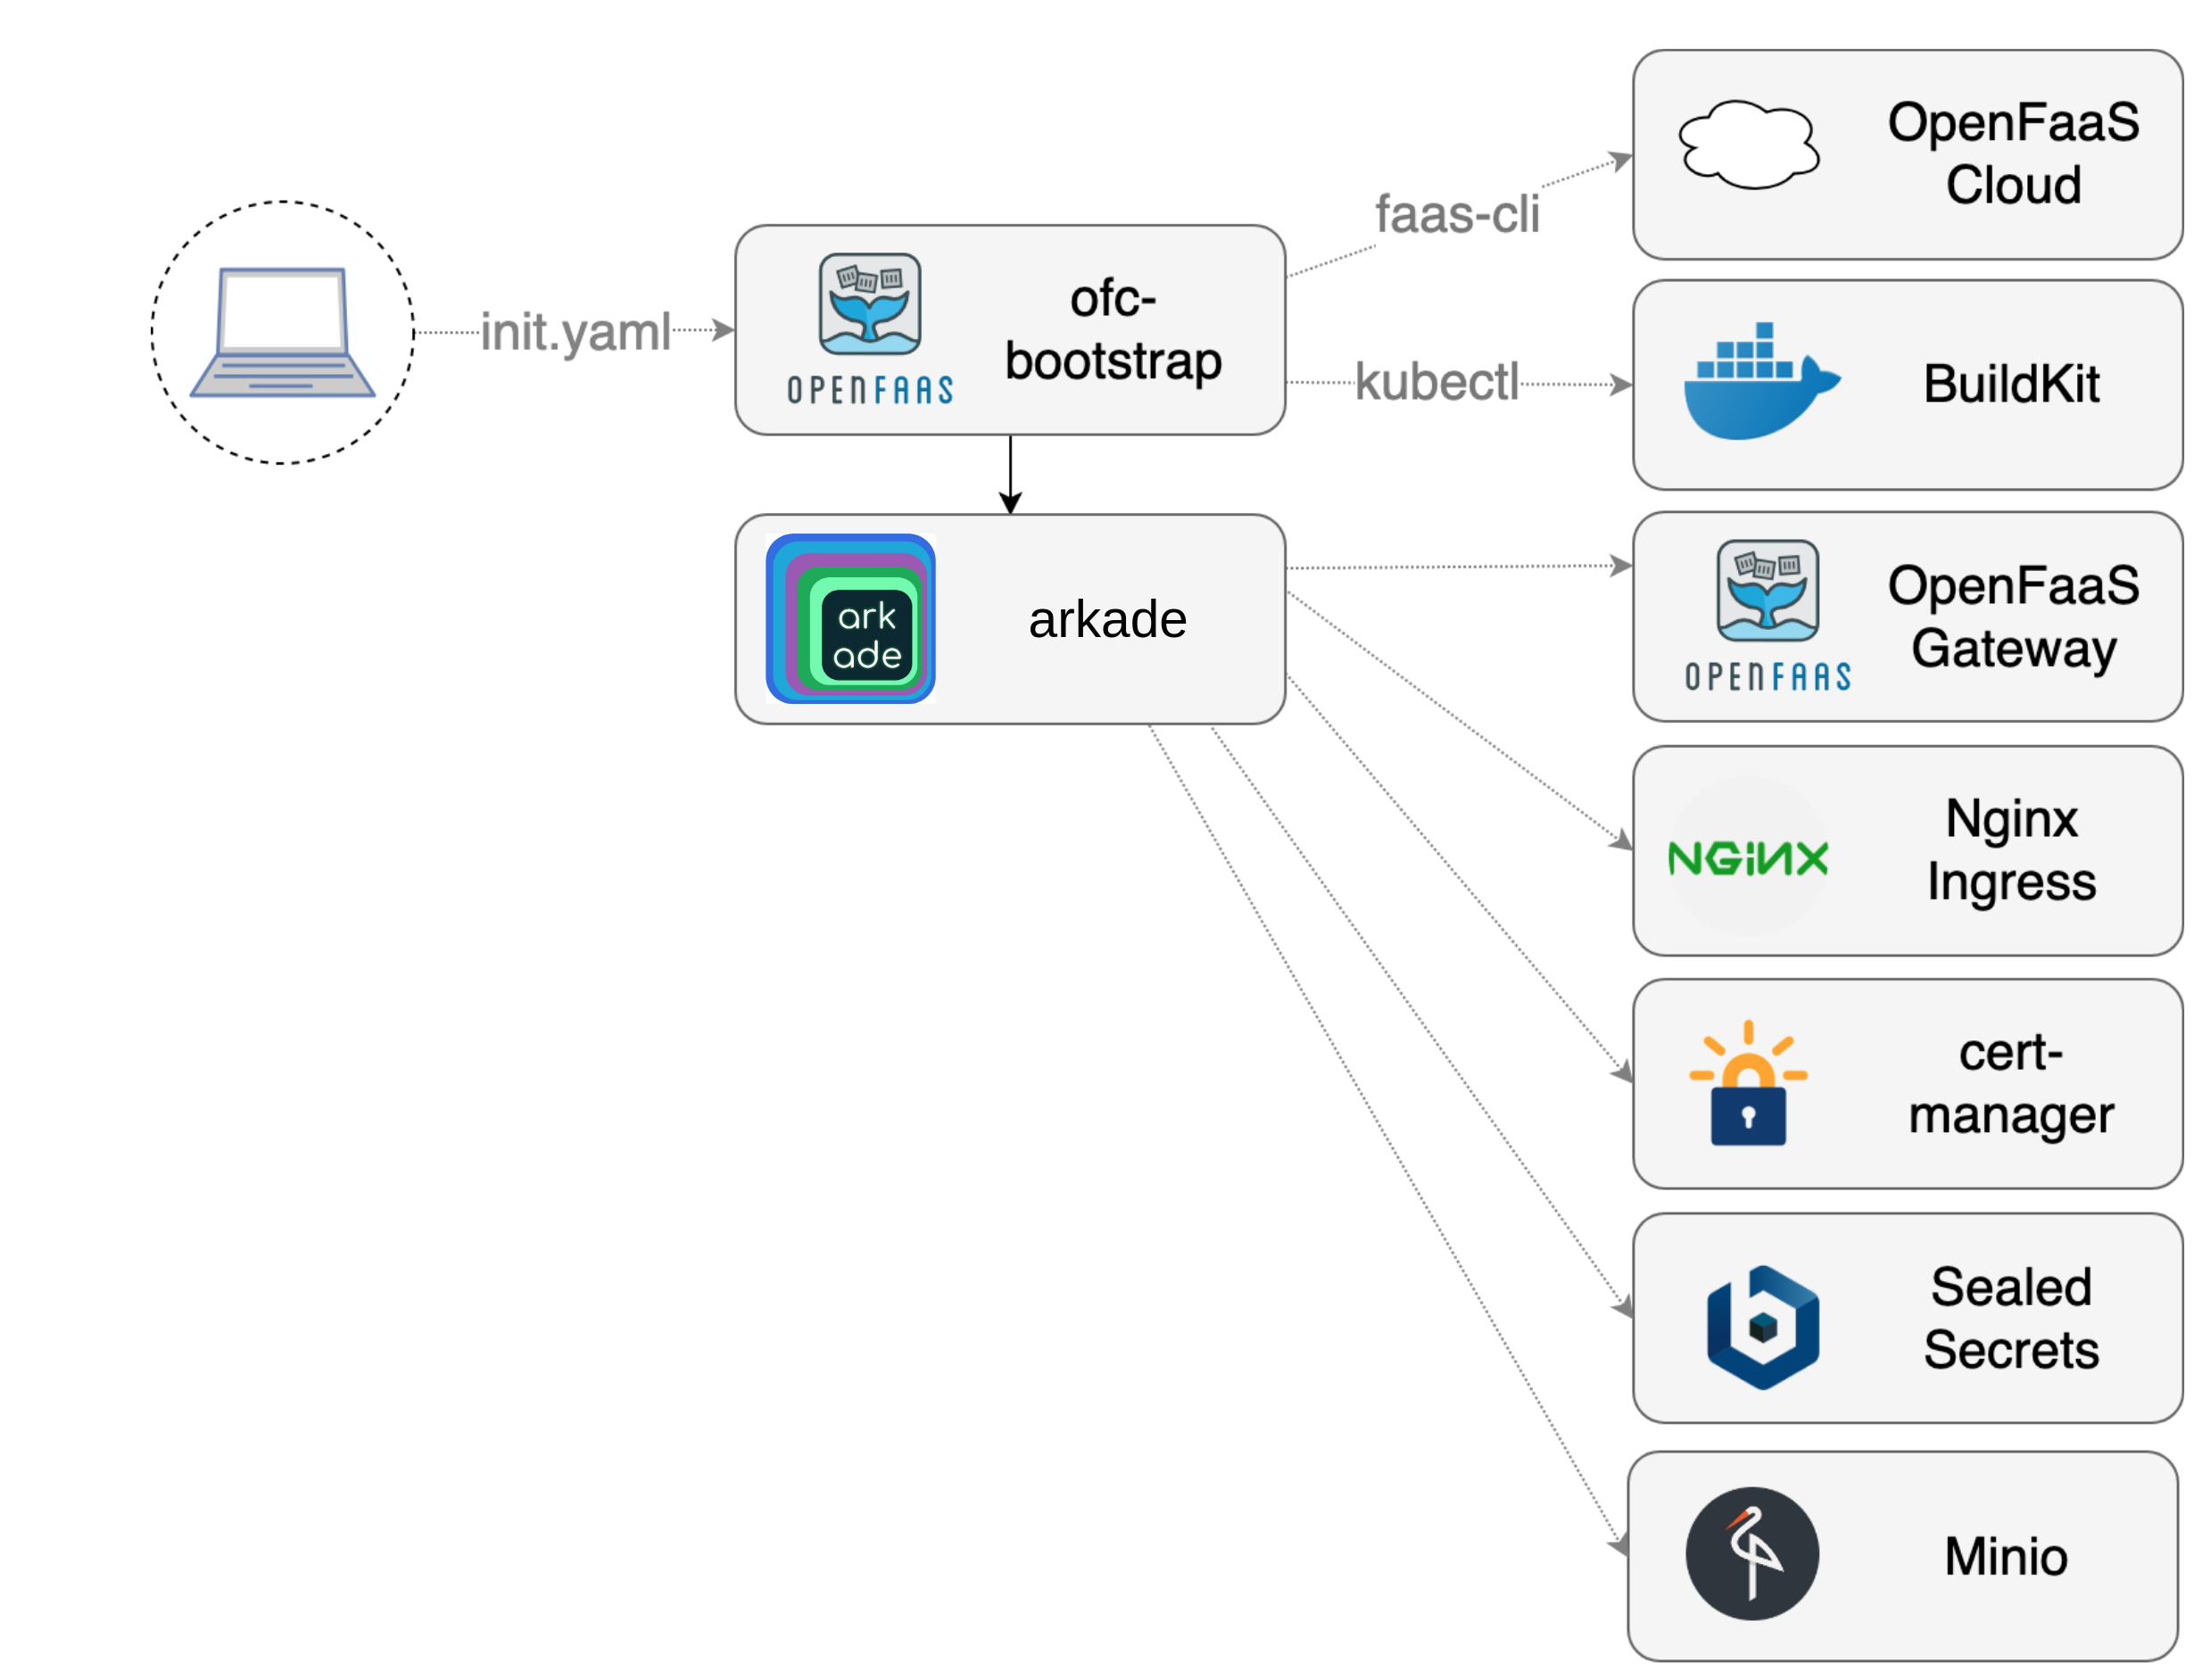
ofc-bootstrap provides an opinionated configuration of OpenFaaS Cloud.
Helm and Tiller are used to install and manage helm charts. Should anyone have a concern about using tiller in a corporate environment, then they are free to use helm template which acts only on the client-side.
It installs the following components:
- OpenFaaS is installed as a substrate layer
- OpenFaaS Cloud as pictured is a set of stateless functions which make up a pipeline and workflow
- Nginx provides Ingress and rate-limiting
- Buildkit provides fast, cached container builds
- cert-manager from JetStack brings free TLS certificates from LetsEncrypt and easy management
- SealedSecrets is an optional component for secret management
- Minio provides a configuration for S3, but we could also use AWS’ own managed S3 service
TLS certificates will be issued using a wild-card for each GitHub user and organisation using cert-manager. Some AWS users may prefer to replace Nginx and cert-manager with the ALB Ingress Controller on Amazon EKS which also offers free TLS certificates.
How this tutorial works
Official documentation exists for some of the tools we will use in this tutorial, therefore I will at times send you to an external site with a Task: link. The goal of this tutorial is to equip you to configure AWS service, Kubernetes, and GitHub so that you can install OpenFaaS Cloud and get started. At the end of the post you will find a new User Guide written to support this tutorial, it includes step-by-step instructions on how to use OpenFaaS Cloud, once you have installed it.
Get ofc-bootstrap
- Clone the repository
git clone https://github.com/openfaas/ofc-bootstrap
cd ofc-bootstrap
- Make a copy of the sample config
cp example.init.yaml init.yaml
- Browse the
init.yamlfile to become familiar with it, but do not edit it yet.
The part you will be editing today starts at ` ### User-input` and extends to the end of the file. Everything above is for the tool to use to generate secrets and configuration.
- Download the latest release of
ofc-bootstrap
Follow the instructions under “Get ofc-bootstrap” - binaries exist for MacOS, Linux, and Windows.
Note: If you use Windows, please install git bash first.
Create a cluster with eksctl
First things first, decide which region you want to operate in. The choice of region could have implications on cost and latency for your users.
I’ll be using eu-central-1.
You will now configure the following with the link below:
- Install AWS CLI with Python (optional)
- Configure AWS CLI (optional)
- Install eksctl with brew
- Then stop and skip Create Your Amazon EKS Cluster and Worker Nodes
Whilst the
aws-cliis optional for using eksctl, it’s likely you will need this or have it configured already.
Task: Install eksctl
Check eksctl:
eksctl version
Now let’s create a cluster in our chosen region:
eksctl create cluster \
--name ofc \
--version 1.13 \
--nodegroup-name standard-workers \
--node-type t3.medium \
--nodes 3 \
--nodes-min 2 \
--nodes-max 4 \
--node-ami auto
This will configure a minimum availability of 2 worker nodes and up to 4 nodes if CPU demand increases enough to trigger the cluster to scale.
Note: the
--node-ami autoflag will likely use Amazon Linux 2 for the worker OS. Some OpenFaaS users prefer to package their own AMIs and specify this, so that they are in full control of OS patches.
I would say that it can be hard to size and specify the correct AWS worker type without some experience of your workload. OpenFaaS Cloud will be mostly idle between builds, so I’m going to use the t3.medium type, but you are free to customise your workers.
See also: M5 vs. T3: How to Choose the Right Amazon EC2 Instance from Cloudability.
The provisioning step will take between 10 and 15 minutes.
[ℹ]  using region eu-central-1
[ℹ]  setting availability zones to [eu-central-1c eu-central-1a eu-central-1b]
[ℹ]  subnets for eu-central-1c - public:192.168.0.0/19 private:192.168.96.0/19
[ℹ]  subnets for eu-central-1a - public:192.168.32.0/19 private:192.168.128.0/19
[ℹ]  subnets for eu-central-1b - public:192.168.64.0/19 private:192.168.160.0/19
[ℹ]  nodegroup "standard-workers" will use "ami-038bd8d3a2345061f" [AmazonLinux2/1.13]
[ℹ]  using Kubernetes version 1.13
[ℹ]  creating EKS cluster "ofc" in "eu-central-1" region
[ℹ]  will create 2 separate CloudFormation stacks for cluster itself and the initial nodegroup
[ℹ]  if you encounter any issues, check CloudFormation console or try 'eksctl utils describe-stacks --region=eu-central-1 --name=ofc'
[ℹ]  CloudWatch logging will not be enabled for cluster "ofc" in "eu-central-1"
[ℹ]  you can enable it with 'eksctl utils update-cluster-logging --region=eu-central-1 --name=ofc'
[ℹ]  2 sequential tasks: { create cluster control plane "ofc", create nodegroup "standard-workers" }
[ℹ]  building cluster stack "eksctl-ofc-cluster"
[ℹ]  deploying stack "eksctl-ofc-cluster"
Get your KUBECONFIG
When eksctl has finished, you can retrieve your KUBECONFIG file so that we can point ofc-bootstrap at it for the subsequent installation.
Look out for a message like this:
[ℹ] kubectl command should work with "/Users/alex/.kube/config", try 'kubectl get nodes'
Then double-check that you are pointing at the new cluster with kubectl config get-contexts.
kubectl config get-contexts

CURRENT   NAME                              CLUSTER                          AUTHINFO                               NAMESPACE
*         alex@ofc.eu-central-1.eksctl.io   ofc.eu-central-1.eksctl.io       alex@ofc.eu-central-1.eksctl.io
The * indicates the current cluster.
Try to view your nodes by running:
kubectl get node

NAME                                              STATUS   ROLES    AGE    VERSION
ip-192-168-15-74.eu-central-1.compute.internal    Ready    <none>   2m8s   v1.13.8-eks-cd3eb0
ip-192-168-61-52.eu-central-1.compute.internal    Ready    <none>   2m7s   v1.13.8-eks-cd3eb0
ip-192-168-95-186.eu-central-1.compute.internal   Ready    <none>   2m7s   v1.13.8-eks-cd3eb0
You will be looking for a Ready status for each.
Create or bring your own domain
For this tutorial you can bring your own domain, or create a new one.
You can create a domain starting from around 2 USD with Namecheap.com, or get a trendy .dev domain from Google Domains. I would recommend creating one for the tutorial to keep existing services separate. I created a domain named cloudnative.space and it cost me about 1.5USD exactly.
We will configure our DNS entries, after provisioning OpenFaaS Cloud. This is because we need to get the IP address of the LoadBalancer which exposes Nginx to the public Internet.
Later we will create the following DNS A records:
*.cloudnative.space- a wildcard domain to access user functionsauth.system.cloudnative.space- the auth domainsystem.cloudnative.space- the domain for the OpenFaaS Cloud dashboard
Edit root_domain in init.yaml, set it to the root of your domain, for me that was: cloudnative.space.
Use the scheme above with your own domain name to fill out the configuration for GitHub.com in the following steps.
Configure GitHub.com
- Ensure
scm:is set togithubininit.yaml
Follow the instructions to create the following:
-
A GitHub App - used for system-to-system authentication between OpenFaaS Cloud and GitHub
Complete task: Create GitHub App
Update
app_id:and set to the value from the UIClick Generate Private Key, a new
.pemfile will be downloadedEdit the
value_fromforprivate-keyininit.yamlto match this path i.e.value_from: "~/Downloads/cloud-native-space.2019-09-04.private-key.pem" -
A GitHub OAuth App - used for logging and for authorization using OAuth2
Complete task: Create GitHub OAuth App
Find Client ID and update
init.yamlwith the value in theclient_id:field underoauthCopy the Client Secret from the UI and set
value:forof-client-secret:ininit.yamlEdit
enable_oauth:ininit.yaml, make sure it’s set to:enable_oauth: true
Set up Route53
Your domain will need to respond to ACME DNS01 challenges to obtain wildcard certificates with cert-manager. For this step we need to set up a DNS Zone with AWS Route 53.
- Access Route 53 from your AWS console.
- Switch to your chosen AWS Region, i.e. eu-central-1 (or Frankfurt)
- Click Hosted Zones
- Create a Hosted Zone and enter your Domain Name:
- Pick Type: Public Hosted Zone and click Create
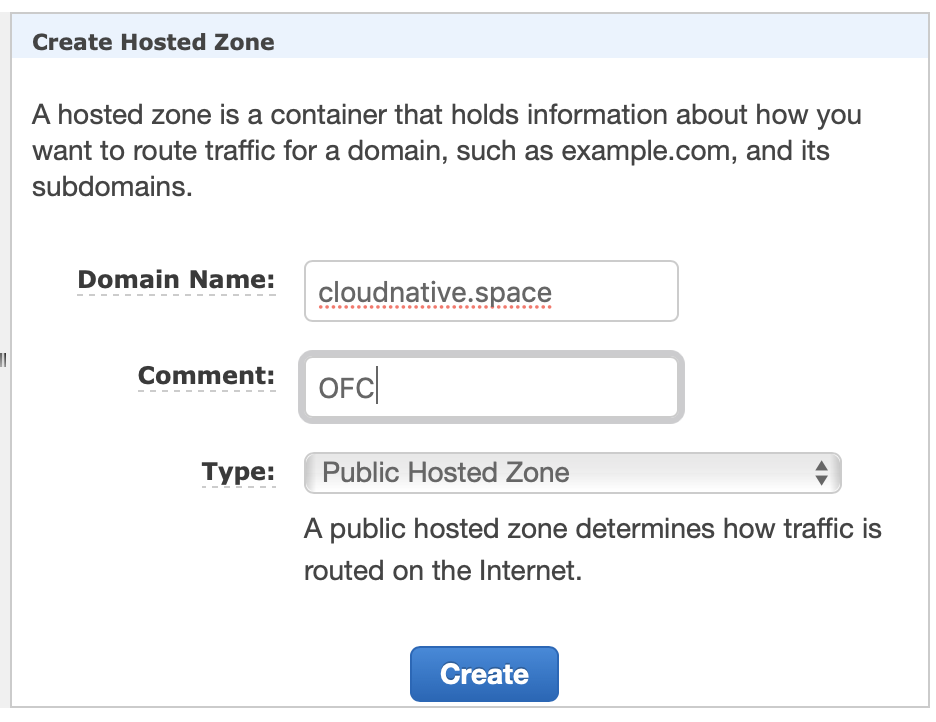
Look for the NS record, and note down the hosts.
- Log into the platform where you registered your domain such as Google Domains or Namecheap.
- Update your config within your domain registrar to point at the hosts you found in the NS record and click save
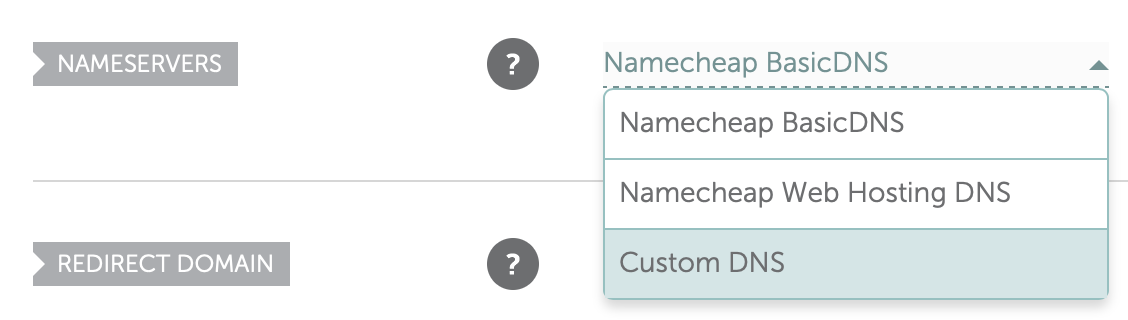
It may take a few minutes for the configuration to be live.
Prepare a Policy and User for cert-manager
cert-manager runs as a Pod inside the cluster and will need access to Route 53 in your AWS account in order to update TXT records for the DNS01 challenge.
In this tutorial we’ll create the policy manually, but you can also create it via the aws-cli or through an additional IAM add-on policy for eksctl.
- Create a new Policy called cert-manager-dns with the following permissions

-
Create a new user for programmatic access and attach the new policy.
-
Click on “Security credentials” and then “Create access Key”. Take a note of the Access key ID and Secret access key for the Route53 user.
-
Create a file named
~/Downloads/route53-secret-access-keyand save the value of the Secret access key into this file, do not add a new-line and add no other characters, this must be the exact value of your Secret access key as displayed on the AWS Console.
We will now enable AWS Route53 for DNS in init.yaml
- Ensure that the DigitalOcean and Google Cloud DNS entries are commented-out
- Un-comment the section for AWS Route53
  ### AWS Route53
  # dns_service: route53
  # region: us-east-1
  # access_key_id: ASYAKIUJE8AYRQQ7DU3M
- Update the
region - Update the
access_key_idwith the value for the user we just created
Find the section tls: in init.yaml
- Set
tls: true
Under tls_config: set:
email:to your own email in""quotes, or your webmaster’s emailissuer_type:should be :"prod"
Configure your container registry
Since automatic CI/CD is built-into OFC, it needs somewhere to store container images.
The easiest registry to use is the Docker Hub, the caveat is that the images will be public, but this can be changed at a later date.
You can also install your own self-hosted registry for private Docker images. Note: you can self-host a registry on a single-node, or in a different cluster all together if you wish.
Note: using AWS ECR is beyond the scope of this tutorial. See here for info: OFC: configuring AWS ECR.
Now log in, using ofc-bootstrap like indicated below:
My registry is registry.on-k3s.dev my user is: ofcuser and my password is: my-password, therefore I ran:
ofc-bootstrap registry-login --server registry.on-k3s.dev \
--username ofcuser \
--password my-password
Check the credentials/config.json file, the credentials should be encoded in base64.
If you are using Dockerhub you can exclude the --server flag
This file will be read from ofc-bootstrap automatically.
Edit registry: in init.yaml and set it to your registry, note the final / character. I set mine to registry.on-k3s.dev/.
Configure OpenFaaS Cloud
Now that we have configured AWS and the integration with our source-control management system, we can configure how OpenFaaS Cloud will operate.
Set up your Access Control List (ACL)
OpenFaaS Cloud uses a list of usernames to validate logins and incoming build requests from the source control system.
- Create a new public GitHub repository, do not put any code here
- Create a plain-text
CUSTOMERSfile and populate it with your own username and/or GitHub orgs - Find the “Raw” (CDN) URL
- Edit
customers_url:ininit.yamland paste in the Raw URL.
You can edit this list at a later time.
Features & add-ons
At the end of the file you can select which features and add-ons you require.
-
enable_dockerfile_lang- enable theDockerfiletemplate, which means any code with a Dockerfile can be deployed. I would recommend setting this totrue. -
scale_to_zero- whether you want to see idle functions scaled to zero or not. This can be opted-out at a per-function level. -
openfaas_cloud_version- the Release of openfaas-cloud -
network_policies- prevents user workloads in theopenfaas-fnnamespace from talking to theopenfaasnamespace, and to each other. Set this tofalsefor the tutorial to keep things simple.
Run the tool
You’re now ready to run ofc-bootstrap. Check over the init.yaml file to make sure you have updated everything needed.
Now run it:
ofc-bootstrap apply -f init.yaml
Keep an eye on the logs and look out for any errors that may have occurred during the installation.
For me the Plan executed in around 127 seconds (connecting from the UK) to an AWS cluster in Frankfurt.
Post-bootstrap tasks
Did something go wrong?
If the installation didn’t work as expected try the following guides:
-
ofc-bootstrap README troubleshooting section.
-
Troubleshooting guide for OpenFaaS Cloud in the OpenFaaS docs
Add your DNS entries
Now that we have a deployment of Nginx, AWS will create a LoadBalancer and provide a public IPv4 IP address.
- Find the LoadBalancer’s address:
export LB=$(kubectl get svc -n default nginxingress-nginx-ingress-controller -o  jsonpath='{.status.loadBalancer.ingress[*].hostname}')

echo $LB

ac97094319e8bcf873ee3b5c1386e9ff32a262fa-542029484.eu-central-1.elb.amazonaws.com
-
Now click Create Record Set for each of the following:
*.cloudnative.space- a wildcard domain to access user functionsauth.system.cloudnative.space- the auth domainsystem.cloudnative.space- the domain for the OpenFaaS Cloud dashboard
For Name type in the part before your domain. Type: CNAME. Select 1m for TTL and in the Value field enter the LB address from above.
Check that the DNS entries resolve with ping or nslookup:
ping -c 1 test.cloudnative.space
Try to visit the health-check endpoint in a browser to see if the TLS certificate is ready:
i.e. (replacing cloudnative.space with your own domain):
https://auth.system.cloudnative.space/healthz/
You can find DNS cannot resolve the entry, this is normal and it can take several minutes to propagate. You may also see a certificate issued by an invalid authority such as Kubernetes Ingress Controller Fake Certificate, this may be because of an incorrect configuration or because the LetsEncrypt servers cannot resolve your DNS entry yet.
- Check DNS is resolving correctly for all three addresses
- Check cert-certmanager: first check the issuer, then the certificate, then its controller’s logs
- If you missed any permissions for the AWS policy, or didn’t assign the policy to the user created for Route53, this could also cause issues
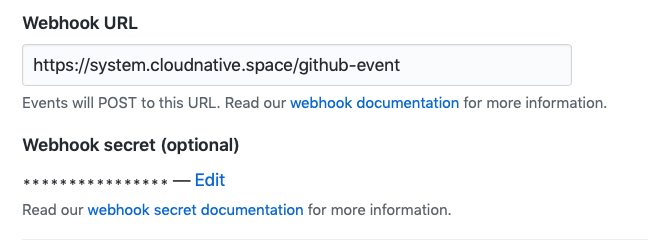
Retrieve the webhook secret
The webhook secret used for your GitHub App is generated by the installation process. Go ahead and fetch it, then update your GitHub App at GitHub.com.
export SECRET=$(kubectl get secret -n openfaas-fn github-webhook-secret -o jsonpath="{.data.github-webhook-secret}" | base64 --decode; echo)

echo "Your webhook secret is: $SECRET"
Go to Settings -> Developer Settings -> GitHub App -> Edit and set the value for Webhook Secret.
Deploy your first endpoint
There is a New User Guide for OpenFaaS Cloud which shows you how to link your first repository and deploy some code and get an endpoint back with TLS. The current example is a URL shortner / redirector written in Node.js and Express.js.
You can deploy functions in any language by using OpenFaaS templates, or a Dockerfile as per Lab 3 of the OpenFaaS workshop. You can even deploy pre-built Docker images such as this example with kubesec.io.
Wrapping up
If this was your first time working with GitHub’s App and OAuth integration, it may have taken you a little while to get set up. I have some ideas for how to automate the GitHub App and some of the other setup items in AWS and would welcome contributions to the OpenFaaS Cloud codebase which is Open Source.
eksctl was developed in collaboration between Weaveworks and AWS. It makes setting up a Kubernetes cluster very quick and easy, and offers add-ons for creating IAM roles and users, something which can be difficult for newcomers to AWS. There is also primitive support for Spot Instances which can reduce the costs of the EC2 nodes used. There is a downside to EKS, its managed control plane costs around 150 USD / mo.
So if you would like to try OpenFaaS Cloud for development, but want to save on your bill then there are a couple of alternatives you may want to consider. If you want to stay on AWS, then try out k3sup (‘ketchup`) which can run Kubernetes with k3s on EC2 VMs and if you are open to trying another cloud, DigitalOcean have a managed Kubernetes service which at time of writing is being used to run the Community Cluster.
Do you want to see a real-world example of what you can build? Check out my blog post on how to create a Serverless Single Page App (SPA) with OFC, Postgres, Go and Vue.js. You may also like goodfirstissue bot which runs on The Community Cluster and is in active use by Google, CNCF (helm) and Jetstack.
Contributions are also welcome to ofc-bootstrap
Thank you to OpenFaaS Ltd
I want to say a thank you to OpenFaaS Ltd and DX - Dialog eXe AS who commissioned this tutorial through a joint commercial project. Dialog eXe AS are one of the leading brands in Norway for e-ticket sales.
Insider Track subscription
Individuals and companies are welcomed to sponsor my OSS work on an ongoing basis through GitHub. I created a program called Insiders Updates, or the Insider Track which includes regular updates from me over email covering all my OSS work, news, events, and early access to new projects. This means you are paying for a subscription, rather than making a donation. GitHub also match the amounts over the first year.
Connect with the community
Connect with us to discuss this blog post, or to share what you’re building with OpenFaaS.
- Join OpenFaaS Slack community
- Follow @OpenFaaS on Twitter
You may also like
-
k3sup (“ketchup”) - the fastest way to create local, remote, or edge clusters with Kubernetes.

Alex Ellis
Founder of @openfaas.